shape
carat
color
clarity

Please help with DK cads

Gussie

Ideal_Rock
Premium
Joined
Apr 20, 2017
Messages
3,700
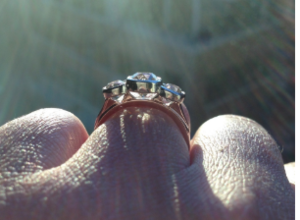
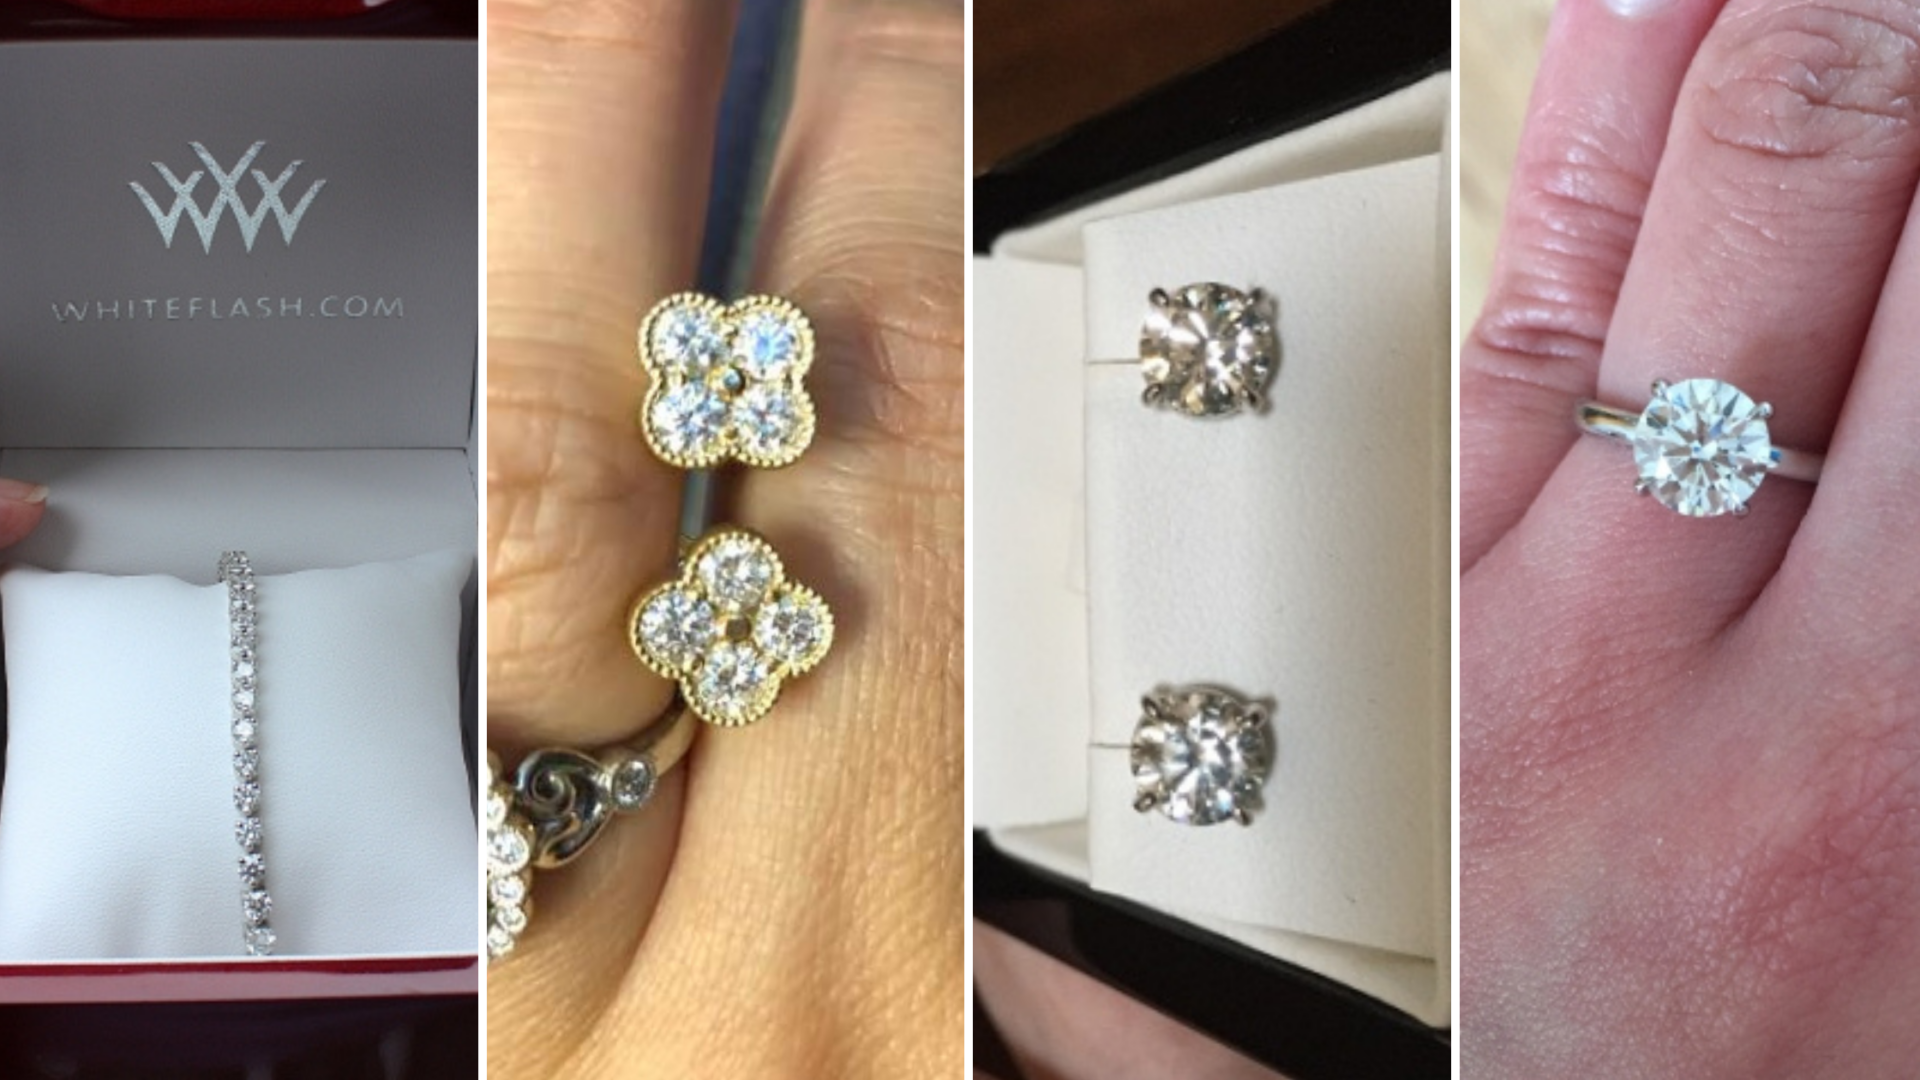
Hi y'all. I got this set of cads from DK and I need help. I am not very good at 3D visualization. I asked for a low set 5 stone ( 0.3 ct each WF 45323-QUAD.jpg ACAS!) With an 18k yg gallery and shank with platinum bezels. This is close but I need these changes.
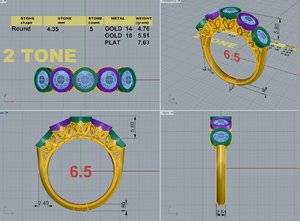
1. I would like the stones to be all the same height.

2. I would like the bezels and stones to be lower in the petals of the flowers in the gallery, thus lowering the entire ring.

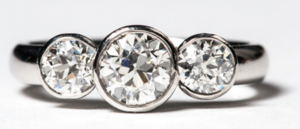
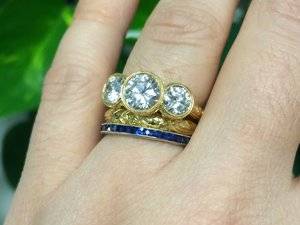
3. I want to be sure that the bezels overlap as in the following ring that DK made for a pser. I am sorry I can't remember who. I don't care for bezels that don't overlap each other.

Any feedback would be greatly appreciated! This rhr needs to be very low and comfortable for a daily ring.


downloadfile-8.jpeg
 

bludiva

Ideal_Rock
Premium
Joined
Sep 23, 2017
Messages
3,078
I'm no help w the cads but it looks like it will be beautiful!
 

meely

Brilliant_Rock
Premium
Joined
Jan 2, 2014
Messages
1,859
Oh the CADs are on the thread I just posted so hopefully that will help
 

yssie

Super_Ideal_Rock
Premium
Joined
Aug 14, 2009
Messages
27,264
This will be lovely!

Two thoughts:

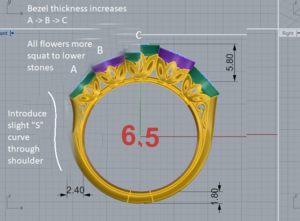
- Agreed that the current height those flowers plus bezels put the stones at is definitely not “low” - the flowers need to be quite a bit more squat, and perhaps the bezels themselves could be slightly thinner?

- I don’t think having the stones set at the same height works if you want the bezels to overlap - having the girdle planes offset slightly creates a natural “step” that the overlap visually explains...
 

Gussie

Ideal_Rock
Premium
Joined
Apr 20, 2017
Messages
3,700
This will be lovely!

Two thoughts:

- Agreed that the current height those flowers plus bezels put the stones at is definitely not “low” - the flowers need to be quite a bit more squat, and perhaps the bezels themselves could be slightly thinner?

- I don’t think having the stones set at the same height works if you want the bezels to overlap - having the girdle planes offset slightly creates a natural “step” that the overlap visually explains...

Thanks! I was thinking that the staggered height might be necessary for the bezels to overlap. I am terrible with this kind of thing! This one observation has helped a lot!
 

tyty333

Super_Ideal_Rock
Premium
Joined
Dec 17, 2008
Messages
27,257
I'm no help but love the changes that yssie caded for you...this is going to be amazing!
 

prs

Brilliant_Rock
Premium
Joined
Dec 26, 2017
Messages
1,883
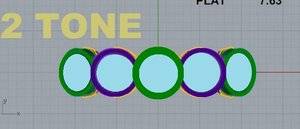
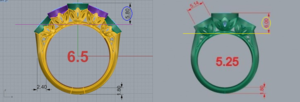
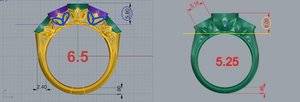
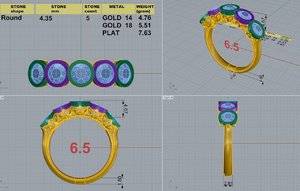
@ceg, the top right hand quarter of the CAD is a 3D view of the ring. This is what your ring would look like in real life, except the bezels are shown in green and purple, and the diamonds in light blue. Look at this view first!!!

The top left hand quarter of the CAD is a plan view of the ring looking down on it from above. Again the bezels are shown in green and purple, with the diamonds in light blue. Look at this view second, and relate it to the 3D view.

The bottom left and right quarters are front and side elevation views of the ring standing up. Again relate these views to the 3D view.

Hope this helps.
 

sledge

Ideal_Rock
Premium
Joined
Apr 23, 2018
Messages
5,791

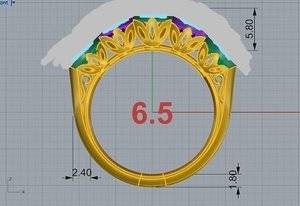
Part of what makes the overlap look in the inspiration ring work is that the center stone is bigger than the two side stones. To achieve this with identical diameter of stones, you will have to "cheat" the circumference by making the metal bezels slightly larger/thicker.

If you look at the picture below that I marked up, you can see where I made the center green bezel thicker than the others. If not, you don't get enough "overlap" on the side purple bezels. And in reality I think the center bezel is the thickest, the purple bezels are second thickest and then the outside green bezels are the thinnest of the group. Effectively you graduate the thickness from the center of the ring to the outside, hopefully in small enough increments that it's not visual to the naked eye.

Also, I would add the milgraining as your inspiration piece had.

45323-QUAD.jpg

The other thing I think makes the overlap look work is the fact it stair steps down. I personally think @yssie did a great job on showing you a method to lower the overall ring and still keep that stair step effect so it helps enunciate the overlap. FYI, your ring directly from DK was 5.80mm and the inspiration was 6.00mm.

The minimum height would be determined by the depth of the diamond, plus whatever height is needed to make the petals not look "too squishy" to you. It appears you could go down quite a bit to me, but Amy @ DK could confirm the actual distance.

Untitled.png


Is this what you meant by the diamonds being flat?

side-compare.jpg

Any consideration to changing the petals up a little and adding some more interest? Maybe something like this?

InkedUntitled_LI.jpg
 

Gussie

Ideal_Rock
Premium
Joined
Apr 20, 2017
Messages
3,700
Thanks @sledge. As @yssie pointed out as well, I realize the bezels being graduated as well as stepping the heights of the stones is the key here. I sent yssie's mock up so waiting to hear back. I really appreciate everyone's input. 3 degrees in physics and I still have no visualization skills!
 

sledge

Ideal_Rock
Premium
Joined
Apr 23, 2018
Messages
5,791
Thanks @sledge. As @yssie pointed out as well, I realize the bezels being graduated as well as stepping the heights of the stones is the key here. I sent yssie's mock up so waiting to hear back. I really appreciate everyone's input. 3 degrees in physics and I still have no visualization skills!

Ack! Teach me to read posts at 6am, lol. I read and then just had a few minutes to toy with this. I noticed @yssie's comments about the stair step, but had overlooked the graduated thickness of metal bezels.

Sorry to duplicate. Carry onward!
 

MissGotRocks

Super_Ideal_Rock
Premium
Joined
Jun 23, 2005
Messages
16,367
I wish I had a side view of my Memoire five stone on hand to post. The stones are graduated down and form a curve. It allows the ring to sit low and the curve allows no pinching or poking into adjacent fingers from the end stones. If it's not comfortable, I'm not wearing it and you would probably be the same way. Yssie provided an excellent visual though - should turn out beautifully!!
 

Gussie

Ideal_Rock
Premium
Joined
Apr 20, 2017
Messages
3,700
I wish I had a side view of my Memoire five stone on hand to post. The stones are graduated down and form a curve. It allows the ring to sit low and the curve allows no pinching or poking into adjacent fingers from the end stones. If it's not comfortable, I'm not wearing it and you would probably be the same way. Yssie provided an excellent visual though - should turn out beautifully!!

The whole point of this ring is a comfortable, daily RHR. I know I won't wear it if it's not comfortable and low enough! That's part of the reason I want bezels is so I can totally not worry about it!
 

rockysalamander

Ideal_Rock
Premium
Joined
May 20, 2016
Messages
5,105
I'm too late to help with this CAD round, sorry. But, posting below a few photos of bezels and profiles to give you some references.

Bezel all the same height and tables of diamonds follow an smooth arc. You can do the same and still step- the bezels.
AP513_1_P.png


Bezel stair-stepped, each bezel the same height. If made a bit better, the tables of the stones each tip off level. So, you don't get a constant smooth arc of tables.
r628g-5.jpg

upload_2018-7-23_17-44-42.png

The visible bezel between the diamonds is removed. this allows the stones to squish a bit tighter and to have a more stairstep look with less metal. You can still have all the feels in the gallery.
upload_2018-7-23_17-46-38.png
 

MissGotRocks

Super_Ideal_Rock
Premium
Joined
Jun 23, 2005
Messages
16,367
I think it looks great! I don't know that it could be any lower given the width of the stones, the overlap and the baskets chosen for the stones. Does he ever make a wax to send out to try on?
 

Gussie

Ideal_Rock
Premium
Joined
Apr 20, 2017
Messages
3,700
Yes he will. I've never gotten a wax before but I might this time. I think it looks great too! I don't think it's high but it's hard to know until you get it!
 

rockysalamander

Ideal_Rock
Premium
Joined
May 20, 2016
Messages
5,105
When you say high, do you mean the overall ring? It looks like he could lower them by 1 mm. You could ask them to lower the stone to where the culet just touch the shank. I'm a bit fan of low-rider settings.

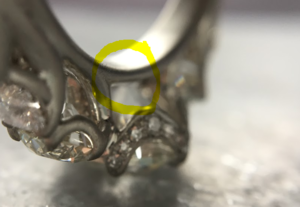
You might have seen this before, Elle@TGP has DK actually drill a hole through the shank to lower the stone on this ring just a bit more. The hole to lower the center culet is not all the way through. But, it got me another 1 mm lowering!

upload_2018-7-25_22-24-59.png
 

Gussie

Ideal_Rock
Premium
Joined
Apr 20, 2017
Messages
3,700
Yes I mean the overall ring. Do you think the bezels and stones could be lowered into the baskets? I think it would look nice for the petals to come up higher on the bezels. But when it comes to millimeters, I can't picture it. To me, the bezels look huge. @rockysalamander
 

SimoneDi

Ideal_Rock
Premium
Joined
Dec 19, 2014
Messages
3,811
@ceg I kind of love this ring the way it is (new alteration) but you need to be pleased with it. As Rocky said, the stones can potentially be set even lower (and I love her example), but is an already low set model and the bezels will protect the stones quite a bit.
 

Gussie

Ideal_Rock
Premium
Joined
Apr 20, 2017
Messages
3,700
Thanks @SimoneDi I think I like it too. It's probably low enough as is but I want it too be comfortable, lol. As in, put it on and forget it! I am a little afraid lowering the stones too close to the shank may make it harder to clean.
 

sledge

Ideal_Rock
Premium
Joined
Apr 23, 2018
Messages
5,791
I like @rockysalamander idea of setting the cutlet near flush with the shank. Also I agree with you the bezels need lowered so the top of them and the top of the baskets are near flush. Right now it kind of looks like you have nice flower baskets and bulky bezels.

I think those last two changes and you are there. Good luck
 

yssie

Super_Ideal_Rock
Premium
Joined
Aug 14, 2009
Messages
27,264
To achieve a stair-stepped profile the centerstone must be held higher than the first sidestone, which must be held higher than the second sidestone... somehow.

In the original CAD the floral baskets were of different heights (basket for the centerstone was tallest) and the bezels were of the same height.

In this CAD the floral baskets are of the same height and the bezels are of different heights (centerstone bezel is taller in profile).

Two ways to achieve the same effect!

If you want to see less bezel all around, they could go back to method #1 and step the heights of the floral baskets and make the bezels all the same height. Pros - they can probably reduce bezel height across all stones. Cons - the differing basket size alludes to a graduation in stone size that isn’t reflected by the face-up view, if that bothers you.

You could also keep method #2 with the baskets all the same height and possibly make the bezels a bit thinner across all the stones, but there’s less leeway this way - the bezel on the end stone is already very thin (those bezels will thin out a lot in polishing!). Pros - the basket sizes clearly speak to matching stones and the mechanism by which they’re stair stepped is a minor detail that won’t draw attention IRL. Cons - definitely more bezel height on the center and first sides, at the end of the day.

It could be lovely either way ::)

Like the “S” curve to the shoulder. Might lose the little curl detail in the cathedral - it made sense when there was a large space to fill, but IMO doesn’t add anything at this point.
 
Last edited:

rockysalamander

Ideal_Rock
Premium
Joined
May 20, 2016
Messages
5,105
To achieve a stair-stepped profile the centerstone must be held higher than the first sidestone, which must be held higher than the second sidestone... somehow.

In the original CAD the floral baskets were of different heights (basket for the centerstone was tallest) and the bezels were of the same height.

In this CAD the floral baskets are of the same height and the bezels are of different heights (centerstone bezel is taller in profile).

Two ways to achieve the same effect!

If you want to see less bezel all around, they could go back to method #1 and step the heights of the floral baskets and make the bezels all the same height. Pros - they can probably reduce bezel height across all stones. Cons - the differing basket size alludes to a graduation in stone size that isn’t reflected by the face-up view, if that bothers you.

You could also keep method #2 with the baskets all the same height and possibly make the bezels a bit thinner across all the stones, but there’s less leeway this way - the bezel on the end stone is already very thin (those bezels will thin out a lot in polishing!). Pros - the basket sizes clearly speak to matching stones and the mechanism by which they’re stair stepped is a minor detail that won’t draw attention IRL. Cons - definitely more bezel height on the center and first sides, at the end of the day.

It could be lovely either way ::)

Like the “S” curve to the shoulder. Might lose the little curl detail in the cathedral - it made sense when there was a large space to fill, but IMO doesn’t add anything at this point.

This is exactly correct. Nice explanation. I think there is still room to squish the ends down a bit with a hole in the shank, but that is really secondary to getting the bezel/basket balance correct.

Not to throw a spanner @ceg, but I wonder

You did not ask for feedback on the design, so ignore me if I'm out of order here... But, I wonder if 5, 3-petal floral baskets on this size stones (~4.5 mm is my guess) will really read as anything more than texture and the very symmetrical shape limits some flexibility. For a 2-petal version, you could use something like the ring by EW where there are fewer petals and they lean a bit more to the side than pointy at the tip. By adding a reduced number of petals and rounding them, that would make the variation in the petals height (to keep less variation in the bezel height) less visible.

upload_2018-7-26_9-30-38.png
 

Gussie

Ideal_Rock
Premium
Joined
Apr 20, 2017
Messages
3,700
Thanks, @rockysalamander .

I get a bit overwhelmed with too many options. I like restaurants with very few choices, lol!

My only requirements with this ring were platinum bezels that overlap, yg shank, low set, and fits right to eliminate spinning (comfortable). I just went with a gallery similar to the inspiration ring for ease of choice. I realize the details may be lost due to the size of the ring but I want to see both metals as much as possible. I started out thinking that I would just get wf to make a shared prong but decided on bezels for durability, more mixed metal, and I just like a bit more of a vintage feel. I am not as detail oriented as some on ps, that's for sure. I think this rendition will be fine but I have requested a wax model. Above all, I want to wear it daily and I know I won't if it's not comfortable. Thank you sooo much for your help!
 
Be a part of the community Get 3 HCA Results
Top