shape
carat
color
clarity

Tiffany Engagement David Klass CAD

daviddaviddavid

Rough_Rock
Joined
Aug 1, 2022
Messages
16
Hi friends!

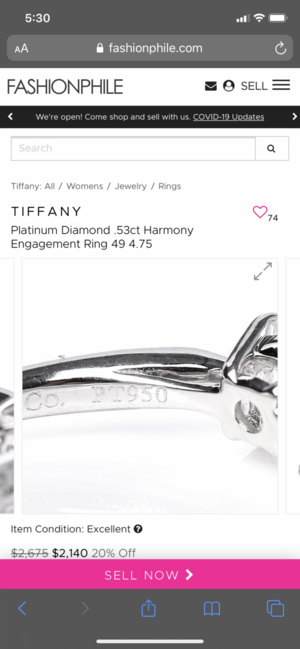
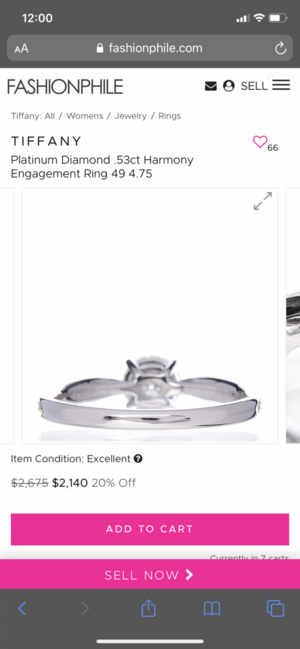
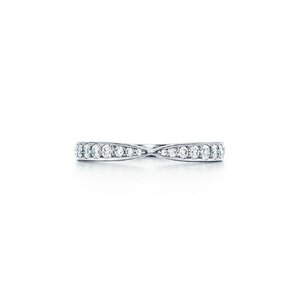
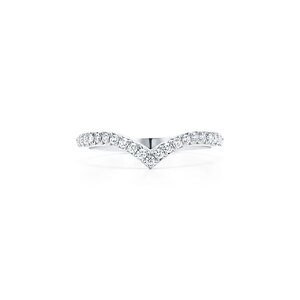
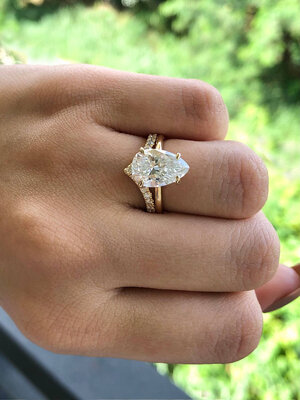
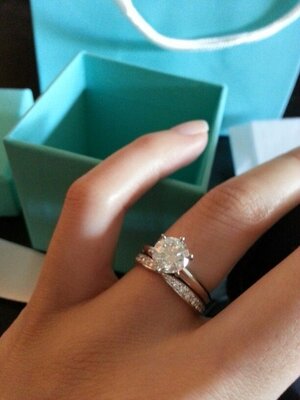
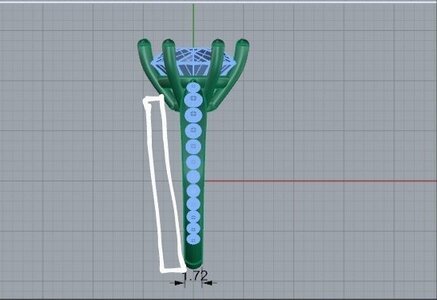
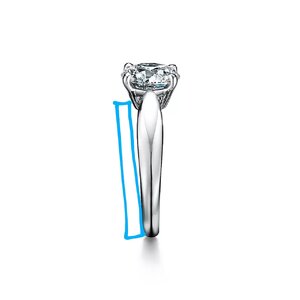
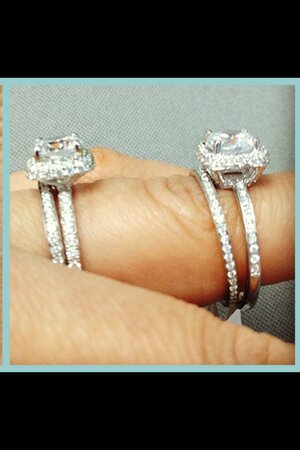
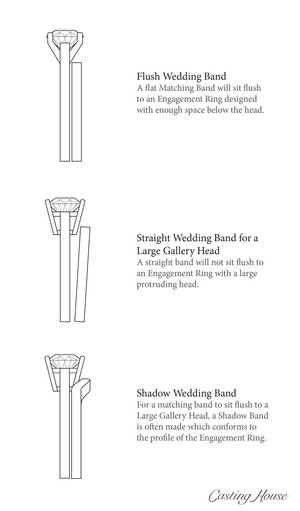
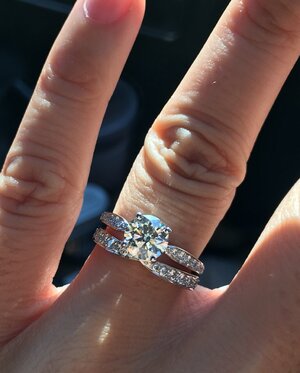
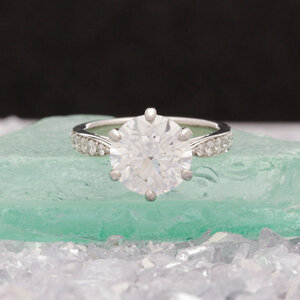
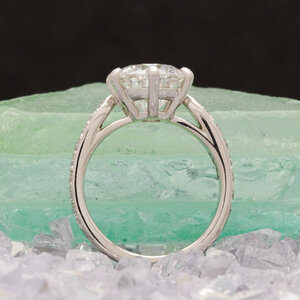
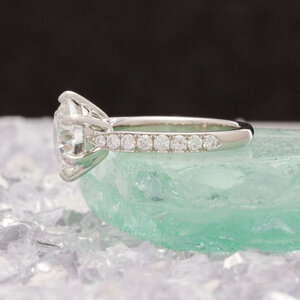
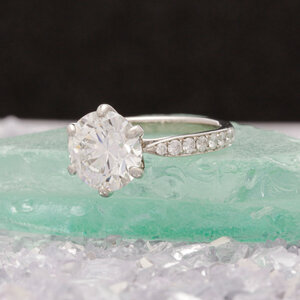
After lots of forum reading, I decided to request a Tiffany Harmony replica from David Klass, who has glowing reviews according to you seasoned lads. I just got back the first CAD from him and wanted to ask if any keen eyes can take a look to see if there are any tweaks/edits that you see to get it as close as possible. Also just any suggestions or comments would be welcome! I've attached some pictures for reference. Thank you so much, really appreciate everyone's time and expertise :)

DK 83230-QUAD.jpg
Pricescope 1.jpeg Pricescope 2.png Pricescope 3.png Pricescope 4.png Pricescope 5.png Pricescope 6.jpeg
 

Attachments

  • Pricescope 5.png
    Pricescope 5.png
    272.6 KB · Views: 27
  • Pricescope 4.png
    Pricescope 4.png
    184.4 KB · Views: 43

emmy12

Brilliant_Rock
Joined
Jul 12, 2020
Messages
623
Hooray! Another Tiffany Harmony fan!!! :)

I just went through a similar process with CADs using the non-pave version as inspiration. The design is on the distinctive gem website now so if you're interested I can link that here.

This post from @peas-and-carats was helpful because it has the actual measurements of the ring in various places along the shank

So I just measured my Tiffany Harmony solitaire ring with digital calipers; I find this ring so comfortable that I hardly feel I'm wearing it. (You can look at my post history for photos to see what it looks like, bearing in mind the diamond is a 6mm round.) The band is 3mm at its widest point in the front, and it narrows to 2mm at the back. Height wise, it is around 1.5mm at the back, 1.75mm on the sides, gradually increasing to over 2mm in front as it rises to meet the basket.

Overall I think DK did a really good job with this initial CAD and there aren't too many changes to make. Here is my feedback and questions for you.
  1. Did you want a 6 prong basket or 4 prongs like the original?
  2. The prongs look straight on the side and profile views but a bit curved in the perspective (upper right) image. Would just confirm that they are straight
  3. The additional prongs at the 12 and 6 o'clock positions are going to make any wedding band you choose sit farther away and with a bigger gap than the original Tiffany Harmony design. (Not a question, just an FYI)
  4. The widest Melee stone IMHO should be a 1-2 spots down the shoulder to get a better flow and follow that "bulge" effect.
  5. Adjust the widths and dimensions on the shank to match the above post if you want to be as close as possible to the original.
  6. Confirm that you like and want bright cut pave like the original design (bright cut pave has the outer rim of metal). I've noticed that DK doesn't show bright cut pave explicitly in his CADs, he just places the stones in the approximate locations to get the right spacing and sizing.
  7. ETA: ask for the prongs to be as slim as possible. They look kinda chunky to me.
DK 83230-QUAD~2.jpg
 

emmy12

Brilliant_Rock
Joined
Jul 12, 2020
Messages
623
Disregard point #4!
Looking closer at the actual ring it does appear that the widest melee on the shoulder is in that 2nd position.
 

junebug17

Super_Ideal_Rock
Premium
Joined
Jun 17, 2009
Messages
14,134
I think it looks great! Can't wait to see!
 

daviddaviddavid

Rough_Rock
Joined
Aug 1, 2022
Messages
16
Hooray! Another Tiffany Harmony fan!!! :)

I just went through a similar process with CADs using the non-pave version as inspiration. The design is on the distinctive gem website now so if you're interested I can link that here.

This post from @peas-and-carats was helpful because it has the actual measurements of the ring in various places along the shank


Overall I think DK did a really good job with this initial CAD and there aren't too many changes to make. Here is my feedback and questions for you.
  1. Did you want a 6 prong basket or 4 prongs like the original?
  2. The prongs look straight on the side and profile views but a bit curved in the perspective (upper right) image. Would just confirm that they are straight
  3. The additional prongs at the 12 and 6 o'clock positions are going to make any wedding band you choose sit farther away and with a bigger gap than the original Tiffany Harmony design. (Not a question, just an FYI)
  4. The widest Melee stone IMHO should be a 1-2 spots down the shoulder to get a better flow and follow that "bulge" effect.
  5. Adjust the widths and dimensions on the shank to match the above post if you want to be as close as possible to the original.
  6. Confirm that you like and want bright cut pave like the original design (bright cut pave has the outer rim of metal). I've noticed that DK doesn't show bright cut pave explicitly in his CADs, he just places the stones in the approximate locations to get the right spacing and sizing.
  7. ETA: ask for the prongs to be as slim as possible. They look kinda chunky to me.
DK 83230-QUAD~2.jpg

Thank you so much for your feedback! I would've never been able to spot some of those suggestions so I really appreciate your eye. A few questions/comments below for ya if you don't mind:

1. Yes! The gf said she likes 6 prong look so that's what I requested
3. I'm sorry, could you please expand a bit on what this means?
5. Thank you for finding these measurements! I will pass them on :)
6. Great point, I will be sure to specify bright cut pave

Again, thank you so much for your comments. I will be sure to keep you updated as I go through with this journey :)
 

emmy12

Brilliant_Rock
Joined
Jul 12, 2020
Messages
623
Easiest to explain with pictures. The additional prongs add some width at the gallery, which makes any straight wedding band she might want to wear show a gap of finger between the two rings. Some like this "gap", others hate it and want the rings to be flush against each other. The original Harmony would also have a little gap with a straight band, but it would be slightly smaller. Please pardon the crude drawings, but hopefully you get the point that the white outline is farther away from the ring than the blue one.

If you were wanting to avoid the gap you'll need to raise the stone up a bit higher OR get a wedding band that "goes around" the part that sticks out (eg. pinched shank Harmony, V-shaped Soleste, custom contoured shadow band). If you know she likes the flush look, then mention it to DK and he'll help you figure out a workaround solution for this design.

Hopefully that wasn't too much info.

DK 83230-QUAD~4.jpg


tiffany-harmony-round-brilliant-engagement-ring-in-platinum-35044841_995663_AV_1_M~2.jpg 15d4699c1993467aa46a87610ae294fd.jpg

tiffany-harmonyband-ring-30620038_1029729_ED_M.jpg
tiffany-solestev-ring-60875499_977200_ED_M.jpg
 

Attachments

  • tiffany-harmonyband-ring-30620038_1029729_ED_M.jpg
    tiffany-harmonyband-ring-30620038_1029729_ED_M.jpg
    40.9 KB · Views: 15
  • tiffany-solestev-ring-60875499_977200_ED_M.jpg
    tiffany-solestev-ring-60875499_977200_ED_M.jpg
    36.7 KB · Views: 18
  • 7-1_Leia_Pave-Verona_Pear_1024x1024.jpg
    7-1_Leia_Pave-Verona_Pear_1024x1024.jpg
    133.1 KB · Views: 22
  • 27328bae8819b98e57eaa0fbb1b6c1c3--tiffany-setting-engagement-engagement-ring-simple.jpg
    27328bae8819b98e57eaa0fbb1b6c1c3--tiffany-setting-engagement-engagement-ring-simple.jpg
    56.2 KB · Views: 26
  • DK 83230-QUAD~4.jpg
    DK 83230-QUAD~4.jpg
    35.7 KB · Views: 26
  • tiffany-harmony-round-brilliant-engagement-ring-in-platinum-35044841_995663_AV_1_M~2.jpg
    tiffany-harmony-round-brilliant-engagement-ring-in-platinum-35044841_995663_AV_1_M~2.jpg
    51.2 KB · Views: 21
  • DK 83230-QUAD~4.jpg
    DK 83230-QUAD~4.jpg
    35.7 KB · Views: 17
  • 15d4699c1993467aa46a87610ae294fd.jpg
    15d4699c1993467aa46a87610ae294fd.jpg
    54.1 KB · Views: 25
  • anatomy_of_a_ring_complementary_wedding_bands.jpg
    anatomy_of_a_ring_complementary_wedding_bands.jpg
    78.5 KB · Views: 35
  • image22.jpeg
    image22.jpeg
    149.8 KB · Views: 35

daviddaviddavid

Rough_Rock
Joined
Aug 1, 2022
Messages
16
Great observation, I understand clearly now. Do you think if she got the matching Tiffany Harmony wedding band which I would also ask David Klass to make (pic below) it would sit relatively flush against the 6 pronged version I'm trying to design?

1661138561044.png
 

daviddaviddavid

Rough_Rock
Joined
Aug 1, 2022
Messages
16
Hooray! Another Tiffany Harmony fan!!! :)

I just went through a similar process with CADs using the non-pave version as inspiration. The design is on the distinctive gem website now so if you're interested I can link that here.

This post from @peas-and-carats was helpful because it has the actual measurements of the ring in various places along the shank


Overall I think DK did a really good job with this initial CAD and there aren't too many changes to make. Here is my feedback and questions for you.
  1. Did you want a 6 prong basket or 4 prongs like the original?
  2. The prongs look straight on the side and profile views but a bit curved in the perspective (upper right) image. Would just confirm that they are straight
  3. The additional prongs at the 12 and 6 o'clock positions are going to make any wedding band you choose sit farther away and with a bigger gap than the original Tiffany Harmony design. (Not a question, just an FYI)
  4. The widest Melee stone IMHO should be a 1-2 spots down the shoulder to get a better flow and follow that "bulge" effect.
  5. Adjust the widths and dimensions on the shank to match the above post if you want to be as close as possible to the original.
  6. Confirm that you like and want bright cut pave like the original design (bright cut pave has the outer rim of metal). I've noticed that DK doesn't show bright cut pave explicitly in his CADs, he just places the stones in the approximate locations to get the right spacing and sizing.
  7. ETA: ask for the prongs to be as slim as possible. They look kinda chunky to me.
DK 83230-QUAD~2.jpg

Also I forgot to ask if you could please link your similar CAD from distinctive gems! Thank you so much :))
 

emmy12

Brilliant_Rock
Joined
Jul 12, 2020
Messages
623
Great observation, I understand clearly now. Do you think if she got the matching Tiffany Harmony wedding band which I would also ask David Klass to make (pic below) it would sit relatively flush against the 6 pronged version I'm trying to design?

1661138561044.png

Yes, if DK is making the engagement ring (ER) and you plan to have him make the wedding band (WB) too, then have him do the CAD for the wedding band now, at the same time so that it is made to work together and sit flush. If you do the WB design concurrently with the ER then you'll be able to see how the two work together before committing to the manufacture of either, giving you the most control of the final product. Once the design for both is done you can have him make both together now, or just the ER for now and then keep the WB design on file and order it later.

It is possible to design the WB later too (after the ER is designed and made and your future fiancé is wearing it) but you won't be able to make major changes to the E-ring if you find out there's a prong in the wrong place to make it flow nice (or some small oversight like that).

Also I forgot to ask if you could please link your similar CAD from distinctive gems! Thank you so much :))

It's been named the "The Melody Signature" by Jon. The design is not an exact Harmony replica, but it's pretty close. The main difference is that the top "shoulders" of the cathedral aren't as thick as the original.
MELODY.3787_900x.jpg
 

daviddaviddavid

Rough_Rock
Joined
Aug 1, 2022
Messages
16
Hi friends, David Klass provided an updated CAD based on the suggestions y'all graciously made - can you please help take another look to see if everything checks out alright?

  • After I commented that the "the prongs look a bit curved in the perspective (upper right) image", he made the prongs more straight but I was unsure of how this affects the look of the ring vs the original design?
  • The paved tiffany harmony ring is actually thinner than the non-paved so that's why the dimensions are different. I think the CAD is pretty close to the paved Tiffany dimensions, but does anyone think the band might seem thin with the size of the center stone? I've attached a picture of my gf wearing an actual Harmony ring for reference (I think the stone in the picture is ~1.7 carats, her ring size is 3 but the example ring is large on her)

Quick note: David accidently shortened the pave but the actual ring will be 3/4th like the original CAD.

Thanks so much everyone :)

DK 83230-QUAD-4.png
300462534_1165216727669305_3933100645675033667_n.jpg
 

emmy12

Brilliant_Rock
Joined
Jul 12, 2020
Messages
623
I'm still having major doubts about the 6 and 12 o'clock prongs being compatible with your desired wedding band.

I think that the 6 prong head in this setting will prevent her from doing a straight or even pinched wedding band like the original harmony band. she'll need to do a V-shaped band or a contoured band in order to get around the head. The base of the prongs are jutting out so far laterally from the shank of the ring (look like at least 1.5-2mm based on the grid).

In order to have a flush fit with a pinched in Harmony-style wedding band I would need to make the wedding band excessively wide (3.5-4mm wide) which will be disproportionate to the engagement ring's band and look silly. Even if you tried to angle in the bottom of those 6' and 12 o'clock prongs (yellow line) it will still end up needing a really wide band (for a pinched band style) and the head might end up looking "squatty". In other words, I'm saying that with the design as-is I think you need a contour band (eg. Princess Beatrice's ring, which is also a very low set 6 prong head) or a V-shaped band (eg Soleste) to get a flush fitting wedding band.

In my mind there are three major factors in the ring that are causing this to be a problem:
  1. the 6 prong head
  2. having the diamond set as low as possible (a characteristic feature of the Harmony)
  3. the large size of the diamond (less problematic with a smaller stone)
I think that the 6 prong head is causing the bulk of the "problem".

I would strongly recommend having David to do a mock up of the wedding band and asking for his opinion on how to make a matching band before going any farther. This way you'll be able to make sure you like how any of those options look as a set and make changes as needed to the E-ring design to get the final look you and your future fiancée want. If you're ok changing up the wedding band style, then the design looks like it meets your criteria. .

6 prong bottom gallery concerns.png


band isses.png

beatrice.png
IMG_7545.jpg
 

emmy12

Brilliant_Rock
Joined
Jul 12, 2020
Messages
623
If you're ok changing up the wedding band style to one of those other ones, then the design looks fine for what you've specified.

The only two minor tweaks I'd make are:

1) have the diameter of the bottom donut (white arrow) increased slightly so that it looks like the prongs were set into the donut rather (right, nice) than just floating against the edge (left, yuck). You could also do this with the basket rail (top donut) as well.

wider bottom donut.png

2) Also have him make sure that the top of the cathedral shoulders align with the top of the basket rail. Right now on the CAD the top surface of the cathedral (dotted white line) is just above the horizontal rail on the basket. shoulder vs rail height.png
 

emmy12

Brilliant_Rock
Joined
Jul 12, 2020
Messages
623
I went back and compared DK's first design (top) and the new one with the straightened prongs (bottom).

The first design looked better and the shoulders were at the correct height relative to the rail. I would have him revert back to that previous design if he can. Straightening the prongs was a key tweak I had to make for my design with DG for the 4 prong basket, but it doesn't flow as well on the 6 prong head for this design. Sometimes the design process goes like this....Try something, then revert it back. Sorry OP!

My comment about the 6 prong head making it trickier to get a flush fit still stands for the original design, and I would definitely have him design the wedding band right now to make sure it works.


ORIGINAL design,
DK 83230-QUAD~3.jpg

2nd profile (straightened prongs and shoulders connect too high on the rail)
shoulder vs rail height.png
 

daviddaviddavid

Rough_Rock
Joined
Aug 1, 2022
Messages
16

HI @emmy12 ,

So sorry about the delayed update! Work has been kicking my butt and only recently had the chance to get going on the ring edits again with Mr.Klass. I asked him to revert the prong style as per your suggestions and am waiting back to see.

Will provide an update once I get the new CAD. Thanks again for your inputs and really appreciate your time. Hoping the next round of edits will be the one!!
 

daviddaviddavid

Rough_Rock
Joined
Aug 1, 2022
Messages
16
@emmy12 Hi! Hope you are well - I got some pictures back on the Harmony ring from David Klass and was hoping to get your (or anyone interested!) feedback on it.

I think the overall structure looks okay, but maybe his photography isn't the best? The prongs look a bit wide and the bottom one especially maybe looks a bit tilted? Not sure if that's my imagination or not.

But biggest gripe is that the pave diamonds do not match the final CAD; you can see that in the CAD, its suppose to go down much further, with a total of 11 diamonds vs the finished ring only has 8 and stops earlier towards the middle of the band. I also feel the pave diamonds don't really taper downwards in size like the CAD and Tiffany Harmony ring...

Would you have any advice on how to discuss this issue with Mr. Klass?

Please let me know if you have any other thoughts - thanks so much!! DK 83230-QUAD-12.jpg
 

Attachments

  • DKPV2021___11__18____83230____83230.jpg
    DKPV2021___11__18____83230____83230.jpg
    741.5 KB · Views: 107
  • DKPV2021___11__18____83230____83230-4.jpg
    DKPV2021___11__18____83230____83230-4.jpg
    809.8 KB · Views: 103
  • DKPV2021___11__18____83230____83230-3 (1).jpg
    DKPV2021___11__18____83230____83230-3 (1).jpg
    736 KB · Views: 102
  • DKPV2021___11__18____83230____83230-2.jpg
    DKPV2021___11__18____83230____83230-2.jpg
    754.1 KB · Views: 106
Last edited:

Kim N

Ideal_Rock
Premium
Joined
Oct 6, 2005
Messages
6,416
@emmy12 Hi! Hope you are well - I got some pictures back on the Harmony ring from David Klass and was hoping to get your (or anyone interested!) feedback on it.

I think the overall structure looks okay, but maybe his photography isn't the best? The prongs look a bit wide and the bottom one especially maybe looks a bit tilted? Not sure if that's my imagination or not.

But biggest gripe is that the pave diamonds do not match the final CAD; you can see that in the CAD, its suppose to go down much further, with a total of 11 diamonds vs the finished ring only has 8 and stops earlier towards the middle of the band. I also feel the pave diamonds don't really taper downwards in size like the CAD and Tiffany Harmony ring...

Would you have any advice on how to discuss this issue with Mr. Klass?

Please let me know if you have any other thoughts - thanks so much!! DK 83230-QUAD-12.jpg

I see the things you mean. David and Amy are great at working to make you happy. I would send them an email noting the issues.
 

daviddaviddavid

Rough_Rock
Joined
Aug 1, 2022
Messages
16
@Kim N Thanks for your input. Was there anything else you could pick up from the pictures vs the CAD? The ring is suppose to be modeled after a Tiffany Harmony Pave in case you were curious. Thank you!!
 

Kim N

Ideal_Rock
Premium
Joined
Oct 6, 2005
Messages
6,416
@Kim N Thanks for your input. Was there anything else you could pick up from the pictures vs the CAD? The ring is suppose to be modeled after a Tiffany Harmony Pave in case you were curious. Thank you!!

I didn't see anything else amiss. I hope they can resolve it quickly to your satisfaction.
 

emmy12

Brilliant_Rock
Joined
Jul 12, 2020
Messages
623
Hi @daviddaviddavid sorry I didn't see this earlier!

The question I would ask you about the pavé is whether the number of stones was significant. Between the CAD and the actual ring, the diamonds seem to cover about the same amount of the shank and go as far down the sides as in the CAD (maybe one diamond short...two at very most). He used slightly larger diamonds than he had predicted on the CAD, which explains why there are fewer than predicted, but I think it looks fine. As is The size of the stones he used matches the width of the shank and is proportionate and appropriate.

If you did want the diamonds to taper more as they go toward the back of the shank you, then you need the shank to get skinnier too as the diamond size decreases or else the diamonds would have a thicker border of metal as the diamonds get smaller. I think it looks fine as it is, but if you're set on having those diamonds taper down in size toward the back then ask him for that specifically. He may have to remake the shank to accomplish that.

I would like to point out that at the shoulders where the shank meets the head I think he did a very beautiful job of replicating the Harmony's taper! This is, to me, the distinctive feature of the Harmony and he nailed that part! The connection between the shoulders and the basket is very nicely finished.

I know that prongs tend to look more prominent and chunky in these macro photos than in real life, but I would ask him to slim them a bit to make them more delicate (and/or shape them into claw prongs?) This would actually be the only thing I'd change on this ring, because otherwise I think he did a lovely job.
 

daviddaviddavid

Rough_Rock
Joined
Aug 1, 2022
Messages
16
Hi everyone!!

Apologize for the delayed update, but thought I definitely owe it to everyone here who was so kind and helpful throughout my journey of creating my fiancé's engagement ring. Our proposal was terrific and she absolutely adores the piece that all of you helped come to life so please find some pictures of the finished product below!

This community has made a overwhelming idea into a manageable project and I am forever grateful. Hope everyone is well and talk soon :) Ring Picture 1.jpg Ring Picture 4.jpg Ring Picture 5.jpg Ring Picture 1.jpg Ring Picture 2.jpg Ring Picture 3.jpg
 

daviddaviddavid

Rough_Rock
Joined
Aug 1, 2022
Messages
16
@emmy12 Hi! Hope you are well - I got some pictures back on the Harmony ring from David Klass and was hoping to get your (or anyone interested!) feedback on it.

I think the overall structure looks okay, but maybe his photography isn't the best? The prongs look a bit wide and the bottom one especially maybe looks a bit tilted? Not sure if that's my imagination or not.

But biggest gripe is that the pave diamonds do not match the final CAD; you can see that in the CAD, its suppose to go down much further, with a total of 11 diamonds vs the finished ring only has 8 and stops earlier towards the middle of the band. I also feel the pave diamonds don't really taper downwards in size like the CAD and Tiffany Harmony ring...

Would you have any advice on how to discuss this issue with Mr. Klass?

Please let me know if you have any other thoughts - thanks so much!! DK 83230-QUAD-12.jpg

Wanted to note that after telling David Klass about my concerns, he agreed with them and actually made the entire ring over again, which is the final one in the pictures. He's truly a professional and am so happy I picked him for the process!
 

Inked

Brilliant_Rock
Joined
Oct 22, 2019
Messages
696
OMG! What a gorgeous magical backdrop for your proposal! Gorgeous pictures!! The ring came out absolutely beautiful! it's the perfect size on her hand! I love DK and Amy, they absolutely will fix anything you dont like. I have had six rings, a necklace, and dagger pendent made by them, they're so great to work with!
 

Kim N

Ideal_Rock
Premium
Joined
Oct 6, 2005
Messages
6,416
Hi everyone!!

Apologize for the delayed update, but thought I definitely owe it to everyone here who was so kind and helpful throughout my journey of creating my fiancé's engagement ring. Our proposal was terrific and she absolutely adores the piece that all of you helped come to life so please find some pictures of the finished product below!

This community has made a overwhelming idea into a manageable project and I am forever grateful. Hope everyone is well and talk soon :) Ring Picture 1.jpg Ring Picture 4.jpg Ring Picture 5.jpg Ring Picture 1.jpg Ring Picture 2.jpg Ring Picture 3.jpg

Congratulations to you both! The ring and your engagement photos are so beautiful!
 

MissGotRocks

Super_Ideal_Rock
Premium
Joined
Jun 23, 2005
Messages
16,299
Turned out beautifully! Thanks so much for the pictures! PS truly is a treasure of wonderful folks!
Now that it is complete, tell us color/size/clarity of the beautiful diamond!
 

momofive

Brilliant_Rock
Joined
Mar 13, 2011
Messages
1,040
I love the ring. Perfection! Congratulations!
 

emmy12

Brilliant_Rock
Joined
Jul 12, 2020
Messages
623
Looks lovely. The proposal also looked like it was something special too! Glad he got everything sorted out and perfect for you. Would love to see the new glamour pictures of the updated ring if you have time to share. A great learning moment to see the differences between the initial and final.
 
Be a part of the community Get 3 HCA Results
Top