shape
carat
color
clarity

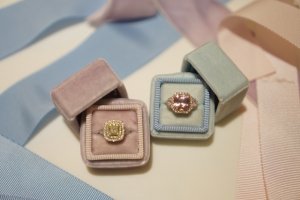
My handmade velvet ring box and cushion halo earrings

missy

Super_Ideal_Rock
Premium
Joined
Jun 8, 2008
Messages
53,978
junebug17|1431650617|3876905 said:
Wow, your box looks so beautiful fussykiki! I love the color, the velvet looks really nice. And the workmanship is great!

And your earrings are absolutely stunning!!! :love:

Huge ditto! Love the ring box and color! And ooh those earrings are GORGEOUS. :love:
 

fussykiki

Shiny_Rock
Joined
Jun 28, 2011
Messages
450
Mom wants a ring box. Of course she has priority! Here is one in light purple!

dsc02085.jpg
 

junebug17

Super_Ideal_Rock
Premium
Joined
Jun 17, 2009
Messages
14,121
fussykiki|1431700451|3877064 said:
Mom wants a ring box. Of course she has priority! Here is one in light purple!

Oooh, that turned out really nice FK! Love the color, and and the bling too :naughty:
 

makeable

Shiny_Rock
Joined
Jun 9, 2014
Messages
284
OOOOHHH I just love this thread! :appl:
 

junebug17

Super_Ideal_Rock
Premium
Joined
Jun 17, 2009
Messages
14,121
Ok, I am very slowly making progress, but I have a quick question for fussykiki or lovesvintage - I'm at the step where you have to fold the velvet over the lid and tack it down with 2 sided tape, but it's not holding the velvet down, the velvet keeps popping up. Do you think I could use a little glue to tack it down?

I think part of the problem is this velvet, it seems to be shedding onto the tape so the tape isn't sticky enough.

Thanks guys!
 

_lovesvintage_

Brilliant_Rock
Joined
May 8, 2014
Messages
817
fussykiki|1431700451|3877064 said:
Mom wants a ring box. Of course she has priority! Here is one in light purple!

Beautiful! Gorgeous rings!!!
 

_lovesvintage_

Brilliant_Rock
Joined
May 8, 2014
Messages
817
junebug17|1431713228|3877150 said:
Ok, I am very slowly making progress, but I have a quick question for fussykiki or lovesvintage - I'm at the step where you have to fold the velvet over the lid and tack it down with 2 sided tape, but it's not holding the velvet down, the velvet keeps popping up. Do you think I could use a little glue to tack it down?

I think part of the problem is this velvet, it seems to be shedding onto the tape so the tape isn't sticky enough.

Thanks guys!

Junebug17, position the velvet onto the cardboard frame and then stick the double sided tape to the cardboard itself on the inside space and wrap the velvet fabric over the side and onto it. The tape part does not have to be neat, just long enough to fill the whole side of the cardboard and make sure to have some on the corners.
 

_lovesvintage_

Brilliant_Rock
Joined
May 8, 2014
Messages
817
_lovesvintage_|1431727424|3877240 said:
junebug17|1431713228|3877150 said:
Ok, I am very slowly making progress, but I have a quick question for fussykiki or lovesvintage - I'm at the step where you have to fold the velvet over the lid and tack it down with 2 sided tape, but it's not holding the velvet down, the velvet keeps popping up. Do you think I could use a little glue to tack it down?

I think part of the problem is this velvet, it seems to be shedding onto the tape so the tape isn't sticky enough.

Thanks guys!

Junebug17, position the velvet onto the cardboard frame and then stick the double sided tape to the cardboard itself on the inside space and wrap the velvet fabric over the side and onto it. The tape part does not have to be neat, just long enough to fill the whole side of the cardboard and make sure to have some on the corners.

Junebug17, I think I misunderstood your question so here is my correct answer. I still used the tape, but stuck it on the cardboard and subsequently cardboard and velvet as you fold. I don't see why you can't use the glue gun for this part too if you can make it neat so it lays properly.
 

Niel

Super_Ideal_Rock
Premium
Joined
Jul 23, 2012
Messages
20,044
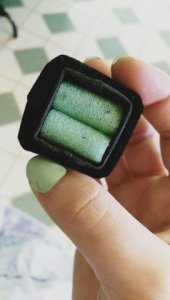
The part thats tripping me up is the sponge area, I can seem to fold it to look good

Ive got some sponge curlers but I can't seem to get the ribbon to wrap right

imag4113_2.jpg
 

fussykiki

Shiny_Rock
Joined
Jun 28, 2011
Messages
450
Niel|1431732185|3877265 said:
The part thats tripping me up is the sponge area, I can seem to fold it to look good

Ive got some sponge curlers but I can't seem to get the ribbon to wrap right

Good morning from Hong Kong. so good to Woke up and see you all in progress. My sponge is cut in rectangular so it is easier to wrap. I would tape it in double side tape first and put velvet on it. Since sponge curlers are round, I would ignore the side because it won't show anyway.
 

junebug17

Super_Ideal_Rock
Premium
Joined
Jun 17, 2009
Messages
14,121
Lovesvintage, you answered my question perfectly, thank you! I ended up just putting more tape on until it stuck, but I still might need to glue the part with the seam, the fabric is thicker and it won't stay put.

Neil, that looks really good! :appl: I haven't even made it to the sponge part yet so I won't be much help…but I'm thinking it might be easier to use sponges that are flat? I was going to cut up one of those dish sponges.
 

cutes814

Brilliant_Rock
Joined
Jun 28, 2005
Messages
1,803
You are so talented Fussykiki!! Thanks for sharing this!! :appl: :appl:

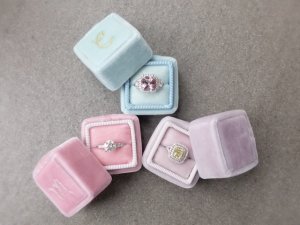
Love the picture with your box and your mom's box! :love: :love: :love:

I put this on my "to do list"
 

fussykiki

Shiny_Rock
Joined
Jun 28, 2011
Messages
450
Okay, I will run out of rings soon....

2015-05-16-10-24-26_deco.jpg
 

junebug17

Super_Ideal_Rock
Premium
Joined
Jun 17, 2009
Messages
14,121
Wow, those are really beautiful FK! I love the colors!

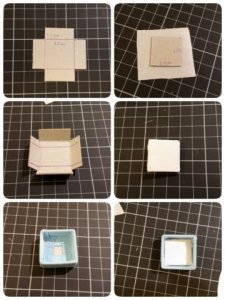
Ok, I swore I wasn't going to bother you anymore, but I'm having a really tough time figuring out how you covered the inner line of the lid with the ribbon, I just can't seem to get the corners right - would you mind going into a little more detail as to how exactly you did it? did you use 4 separate pieces of ribbon? How did you get the ribbon to stay on, a glue gun? And did you have any problems with the ribbon fraying? I'm referring to the last picture on the left. Thanks for your help!

2015-05-14-13-27-25_deco_0.jpg
 

fussykiki

Shiny_Rock
Joined
Jun 28, 2011
Messages
450
I first taped the back of the ribbon with double side tape. And then wrap the outside of the box starting from one corner. And then I cut a slit at each corner before I fold inside of the box. You can see the pic for the lid inner layer.

As for fraying, Since is it nylon ribbon, you can use a fire lighter to lightly burn the edge.

Hope that helps.
 

junebug17

Super_Ideal_Rock
Premium
Joined
Jun 17, 2009
Messages
14,121
Thanks very much Fussykiki! I'm beginning to think this might be a little beyond my skill level, but I'll keep playing around with it. Yes, I think the ribbon I have is nylon, thanks for the tip.

Your boxes are really lovely, you're very talented!
 

_lovesvintage_

Brilliant_Rock
Joined
May 8, 2014
Messages
817
You can also use clear nail polish or clear craft glue for the fraying if you don't want to mess with a flame.
 

McGinnis

Shiny_Rock
Premium
Joined
Jun 5, 2013
Messages
216
I'm having trouble understanding the part where the initial goes...is it just a square that is glued to the frame or am I mixxing something?
 

_lovesvintage_

Brilliant_Rock
Joined
May 8, 2014
Messages
817
McGinnis said:
I'm having trouble understanding the part where the initial goes...is it just a square that is glued to the frame or am I mixxing something?

You embroider, bead, whatever you want to do to personalize your box on the ribbon or fabric, then wrap it over the piece of cardboard with tape as instructed. This piece gets glued onto the liner that is positioned inside the top. You can piece the parts together to see the fit and then glue it all down...liner first and then this top cover.
 

_lovesvintage_

Brilliant_Rock
Joined
May 8, 2014
Messages
817
Hello fellow crafters... I just found out that there is a mini hot glue gun called the detailer, which has a 1 mm insulated nozzle. I think it would really work well for this project and minimize gluing mishaps. I am getting one...not that expensive.
 

junebug17

Super_Ideal_Rock
Premium
Joined
Jun 17, 2009
Messages
14,121
_lovesvintage_|1431769726|3877392 said:
You can also use clear nail polish or clear craft glue for the fraying if you don't want to mess with a flame.

Ah, that's a good idea lovesvintage! I'll do that for the bottom part, the ribbon was falling apart as I was wrapping it.

I was able to finish the top, doesn't look great, the velvet bunched up when I put the inner box, tried to fix it but just couldn't, and overall it just looks pretty sloppy. But I'm glad I was able to do it lol. Hopefully the bottom comes out a bit better, now that I've done it and have an idea of what can go wrong.
 

_lovesvintage_

Brilliant_Rock
Joined
May 8, 2014
Messages
817
Junebug17, do you have a seam splitter? I use that to help push the velvet in place. If not, try using a toothpick to ease out the bunches. I did find out that you have to get the velvet pretty tight around the box frame to execute the smooth look. I still got some tiny wrinkles with my box, but only seen inside and around the corners.
 

LuckyKelleyK

Shiny_Rock
Joined
Jul 18, 2014
Messages
198
Did you guys use little tiny embroidery hoops to do the monogram?
 

_lovesvintage_

Brilliant_Rock
Joined
May 8, 2014
Messages
817
LuckyKelleyK said:
Did you guys use little tiny embroidery hoops to do the monogram?

How tiny can those get? I know of them, but did not search to find the smallest size available. So for me, no...I just held the velvet in my hand pulling it as tight as I could between my fingers and then hand embroidered it.
 

junebug17

Super_Ideal_Rock
Premium
Joined
Jun 17, 2009
Messages
14,121
_lovesvintage_|1431793486|3877469 said:
Junebug17, do you have a seam splitter? I use that to help push the velvet in place. If not, try using a toothpick to ease out the bunches. I did find out that you have to get the velvet pretty tight around the box frame to execute the smooth look. I still got some tiny wrinkles with my box, but only seen inside and around the corners.

Thanks for the suggestion lovesvintage!…yeah, I tried poking the velvet back with a few different kinds of pointy things, but just couldn't get it to smooth out that much and didn't want to mess it up any further. So it's a bit lumpy lol. I'm hoping now that I know it happens, I can secure the velvet better when I do the bottom part.
 

McGinnis

Shiny_Rock
Premium
Joined
Jun 5, 2013
Messages
216
AH, you read my mind. My initial question/confusion was about wrapping my head around how clean the edges would look if I just glued the top where the initial goes right into the frame. It seems as though this mini glue gun will work!
 

LuckyKelleyK

Shiny_Rock
Joined
Jul 18, 2014
Messages
198
_lovesvintage_|1431794552|3877475 said:
LuckyKelleyK said:
Did you guys use little tiny embroidery hoops to do the monogram?

How tiny can those get? I know of them, but did not search to find the smallest size available. So for me, no...I just held the velvet in my hand pulling it as tight as I could between my fingers and then hand embroidered it.

I'm going to try it with a 2.5 inch one. It's the smallest I could find.
 

junebug17

Super_Ideal_Rock
Premium
Joined
Jun 17, 2009
Messages
14,121
junebug17|1431795875|3877484 said:
_lovesvintage_|1431793486|3877469 said:
Junebug17, do you have a seam splitter? I use that to help push the velvet in place. If not, try using a toothpick to ease out the bunches. I did find out that you have to get the velvet pretty tight around the box frame to execute the smooth look. I still got some tiny wrinkles with my box, but only seen inside and around the corners.

Thanks for the suggestion lovesvintage!…yeah, I tried poking the velvet back with a few different kinds of pointy things, but just couldn't get it to smooth out that much and didn't want to mess it up any further. So it's a bit lumpy lol. I'm hoping now that I know it happens, I can secure the velvet better when I do the bottom part.

An update - I decided this was a practice box so I just really shoved the fabric hard with a seam ripper, and it looks better; still lumpy but not as bad - just wanted to mention it if anyone else has this problem.
 

yanaazul

Shiny_Rock
Joined
Aug 29, 2009
Messages
222
fussykiki, thank you so much for sharing your hard work in reverse-engineering these boxes!

So, like everyone else, I ran out to my local fabric store and nope, no velvet ribbon. The store associate says velvet ribbon is seasonal -- fall/winter. I think a field trip up to Britex is in order, if I can get over my absolute irritation at parking in that part of San Francisco. (Oh, but then I could do a side trip to Lang's Antiques!)

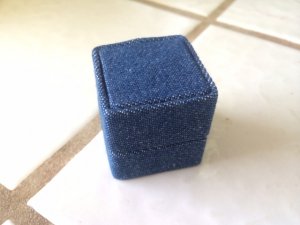
But... I had grosgrain ribbon from another project, and I had fabric scraps. So I give you: Denim Ring Box! :lol:


I'm thrilled, it's so cute, and I'm a jeans and hoodie kind of girl so perhaps denim is more appropriate for me than velvet, ha. The only part I'm not completely satisfied with is the sponge; I used the inner of a kitchen sponge and it was too soft to wrap the ribbon neatly. So I think I'm going to look for a firmer craft foam.

Thanks again, fussykiki! Happy crafting, everyone else!

yanaazulbox2.jpg

yanaazulbox3.jpg
 

blingbunny10

Brilliant_Rock
Joined
Jan 15, 2010
Messages
848
Oops, nevermind...
 
Be a part of the community Get 3 HCA Results
Top