shape
carat
color
clarity

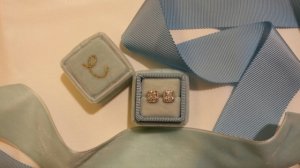
My handmade velvet ring box and cushion halo earrings

hsc9

Rough_Rock
Joined
Jul 24, 2018
Messages
26
Process photos would be very much appreciated if you wouldn't mind! What material did you use for the foam and interior lining of the lid? Your boxes turned out sooo neat and lovely! :love:
Do you know the mm thickness of the cardboard you used?

Thank you! I used white velvet for the lid interior lining. I've used makeup sponges, magic erasers, and random packaging foam. They all worked well. It just needs to have enough strength to keep it's shape. The chipboard I'm using is less than 1mm I haven't measured but I think it's 24pt (~0.6mm). I do think it would work slightly better with the 1mm but I haven't been able to find it at my local craft store. My boxes have a tiny bit of flex.

I'll post some photos next time!

I am in awe of people like you. I couldn't craft my way out of a paper bag. Those boxes are magnificent! :love:

Thank you! OP did all the hard work figuring out how to make these!
 

junebug17

Super_Ideal_Rock
Premium
Joined
Jun 17, 2009
Messages
14,142
Hi Everyone!

I stumbled on this thread a couple weeks ago and have been having a lot of fun crafting these adorable boxes. There are some fantastic tips on this thread already and I just wanted to share some I've learned that might be helpful!

1. I found that the trick to have neater looking boxes is to make sure that the velvet is sewed to exactly to the right size which can be difficult. Game changer for me was when I started the use a binder clip to help me sew. You wrap the ribbon around and then use the binder clip to clip the ribbon and then sew. The added benefit is that your stitches will also be straight because the binder clip acts as a guide.

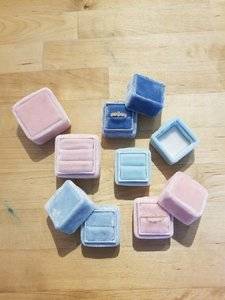
20180915_160648.jpg

2. I used a combination of hot glue and E6000 glue. The E6000 sets much slower so it gives you more time to adjust things to make everything neater. Also acetone gets the E6000 glue right off in case you smudge it on the fabric.

3. Trimming as much of the velvet as possible helped to keep the boxes from looking lumpy.

4. The boxes are cube shaped and the size is limited by the width of the ribbon. I used 1.5in ribbon and the exact measurements from fussikiki's instructions to make the smaller boxes. I bought some 2in ribbon and scaled everything up to make the larger box.

5. I made stencils so I wouldn't have to measure everything out every time.

20180917_173158.jpg

They are FANTASTIC! You did such a fabulous job! Your tips are great - the idea of using a clip is really good, getting the fabric tight enough and getting the stitches straight were a big problem for me. And making a stencil, genius! I'm embarrassed I never thought of it lol :oops: I haven't made any in a long time but I still have leftover materials, maybe I'll give it another shot.
 

hsc9

Rough_Rock
Joined
Jul 24, 2018
Messages
26
Process photos would be very much appreciated if you wouldn't mind! What material did you use for the foam and interior lining of the lid? Your boxes turned out sooo neat and lovely! :love:
Do you know the mm thickness of the cardboard you used?

Sorry for the delay! I was waiting on some new ribbon from Etsy. Here are some progress pictures. I hope it's helpful! Let me know if you have questions!

1. Trim the foam. 2. Apply hot glue in a line avoiding edges. 3. Press to ribbon. 4-8. Repeat on all sides. 9. What it looks like before trimming the extra ribbon. 10-11. What it looks like after trimming. The side that has velvet going all the way down will be the side where the ring will touch. 12. Glue the foam insert to the inside of the box. 13. Finished box after repeating for the other side!

IMG_20181009_172350.jpg

IMG_20181009_172451.jpg

They are FANTASTIC! You did such a fabulous job! Your tips are great - the idea of using a clip is really good, getting the fabric tight enough and getting the stitches straight were a big problem for me. And making a stencil, genius! I'm embarrassed I never thought of it lol :oops: I haven't made any in a long time but I still have leftover materials, maybe I'll give it another shot.

You should!!! They're fun and your boxes looked so good!
 

Skhii

Shiny_Rock
Joined
Sep 18, 2014
Messages
348
Thank you so much for the detailed instructions and photos, hsc9! I can't tell you how much I appreciate your help! Can the glue be felt through the foam fabric? When I attempted making a box, I had wanted to make sure the foam stayed moldable and squishy, so I had tried to avoid using glue and tape on the areas that could be touched (top and where the ring sits), but the fabric didn't sit as nicely as yours.

Also, do you have any tips for how to prevent/diminish fabric and ribbon fraying? My velvet would unravel at the slightest touch once cut, and the ribbon would fray if I didn't use "fray check".

Thanks!
 

hsc9

Rough_Rock
Joined
Jul 24, 2018
Messages
26
Thank you so much for the detailed instructions and photos, hsc9! I can't tell you how much I appreciate your help! Can the glue be felt through the foam fabric? When I attempted making a box, I had wanted to make sure the foam stayed moldable and squishy, so I had tried to avoid using glue and tape on the areas that could be touched (top and where the ring sits), but the fabric didn't sit as nicely as yours.

Also, do you have any tips for how to prevent/diminish fabric and ribbon fraying? My velvet would unravel at the slightest touch once cut, and the ribbon would fray if I didn't use "fray check".

Thanks!

Hi! I don't really notice the glue through the fabric too much. When you press down, the foam is a bit firmer? But it still squishy and has no problem holding rings. I use hot glue for this step. E6000 won't work because the E6000 soaks slightly into the fabric. Maybe try spray adhesive? It might be thin/flexible enough to get the velvet to lie flat and not be noticable.

I just let it fray. Haha. For the velvet I only trim right before I glue things down. The glue takes care of the fraying. And for the grosgrain, I just work with it and trim the loose threads with sharp scissors. The inner parts of my box where you can't see are a mess. But it doesn't matter because only the parts where you can see needs to be neat. Good luck!
 

Crystal_Dreams

Brilliant_Rock
Premium
Joined
Aug 25, 2014
Messages
808
It has been awhile since I made my lot... but if you are using grosgrain ribbon, I take a lighter and singe the edges. Because it’s synthetic, it kind of melts to form a ‘seam’ that doesn’t fray any more.

Velvet is harder. I used silk velvet on mine and it frayed like crazy! I ended up putting double sided fabric tape on mine, doubling it over by like... 1mm at the very edges and then sticking it all down to the cardboard like that. It was super hard to make sure it all lined up and wasn’t uneven though.

Here’s one of my ‘neater’ ones using the technique I described above:

9D25FAF8-A573-4175-8DD9-C89C88095EC2.jpeg
 

junebug17

Super_Ideal_Rock
Premium
Joined
Jun 17, 2009
Messages
14,142
It has been awhile since I made my lot... but if you are using grosgrain ribbon, I take a lighter and singe the edges. Because it’s synthetic, it kind of melts to form a ‘seam’ that doesn’t fray any more.

Velvet is harder. I used silk velvet on mine and it frayed like crazy! I ended up putting double sided fabric tape on mine, doubling it over by like... 1mm at the very edges and then sticking it all down to the cardboard like that. It was super hard to make sure it all lined up and wasn’t uneven though.

Here’s one of my ‘neater’ ones using the technique I described above:

9D25FAF8-A573-4175-8DD9-C89C88095EC2.jpeg

@Crysal_Dreams, they turned out beautifully! You did an amazing job. I love how straight your seam is. They look perfect :love:
 

hsc9

Rough_Rock
Joined
Jul 24, 2018
Messages
26
It has been awhile since I made my lot... but if you are using grosgrain ribbon, I take a lighter and singe the edges. Because it’s synthetic, it kind of melts to form a ‘seam’ that doesn’t fray any more.

Velvet is harder. I used silk velvet on mine and it frayed like crazy! I ended up putting double sided fabric tape on mine, doubling it over by like... 1mm at the very edges and then sticking it all down to the cardboard like that. It was super hard to make sure it all lined up and wasn’t uneven though.

Here’s one of my ‘neater’ ones using the technique I described above:

9D25FAF8-A573-4175-8DD9-C89C88095EC2.jpeg

Wow!! They look perfect! Any tips on how to get that velvet seam to be so flat? I trim mine as much as possible but there is still a slight bulge. Yours look completely flat!!
 

junebug17

Super_Ideal_Rock
Premium
Joined
Jun 17, 2009
Messages
14,142
Wow!! They look perfect! Any tips on how to get that velvet seam to be so flat? I trim mine as much as possible but there is still a slight bulge. Yours look completely flat!!

Yep, I agree hsc9...Your seam is so flat @Crystal_Dreams. Mine bulge a lot more.
 

Crystal_Dreams

Brilliant_Rock
Premium
Joined
Aug 25, 2014
Messages
808
I think maybe that photo doesnt show the bulge much. I find the less I fold ‘under’ it to stop the fraying, the less it bulges. So I will literally try to make the fold under 0.5-1mm (I sometimes used tweezers to help with this, after attaching double sided fabric tape to the back of the velvet so all I needed to do was press it down and it would stay. I don’t sew my seams at all.

I use melamine sponges for my cushions. Cheap as, with a nice firmness and easy to cut with any kitchen knife lol.
 

hsc9

Rough_Rock
Joined
Jul 24, 2018
Messages
26
I think maybe that photo doesnt show the bulge much. I find the less I fold ‘under’ it to stop the fraying, the less it bulges. So I will literally try to make the fold under 0.5-1mm (I sometimes used tweezers to help with this, after attaching double sided fabric tape to the back of the velvet so all I needed to do was press it down and it would stay. I don’t sew my seams at all.

I use melamine sponges for my cushions. Cheap as, with a nice firmness and easy to cut with any kitchen knife lol.

I've never even considered not sewing! I'll try that on my next one. The sewing is literally the most challenging part for me.
 

MrsKBP

Shiny_Rock
Joined
Sep 16, 2018
Messages
195
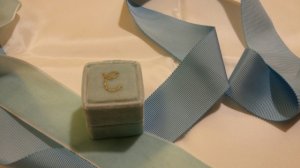
Here is my handmade velvet ring box and tutorial. I did that in a hurry and I hope it make sense.

**edited by moderator, sorry we do not allow personal blog mentions or links**

So I figure maybe I should also show you my cushion cut halo earrings which my husband bought me as a gift of having our first baby last year. I don't quite remember the spec because I don't have the certs with me. They are 1 ct each, H color, IF and set in diamond halo. I will update the spec if anyone is interested. But this post is more about the RING BOX!!!

20150512_223655_resized.jpg

20150512_223821_resized.jpg

YES! It want to make a box like this please!!! I LOVE it!!! I can't find your blog. Is it possible to DM to me? I think the moderator removed it?
 

LightBright

Brilliant_Rock
Premium
Joined
Mar 11, 2013
Messages
1,621
It has been awhile since I made my lot... but if you are using grosgrain ribbon, I take a lighter and singe the edges. Because it’s synthetic, it kind of melts to form a ‘seam’ that doesn’t fray any more.

Velvet is harder. I used silk velvet on mine and it frayed like crazy! I ended up putting double sided fabric tape on mine, doubling it over by like... 1mm at the very edges and then sticking it all down to the cardboard like that. It was super hard to make sure it all lined up and wasn’t uneven though.

Here’s one of my ‘neater’ ones using the technique I described above:

9D25FAF8-A573-4175-8DD9-C89C88095EC2.jpeg

Hi Crystal_Dreams your boxes are lovely. Where does one buy genuine silk velvet? (I would love to find real silk grosgrain too, but that may be tricker.)
 

Crystal_Dreams

Brilliant_Rock
Premium
Joined
Aug 25, 2014
Messages
808
I bought mine online off an eBay seller who sells fabric remnants (so much cheaper than getting big full lengths!) which enabled me to make them in many colours! I believe the seller’s name is silkfabric. They also have a website where they sell a wide range of colours. The ebay listings I go for tend to be the auctions :) they’re cheaper lol.
 

Skhii

Shiny_Rock
Joined
Sep 18, 2014
Messages
348
I think maybe that photo doesnt show the bulge much. I find the less I fold ‘under’ it to stop the fraying, the less it bulges. So I will literally try to make the fold under 0.5-1mm (I sometimes used tweezers to help with this, after attaching double sided fabric tape to the back of the velvet so all I needed to do was press it down and it would stay. I don’t sew my seams at all.

I use melamine sponges for my cushions. Cheap as, with a nice firmness and easy to cut with any kitchen knife lol.

Thanks for the tips, Crystal_Dreams! :D I would never have thought double-sided tape would be strong enough to keep the velvet in place, especially when wriggling the ribbon-covered box in. Do you also use double-sided tape on the sides of the sponges to attach the velvet?
 

Crystal_Dreams

Brilliant_Rock
Premium
Joined
Aug 25, 2014
Messages
808
I sure do! I use the crafting stuff that is meant to hold fabrics and is ‘extra tacky’. Seems to work just fine!! I use it for every single bit of the box lol!
 

winnietucker

Ideal_Rock
Joined
Jan 4, 2019
Messages
2,487
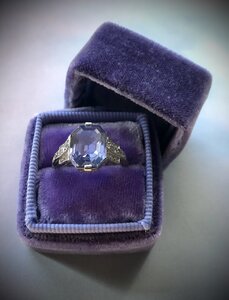
So...I’m a few years late to the party lol, but thanks to everyone’s tips on this thread, I finally made my own ring box!

I was driven to do it because I could not find the shade of purple I wanted on the Mrs. Box website or on Etsy, and I also wanted just slightly different colored velvets for the cushions vs the outside of the box, and I wanted a velvet without an odd sheen (seen on lots of modern rayon blend velvets) so I figured I should just make my own. It was fun shopping for vintage French velvet ribbons, and I was hooked!

My first few boxes were quite wonky. Here’s the final result:

FAB29B59-7C6B-4BAA-AB1C-159CC7C1EB6D.jpeg D317BAD0-C2A7-4A63-A7F7-A3CA75002DDF.jpeg

Great job! Looks fantastic!
 

Bluemuse

Shiny_Rock
Joined
Jan 5, 2020
Messages
382
So...I’m a few years late to the party lol, but thanks to everyone’s tips on this thread, I finally made my own ring box!

I was driven to do it because I could not find the shade of purple I wanted on the Mrs. Box website or on Etsy, and I also wanted just slightly different colored velvets for the cushions vs the outside of the box, and I wanted a velvet without an odd sheen (seen on lots of modern rayon blend velvets) so I figured I should just make my own. It was fun shopping for vintage French velvet ribbons, and I was hooked!

My first few boxes were quite wonky. Here’s the final result:

FAB29B59-7C6B-4BAA-AB1C-159CC7C1EB6D.jpeg D317BAD0-C2A7-4A63-A7F7-A3CA75002DDF.jpeg

I love this @Pinkmartini87 !! Your ring looks beautiful in its handmade box!! It’s quite romantic. Love the colors! Great job!!
And I really love the details of your ring!
I keep finding really sweet old jewel boxes and compacts with pretty velvet linings, so I get the draw to older silk/cotton velvets. I might have to try this myself one day.
 

MeowMeow

Brilliant_Rock
Joined
Nov 27, 2009
Messages
1,647
@Bluemuse Thank you for your kind words! You should absolutely try it! Elena deserves to live in a spectacular blue & plush velvet palace!

I bought my vintage velvet on Etsy; I too am drawn to lovely, high quality fabrics—so much to choose from!

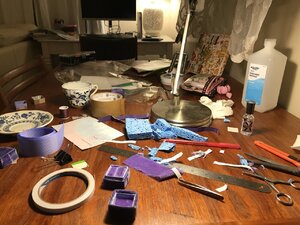
It does make a big mess and takes oodles of patience though lol. Here’s what my table looked like:
E35FE052-E5EE-469B-A5B0-670DDC0F114A.jpeg
But the humble end product is worth it! It’s not perfect, but it’s handmade with love!

2EA196E2-7108-443A-AB79-41A08ED8A45B.jpeg

I think it looks amazing!! There are etsy sellers who sell lots of boxes that don't even look that good! You did a great job and it's the perfect shade for your ring!!
 

Bluemuse

Shiny_Rock
Joined
Jan 5, 2020
Messages
382
Thank you for the visual @Pinkmartini87 !
It helps to see the raw materials that went into the project! Almost as good as a how to!
I love arts and crafts, so I will definitely give it a try at some point. I’ve seen old pieces of velvet and ribbon in my antiquing travels. Whenever I get to it, I’ll definitely share.
Elena does deserve a beautiful silk velvet bed for rest time, I agree. =)2
 

Crystal_Dreams

Brilliant_Rock
Premium
Joined
Aug 25, 2014
Messages
808
So...I’m a few years late to the party lol, but thanks to everyone’s tips on this thread, I finally made my own ring box!

I was driven to do it because I could not find the shade of purple I wanted on the Mrs. Box website or on Etsy, and I also wanted just slightly different colored velvets for the cushions vs the outside of the box, and I wanted a velvet without an odd sheen (seen on lots of modern rayon blend velvets) so I figured I should just make my own. It was fun shopping for vintage French velvet ribbons, and I was hooked!

My first few boxes were quite wonky. Here’s the final result:

FAB29B59-7C6B-4BAA-AB1C-159CC7C1EB6D.jpeg D317BAD0-C2A7-4A63-A7F7-A3CA75002DDF.jpeg


great job! That’s a lovely shade of purple and your seams are nice and neat :)

agree on the making a mess part too... wild velvet just frays and sends tiny velvet fibres EVERYWHERE!! So worth it though.
 

JPie

Ideal_Rock
Premium
Joined
Feb 12, 2018
Messages
3,932
Well done! I can’t but help stare at that bottle of rubbing alcohol though. It’s worth its weight in gold!
 

Pinkmartini87

Brilliant_Rock
Joined
Apr 10, 2017
Messages
1,314
@MeowMeow Aww, thank you for the generous compliment! I do have a whole new respect for the folks on Etsy who make these boxes now. Handmade = time + mess + patience

@Crystal_Dreams Thank you! I really love your avatar ring—incredible color and a lovely/delicate design.

@JPie Thank you friend! Oh yes, could not have done without the alcohol—the tape made the scissor blades stick together. Although, other alcohol was involved also (the opened bottle of wine in the kitchen not pictured here!).
 

MeowMeow

Brilliant_Rock
Joined
Nov 27, 2009
Messages
1,647
@MeowMeow Aww, thank you for the generous compliment! I do have a whole new respect for the folks on Etsy who make these boxes now. Handmade = time + mess + patience

@Crystal_Dreams Thank you! I really love your avatar ring—incredible color and a lovely/delicate design.

@JPie Thank you friend! Oh yes, could not have done without the alcohol—the tape made the scissor blades stick together. Although, other alcohol was involved also (the opened bottle of wine in the kitchen not pictured here!).

Oh definitely! I've made a few boxes myself. Trashed most of them though because they look so bad. Only kept one. Decided I would rather pay someone else for now for boxes xD
 
Be a part of the community Get 3 HCA Results
Top