shape
carat
color
clarity

#JOTW Homemade E-ring... 2mm ok? What about prongs?

Undercover999

Rough_Rock
Joined
Nov 15, 2011
Messages
62
I'm trying to be a little different and am making an engagement ring for my intended... at home. I have no experience with this, but I'm pretty handy, and if it doesn't work I'll just scrap it and buy one.

She has told me, repeatedly, that she wants a THIN band. She would definitely not like anything that looks heavy, her #1 concern is that it be THIN. I don't really know what that means in jewelry terms, but I'm finding 2mm to be roughly the thinnest commonly available so thats my starting point.

First question:
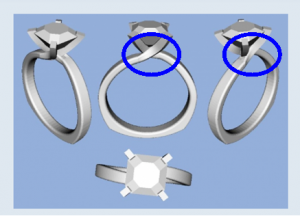
Will 2mm wide x 1.5mm "tall" band be adequate in terms of durability, etc? And 2mm won't be TOO thin looking, will it? I wouldn't want her to think I tried to skimp on the metal, haha. I'm going to use some "heirloom" gold that was given to me when I was born so the material will be 14k palladium white gold. Here is the design I came up with, borrowing features from rings she said she liked and mashing them together:
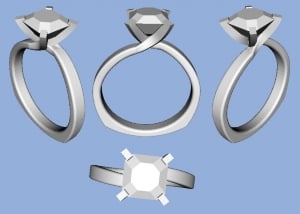
swoopy3.0.jpg

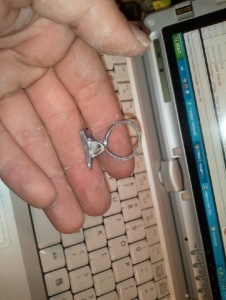
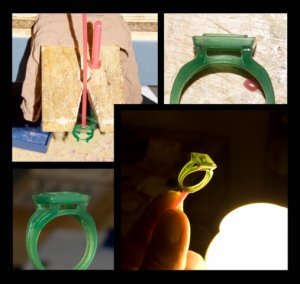
I machined a wax block so I could make some rubber molds and make a urethane (plastic) test run.
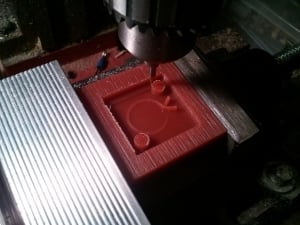
WP_000666.jpg

Here's my test run with my diamond popped into it.
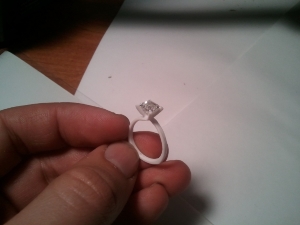
WP_000796.jpg

Band width looks OK to you folks? I've asked her friends and they're all like "omg sparkles?!?!" and haven't given me any real feedback. My taste in rings would be somewhat opposite, I'd want something HEAVY so it feels expensive and you could use it for bashing your enemies... but she wouldn't agree. I have no idea.

Second question:
I have been annoying all my friends by asking them to see their rings and measuring them with calipers so I have a certain starting point already, but what is a good size for the prongs? I believe I'm at roughly 1mm square now, and again they'll be 14k palladium white gold holding a 1.53 Asscher. Will that be good enough/fairly robust?

Thanks!
 
WOW! I'm super impressed.

2mm wide is just fine. 1.5 mm I'm not sure about. You might want to repost in the show me the bling forum because you'll get more traffic.

Looking good thus far.

Scintillating
 
I think 2mm is good, and 1.5 in height is probably fine, too. The design looks good, but I'd be a little concerned with how a wedding band would work with it. But how are you doing this if you have no experience????

You really need to post on Rocky Talky as that is where the jewelers hang out and settings and stones are discussed. Finished jewelry is posted on Show Me the Bling.
 
HI:

Are you setting your own stone??? The thought give me palps! :o

cheers--Sharon
 
Scintillating|1321407046|3062564 said:
2mm wide is just fine. 1.5 mm I'm not sure about. You might want to repost in the show me the bling forum because you'll get more traffic.

OK... is that sort of thing OK at this forum? Sometimes people get all... excited... if you post the same thing in multiple places?

diamondseeker2006|1321409023|3062588 said:
I think 2mm is good, and 1.5 in height is probably fine, too. The design looks good, but I'd be a little concerned with how a wedding band would work with it. But how are you doing this if you have no experience????

I've seen twisty rings like this with a wedding band, so its not impossible, but yeah its a little awkward. I'm not sure my lady will tolerate anything but one ring anyway - I asked her what she wanted and she said she never considered it but would be fine wearing just her ering. Right now she wears no jewelry at all; shes kinda an "active" type chick.

I'm learning as I go. I'm an engineer and a tinkerer. This project is giving me an excuse to buy sooo many fun tools!!! How hard could it be???? :saint:

canuk-gal|1321409629|3062598 said:
HI:

Are you setting your own stone??? The thought give me palps! :o

cheers--Sharon

Super nervous about that part. I might let a jeweler do it. But I did buy these awesome pliers just for the job, we'll see how brave I feel!
 
This is just awesome. Even if you don't get to make it perfectly I would still give it to her with maybe a different stone in it, because, well, taking up a whole new craft just for her is the cutest thing ever!

I wish you lots of luck!
 
Deia|1321456664|3062923 said:
This is just awesome. Even if you don't get to make it perfectly I would still give it to her with maybe a different stone in it, because, well, taking up a whole new craft just for her is the cutest thing ever!

I wish you lots of luck!


Ditto! What a lucky lady you have!
 
Soo lovely of you! Can't wait to watch the story unfold... Please take photos of the process for us? :))
 
I'm with Deia and Canuk-gal -- I'd also be concerned about loosing a 1.59 ct diamond because you were using cool new tools! I like the idea of the design but using a different coloured stone in it. The whole idea is the cool part, no doubt, and she'll be thrilled you took on such a huge project, but I'd hate to see you lose the stone.

:errrr:
 
This is SUCH a cool idea! And the "omg sparkles?!?!" comment made me laugh. I don't have any constructive comments on the ring because I'm not an expert at all, but maybe you could take it to a jeweler either for setting the stone (since damaging it would totally suck), or after you "attempt" to set it (regardless of whether you believe you were successful in your endeavor :saint: ), and have them check out the structural integrity of the ring and fix anything that makes it less secure. Then you put in all the effort, most likely get to use the setting you made, but a professional gives you the ok and any necessary finishing touches.
 
atp223|1321483717|3063226 said:
This is SUCH a cool idea! And the "omg sparkles?!?!" comment made me laugh. I don't have any constructive comments on the ring because I'm not an expert at all, but maybe you could take it to a jeweler either for setting the stone (since damaging it would totally suck), or after you "attempt" to set it (regardless of whether you believe you were successful in your endeavor :saint: ), and have them check out the structural integrity of the ring and fix anything that makes it less secure. Then you put in all the effort, most likely get to use the setting you made, but a professional gives you the ok and any necessary finishing touches.

Thats more or less the plan. I need to go to a professional anyway to have it rhodium plated so that'll be a good time to have them right any wrongs. :)

But I certainly don't want to roll in there with something completely unworkable.
 
Wow, impressive!

Question: How in the world did you set up shop with all the tools to do this without her noticing? Are you planning on casting and finishing it yourself? That's a huge investment; I hope you continue to make stuff after this project! I'm currently learning to hand carve wax pieces, and I have done some finishing work, but all in my teacher's shop. Awesome job! :appl:
 
aviastar|1321497651|3063404 said:
Wow, impressive!

Question: How in the world did you set up shop with all the tools to do this without her noticing? Are you planning on casting and finishing it yourself? That's a huge investment; I hope you continue to make stuff after this project! I'm currently learning to hand carve wax pieces, and I have done some finishing work, but all in my teacher's shop. Awesome job! :appl:

Yeah, I'm going to cast it myself. I was thinking maybe I throw a piece of hair from each of us into the crucible too - seems the the sort of sentimental thing women like. ;-)

Keeping it a secret is tough. I've been staying up very late.
 
No, 2mm is not too narrow! I suggest you don't go more than 2.5mm.

1.5mm thick would be structurally sound. That's not an unusual thickness.

I enjoyed your pictures and good luck with your project!
 
Hi Undercover999, Cool Project! Maybe you could practice by making yourself a wedding band first?

In highschool I took art metal class and cast some silver rings using the lost wax technique. I was a little zelous with the polishing and polished a prong off - oops!

Don't forget to take polishing into account! Often jewellers will make waxes slightly bigger (105-110%) to account for material lost during polishing. Don't forget to finish your wax before casting it (smooth the edges and corners so the ring is actually comfortable, and not blocky-looking).

Also don't forget to suction the airbubbles out of the wet casting plaster, or you'll have extra space in your mold and your cast ring will have little "warts" you'l have to painstakingly sand off.

When casting a ring, you have to make sure the plaster mold is hot from the kiln (that you used to melt the wax off) at the time of the casting, or the temperature difference between the molten gold and the cold plaster will cause it to shatter. When I cast a ring we used a nifty centrifugal casting apparatus that spun the molten metal through the mold before the metal had a chance to cool.

Is there a local jeweller who would be willing to partner with you on this? I imagine the jeweller could show you how much to finish the wax and assist you with casting the ring, then the jeweller could finish up the piece and set the stone?

If using recycled gold you will probably have to have it refined before you can use it.

Making jewellery is definitely more complicated than handyman projects like building a birdhouse, or a computer, but with an experienced jeweller to guide you I think your project will be a success.
 
Re your design:
( Note I'm not a Jeweller, double check your design for soundness with an actual jeweller)

The band looks good -(nice euroshank design). I think the prongs look ok (not a prong expert here)
The one spot I do worry about is where the ring head meets the band (circled in blue) - it looks weak and vulnerable to bending or twisting if she accidentaly catches the ring on a sweater, or accidentily knockc it against something with her hand.
Even if she's super carful, casual knocks are unavoidable.

Your design reminds me a lot of the settings from Maevona:
http://www.maevona.com//bridal/10/shapinsay
http://www.maevona.com//bridal/1/rousay

You've made an excellent start.

454weakspot1.png
 
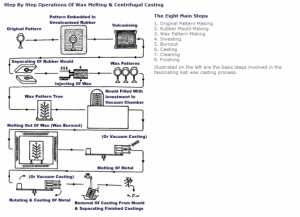
Found this diagram and had to post it :bigsmile:

454casting1.png
 
HopeDream|1321675383|3064941 said:
Hi Undercover999, Cool Project! Maybe you could practice by making yourself a wedding band first?

In highschool I took art metal class and cast some silver rings using the lost wax technique. I was a little zelous with the polishing and polished a prong off - oops!

Don't forget to take polishing into account! Often jewellers will make waxes slightly bigger (105-110%) to account for material lost during polishing. Don't forget to finish your wax before casting it (smooth the edges and corners so the ring is actually comfortable, and not blocky-looking).

Also don't forget to suction the airbubbles out of the wet casting plaster, or you'll have extra space in your mold and your cast ring will have little "warts" you'l have to painstakingly sand off.

When casting a ring, you have to make sure the plaster mold is hot from the kiln (that you used to melt the wax off) at the time of the casting, or the temperature difference between the molten gold and the cold plaster will cause it to shatter. When I cast a ring we used a nifty centrifugal casting apparatus that spun the molten metal through the mold before the metal had a chance to cool.

Is there a local jeweller who would be willing to partner with you on this? I imagine the jeweller could show you how much to finish the wax and assist you with casting the ring, then the jeweller could finish up the piece and set the stone?

If using recycled gold you will probably have to have it refined before you can use it.

Making jewellery is definitely more complicated than handyman projects like building a birdhouse, or a computer, but with an experienced jeweller to guide you I think your project will be a success.

I think the bolded statement above is really important to remember (I added the bold). The recycled gold you would use has all sorts of different alloys in it, if you simply melt it and cast it you might not get the color you are hoping for, but it will very probably also be a weak and uneven cast and you can't even hazard a guess at the karatage. You've put in too much effort to have it fall apart at that stage!
 
HopeDream|1321675383|3064941 said:
Don't forget to take polishing into account! Often jewellers will make waxes slightly bigger (105-110%) to account for material lost during polishing.

Good tip. I already need to machine a new master because I'm not pleased with the circularity of the inside of the ring - there is a problem with the spline in my CAD model. Whoops. I'll enlarge things a bit as well.

HopeDream|1321675383|3064941 said:
Is there a local jeweller who would be willing to partner with you on this? I imagine the jeweller could show you how much to finish the wax and assist you with casting the ring, then the jeweller could finish up the piece and set the stone?
...
Making jewellery is definitely more complicated than handyman projects like building a birdhouse, or a computer, but with an experienced jeweller to guide you I think your project will be a success.

Noooo wayy! The journey is every bit as important as the destination in this case; where's the challenge if I have a professional holding my hand?? :D


aviastar|1321742437|3065328 said:
HopeDream|1321675383|3064941 said:
If using recycled gold you will probably have to have it refined before you can use it.

I think the bolded statement above is really important to remember (I added the bold). The recycled gold you would use has all sorts of different alloys in it, if you simply melt it and cast it you might not get the color you are hoping for, but it will very probably also be a weak and uneven cast and you can't even hazard a guess at the karatage. You've put in too much effort to have it fall apart at that stage!

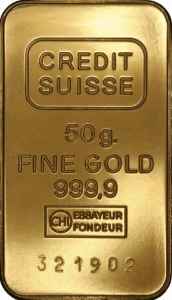
Not an issue. I don't really know why, or how, but when I was born I was given a number of 5g gold bars from one of my aunts. They're not an alloy, they're 24k and stamped 999.9. In fact they look just like this,but smaller (5g):
50gramcreditsuissegoldbarobv400.jpg

I tried out my brand spanking new kiln today to burnout a test mold. Learned some good info... for example, I learned that investment is quite fragile after its been fired. Whoops. Soooo tomorrow I'll try again, haha. I have some low temperature alloys (tin/lead based) and I'm going to try to make a tester before I use up my gold.

I'm also a little concerned about how creating my alloy is going to work out... will I have to stir the metals or are they miscible!? Who knows. I'll have to test a little bit first before I waste all my goodies.
 
There aqre 4 basic steps to a job like this:

wax
cast
finish
set

Casting takes some slightly unusual equipment that can be dangerous and I would seriously recommend farming out this part.
Finishing takes a little bit of practice but it is something you can do at home with a few inexpensive tools and a bit of patience. I would recommend you practice on something else first. It's unlikely you're first pice will be your best and you would like this ring to come out well.
Setting can be tricky and the secret is in cutting the seats, not in the pliers. This is another one that I would seriously suggest you job out to a pro but if you're going to do it yourself, get some burs to cut the seats and, like the finishing, practice on a few easy stones first (small round synthetics are the easiest).
 
denverappraiser|1321828817|3065742 said:
Casting takes some slightly unusual equipment that can be dangerous and I would seriously recommend farming out this part.

And miss the fun bits?! No way man... I have a kiln now, I can melt anything, I feel like a God!

I had a bunch of scrap parts laying around the garage today so I kinda beat together a vacuum casting apparatus so I could do a quickie test run with some scrap metal (not precious).

It worked!!!
WP_000802.jpg

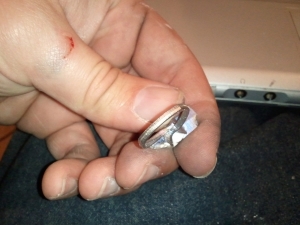
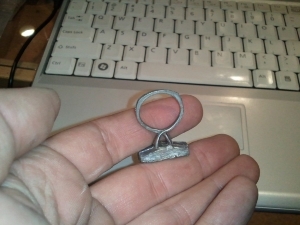
The machining marks that came through pretty heavily; they didn't look that bad on the machined wax. Oh well, just more filing I guess. I used a two-piece mold because I was trying to avoid using injection wax to make a wax pattern (step 2 and 3 on HopeDream's diagram) so I ended up with a seam visible in the center of the band as well. This was a terrible idea as the molds leaked some metal through the seam into my vacuum pump - I'll have to find a way to do the wax injection and make a single-piece mold.
WP_000806.jpg
 
Hi Undercover999,

Re : Machining marks on the wax:

For rings that are CAD designed and then cut out of wax by a computer, the jeweller will then take the rough machined wax (like yours)
and finsish it with small sculpting tools to make it as smooth and perfect as possible before casting it in metal, the idea being that 1)wax is easier to shape than metal 2)filing down wax doesn't lose you money, but filing down gold does.

When I was finishing my wax in school, I'd usually heat my tool slightly on a candle flame and then use the hot tool to gently sculpt the wax - I'm not sure how actual jewellers do it. (We made our own wax sculpting tools as an earlier project).

Note that the diagram I posted is related to commercial production. In your case you shouldn't have to make a rubber mold - you should skip steps 1 and 2 and go straight from finished wax to investment - so hopefully you won't get seam lines.

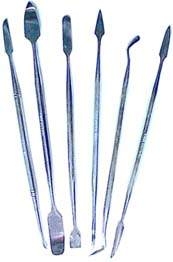
Wax shaping tools: http://www.sundanceglass.com/lgtoolweb.htm

Spruing

A sprue is a little wax rod that will melt out to form the channel for your metal to be poured in. The sprue is usually attached to the ring wax on the band, so that when it comes time to trim off the sprue ( with a jeweller's saw), the area is then easily sanded down and polished.

454shapingtools1.jpg

454sprue1.jpg
 
HopeDream|1321858298|3066006 said:
For rings that are CAD designed and then cut out of wax by a computer, the jeweller will then take the rough machined wax (like yours)
and finsish it with small sculpting tools to make it as smooth and perfect as possible before casting it in metal, the idea being that 1)wax is easier to shape than metal 2)filing down wax doesn't lose you money, but filing down gold does.

Yeah I actually think I'm going to leave them and clean them up at the end, lost metal be damned. I already tried casting patterns in urethane and cleaning them up... but I found it was TOO easy to sand and file them, very difficult to remove ONLY the machine marks - the radiuses on my edge fillets were getting altered and it was too easy to make a nick or dent with a stray file.

Same thing for the prongs, actually - you might be able to see in my photos that the prongs are not finished and are connected by a large web. That metal will be wasted but... oh well.
 
Ok...if you really want my honest opinion.... YOU ARE BADASS!!!!
i love the design and the effort. Since you have been doing casting with practice maybe you could calculate the density and compare it to the expected density just to make sure you don't have any air bubbles or impurities. This problem has caused a bunch of problems with my ring and it was done by a professional...whatever the hell that means. A jeweler could probably tell you all of this but seriously you are and engineer I'm sure you are qualified. I married and chem e and my best friends are ME's and CE's. My Dad is a CE and my Mom is a CE. My husbands mother is a Chem E/PE and his father is a Environmental science PhD. So coming from a long line of tinkerers and inventors ( btw I only included immediate family) this project is so awesome from so many more levels then just "OMG sparkles"


not to say i don't love sparkles...who doesn't
 
Based on your urethane model, I would say that you should make your prongs longer. Prongs are trimmed down to size after an initial bend and the length is important for leverage. I would certainly say to leave the setting to a pro. There are a lot of small, hard to see things that lead to an unsafely set diamond.

Also, I would rethink your sprueing path. It seems that the metal will flow from the prongs down to the main body of the ring. It is usually better to connect the sprues to the main mass of the piece and have it flow to the thinner ones. Otherwise, the metal can harden before fully filling out the piece. This is a pretty good article: http://www.beadfest.com/feature/adding-a-sprue.cfm and http://www.hooverandstrong.com/blog/archives/77/

Alloying is not difficult in itself but you have to be extra careful since you will be casting with it, which can lead to porosity issues.

Is there a community college near you? They often have adult classes on jewelry making and, even if you don't want to take a full class, maybe the teacher can be approached to look over your project and give you some advice.
 
Lady_Disdain|1321889885|3066128 said:
Based on your urethane model, I would say that you should make your prongs longer. Prongs are trimmed down to size after an initial bend and the length is important for leverage. I would certainly say to leave the setting to a pro. There are a lot of small, hard to see things that lead to an unsafely set diamond.

Also, I would rethink your sprueing path. It seems that the metal will flow from the prongs down to the main body of the ring. It is usually better to connect the sprues to the main mass of the piece and have it flow to the thinner ones. Otherwise, the metal can harden before fully filling out the piece. This is a pretty good article: http://www.beadfest.com/feature/adding-a-sprue.cfm and http://www.hooverandstrong.com/blog/archives/77/

Alloying is not difficult in itself but you have to be extra careful since you will be casting with it, which can lead to porosity issues.

Is there a community college near you? They often have adult classes on jewelry making and, even if you don't want to take a full class, maybe the teacher can be approached to look over your project and give you some advice.

Good articles, thanks for that. I'll flip the model around so its not sprued through the prongs when I machine my "final" waxes. To be honest I just kinda guessed when I oriented it. :oops: :D

I had already trimmed the prongs on the urethane - I have quite a bit extra in the model.
 
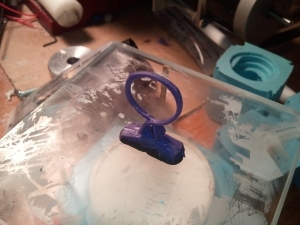
I went back to my junk box and rigged up a wax injector thing so I could make a wax model to burn out instead of my stupid two-piece investment idea... it worked OK. I think my rubber molds are too soft - they deform a lot when clamped and then also leak like crazy when I'm injecting the wax. I think I need to make more rubbers with a firmer material; I used shore 25A rubber which is like a rubber band, but I have some 60A stuff which should be more like a tire.

I tried to clean up the wax a bit as mentioned but the wax I have is also too soft. I have Kerr "Purple" injection wax which is supposed to be "carvable"... but for a design as thin as mine that seems to just mean "floppy". I'll grab a harder wax.

WP_000809.jpg

My last mold doesn't really count because of the janky way I made it, so this was my first real attempt at casting. I did everything wrong so that I could move quickly since this was just a test - didn't vacuum the plaster, didn't vacuum the mold, didn't follow the burnout profile, etc etc. But... all my homebrew equipment seems to work fine, as I got another reasonably good casting.

WP_000813.jpg

Sooo I think I'll spend some time making new CNC masters with proper sprues, new CNC waxes, new (firmer) rubber molds, and new (harder) wax models... and then we'll be getting close!

Oh, did I mention I'd like to propose over the Christmas holiday? :o :shock: :o :shock: :o :shock: :o :shock:
 
Sprue from the back into the heaviest part of the shank with your prong tips as the deepest point in the casting. It improves density and reduces setting problems later.

Xylol, which is available at Home Depot and the like makes a good wax solvent and can be used to prepolish your wax before you cast. Nylon stockings stretched over a finger or one of your wax tools makes a pretty good applicator.
 
denverappraiser|1321983394|3066867 said:
Sprue from the back into the heaviest part of the shank with your prong tips as the deepest point in the casting. It improves density and reduces setting problems later.

Xylol, which is available at Home Depot and the like makes a good wax solvent and can be used to prepolish your wax before you cast. Nylon stockings stretched over a finger or one of your wax tools makes a pretty good applicator.


Cool, thanks!
 
This is the most awesome thread ever! I can't wait to see how the final product turns out! It would have to be the most satisfying feeling to know that you made your fiancee's ring!
 
GET 3 FREE HCA RESULTS JOIN THE FORUM. ASK FOR HELP
Top