- Joined
- Jun 16, 2017
- Messages
- 424
2")

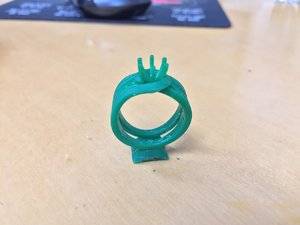
Okay everyone, just got revision 3 emailed over to me. Also, Amy @ DK confirmed she is making a plastic version of this iteration to mail to me so I can see the real deal in-person.
Please keep the comments coming. Although I've been giving all the credit to you fine people on here for helping, she thinks I actually know what I'm talking about and really good at articulating my desires, lol. Without you guys, I'd be nothing so thank you bunches!!
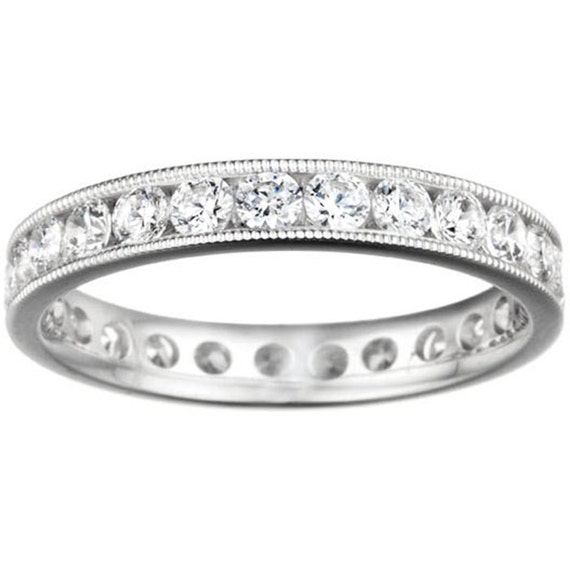
FYI, I did notice they left the stones out of the wedding band on this iteration. I did not request this, and think it was a mistake when the corrections were being made.
Are there visible gaps between the channel and the pave bands that we're not seeing on the cad? The ring just looks so bulky without seeing the distinct separation. Can the pave band be flared out and more gradually curve in with separation rather than the abrupt bend I see on the 4th cad pic?

I have to be honest, I’m glad they left the WR bare; it was getting confusing trying to distinguish ER from WR contour lines & separation. I also think it makes it easier to determine the curves, and lines, this way.
I must say, CAD #3 is a huge improvement, and looks so beautiful!!! It’s going to be amazing, after it’s polished & the prongs are done!
I'd make sure because I see the gap a bit more clearly on your post #78(3rd page) 2nd cad drawing.I think they are very hard to see in the CAD drawings because of the green colors they used in the renderings.
Wow. This is getting really close. What a patient person you are!Are there visible gaps between the channel and the pave bands that we're not seeing on the cad? The ring just looks so bulky without seeing the distinct separation. Can the pave band be flared out and more gradually curve in with separation rather than the abrupt bend I see on the 4th cad pic?


This is important - this will also assure the swirl be flared out enough from the top view. Remember your gal didn't want that swirl view impeded by a larger stone.Just make sure DK assures you that the "hole" in the bottom of the halo is wide enough if she ultimately wants to drop the stone to a more "halo" height.
Teeny tiny holes are absolutely maddening if not impossible to clean, so absolutely ask the holes are big enough.I like my pave bands to have nice big holes so I can get a brush against those diamonds.


I'd make sure because I see the gap a bit more clearly on your post #78(3rd page) 2nd cad drawing.
i think this rendering is just about SPOT ON given the gaps are going to be there. the tilt on the swirl going up is perfect. On the height of the stone, i went back and looked at the original setting and when the stone was set in it, the entire profile of the stone including the culet was visible. i think that's a tad high. On this CAD rendering, it looks slightly lower, the culet is just covered which i think is just right. i wouln't lower it anymore because then you're going to start to get that halo look. She doesn't want a halo, she wants an asymetrical swirl bypass type of setting. i think this is just high enough to get out of halo territory without looking like the head was just plopped in there as an afterthought. As far as the prongs, all CADs will look like that, the prongs will be refined on the finished product, no need to worry about that.
Take a look at this project of his. the CADs are on the first page and the finished product on pg 13. This is one of my top 3 favorite rings here on PS
https://www.pricescope.com/community/threads/dk-cad-assistance-needed.234335/
I can't wait to see the wax replica!
Wow. This is getting really close. What a patient person you are!
I agree with @blueMA that it is hard to know if the gap between the shanks is enough. The inspo. picture makes is look larger as the rings are tipped toward the viewer. So you are seeing more through that gap. But, I think there is a real difference to resolve. I'll start by saying I personally like the DK version. But, it is not quite exactly the inspo. To make it match the inspo, they need to shallow the angle from the halo down to the shank (red line; arrow). Basically, the two shanks need to be separated for longer. This is the same concept as your pink line. But, maybe this drawing will help communicate it.
I think that a 7 mm stone is very very high and she will knock it on everything. i would have it set about 1 mm above the halo, but that is not what SHE wants. And it is easier to remove metal than add. So, I'd leave it high (maybe drop to 6-6.5) and then adjust if needed. Just make sure DK assures you that the "hole" in the bottom of the halo is wide enough if she ultimately wants to drop the stone to a more "halo" height.
The prongs always look terrible in CAD. Don't worry. If you say delicate prongs, you will get delicate prongs from DK. I have full confidence.
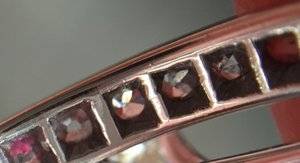
Ok. One this we have not talked about is cleaning access to the diamonds. The pave shank seems to have some square-holes, which is quite what I'd like to see. You can check with DK, but I like my pave bands to have nice big holes so I can get a brush against those diamonds. The channel band seems to be solid and I would really suggest cleaning access.
These are too small
These are better and are fine.
If the pave band has squares, then I'd want the channel to as squares for access as well. These are nice and big. This will make the setting less hefty, but likely won't alter the price as this is a ton of finishing. But, dirty diamond can lose 2 color grades. So, you want to be able to clean and dry them well. You won't have these on the halo area just the shank.
This is important - this will also assure the swirl be flared out enough from the top view. Remember your gal didn't want that swirl view impeded by a larger stone.
Teeny tiny holes are absolutely maddening if not impossible to clean, so absolutely ask the holes are big enough.
2")
LOL, as a guy I am familiar with this struggle. My paws are always too big for wherever I need to put them. Just the other night my girl dropped her phone in the couch and I couldn't get it because my hands were too big. I was figuring out a way to get it from the bottom when I saw her hand slip down like no problem and grab it. My point is I will make sure DK gets the holes right.

It's not the size of the hole, but the size of the...
OK, there's a joke in here somewhere, but I'll just leave it at that.
^trunk


Sledge this most recent iteration is lovely. I agree that sloping/tilting/twisting the (not) halo and side diamonds really makes it more like the inspiration ring - and will allow for multi-angle bling viewing!
Yes to the holes for cleaning access! Super necessary and they'll smooth it down she'll never even feel that.
Can't wait to see the wax/plastic version. Are you having them send it to your work so she doesn't open it?
I really, REALLY love this iteration of the CADs! It's gonna be great!!
They will be well polished to the point where she will never even feel those openings, promise! DK has done all of my rings this way, including a full eternity, and GOOD LORD his rings are the most comfortable rings I've ever worn. To me this is truly the beauty and genius of David Klass - gorgeous pieces that are designed to look beautiful while still being comfortable and a joy to wear.On a side note. With the gaps/holes in there, will the polishing still provide a nice smooth comfort fit type feel with proper polishing? I don't want her to feel like her hands are being cut up or irritated because of them.

I am re-posting the original inspiro pictures above for easy reference.
Things I've noticed:
Obviously I would love to hear more of everyone's input and suggestions. For now, I'm going to grab some wings and maybe a few crown & cokes and let all this stew.
- Channel set band has too much twist and is not wide enough. It appears very dainty in real life and just off. You can see the difference looking at post #101.
- As noted by @blueMA, the split between the channel set & pave portions of the shank need to be much larger.
- Amy and I have talked via email (since the last CAD revision) and the top definitely needs adjusted so the diamond can sit lower (if ever desired); however, Amy was suggesting we lower now. My girl liked the height of the original ring and the fact the diamond did not bleed over into the halo, so we need to make the opening bigger regardless if we lower the stone now or not.
- I need to have them add the cleaning holes to the pave portion of the bands.
- The w-band isn't right either. I've kind of ignored it as the e-ring is more important, but essentially the inspiro ring has the pave sitting at a higher elevation level than the plain portion of the shank. In the replica, they are almost even.
- I think once the issues with the e-ring are resolved, we can work on the alignment/fit of the w-band. Some of the issue in these pictures is the plastic molds came with both pieces attached at the bottom so they aren't fitting snug like the CAD's show.
- Depending what Amy tells me, I am considering putting the revisions of hte w-band on hold until I can ensure we get the e-ring done and shipped to me by 6/29. I am running out of time.
- I'm seriously considering letting my girl see the plastic models and get her input. She knows I'm up to something and that the ring is coming so this isn't a stealth operation by any stretch.
Sorry to threadjack, but I have a question about this. I just received a setting from James Allen that doesn't have any holes on the underside of the band. In the recently sold images, all of them have the holes. I chatted with JA about it and they said that the holes are only used "if necessary". Should I request that it be remade with the holes?Wow. This is getting really close. What a patient person you are!
These are too small
These are better and are fine.
If the pave band has squares, then I'd want the channel to as squares for access as well. These are nice and big. This will make the setting less hefty, but likely won't alter the price as this is a ton of finishing. But, dirty diamond can lose 2 color grades. So, you want to be able to clean and dry them well. You won't have these on the halo area just the shank.


300x240.png)