shape
carat
color
clarity

DK/BGD Custom Setting...The Home Stretch

farrahlyn

Brilliant_Rock
Premium
Joined
Sep 22, 2015
Messages
1,170
Me too! Me too!!

I never got it yesterday as Amy promised. I need to call and check on it today, but the GF is all up in my business today, lol. We are getting the RV ready for a camping trip and heading out soon. Not sure how I will make contact w/ DK yet.

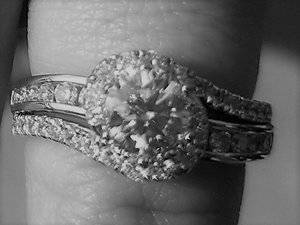
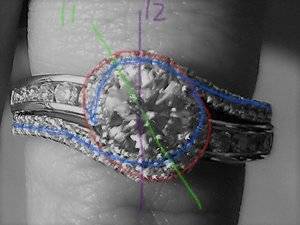
Funny though, the other night she point blank asked when she was getting her big blingy ring. :lol:

She doesn't know the DK debacle going on. She just knows that's the setting she wants. More funny is she called it "blingy", since she originally wanted plain & simple. Got so tempted to just do the solitaire and then bring her into the design process.

oh, the wait! and good on you for going with the .8 stone! she OBVIOUSLY wants bling :lol:
 

CHRISTY-DANIELLE

Ideal_Rock
Joined
Jul 10, 2017
Messages
2,551
Just wanted to chime in since you seem on the fence about DK's 14k PD WG. My DK is heavily engraved, but you can see the inside band is polished and shiny. Mine is unplated 14k PD WG and I assure you, it doesn't need it! This metal is very white and very shiny! (And no replating!). 20180528_073601.jpg
 

leukolenos

Brilliant_Rock
Premium
Joined
Mar 27, 2016
Messages
825
Just wanted to chime in since you seem on the fence about DK's 14k PD WG. My DK is heavily engraved, but you can see the inside band is polished and shiny. Mine is unplated 14k PD WG and I assure you, it doesn't need it! This metal is very white and very shiny! (And no replating!). 20180528_073601.jpg
Please share photos of your ring!!! It looks beautiful :love:
 

sledge

Ideal_Rock
Premium
Joined
Apr 23, 2018
Messages
5,791
Wow, gorgeous ring @CHRISTY-DANIELLE!!

And thank you for sharing your experiences with DK's WG/palladium alloy. It's nice to see some actual products. I agree it's very white. FYI, I did speak with Amy @ DK about the pave and how many here had recommended platinum. She said they highly recommend their WG mix as it's actually stronger and doesn't break the same way that platinum does. :think:

More importantly...look what showed up today. :dance:

Right off the bat, I see the pave needs the 20* tilt that @rockysalamander went into detail about.

Hi Sledge,

Let me know if I have started in the right direction for your ring set design? The setter will carve small claw prongs, now they are long and open. The walls around the channel set stones will be about 25% smaller once the stones are set. You can draw on the cads if it helps to show me anything you might want to change. Thanks David


44836-QUAD (1).png


44836-QUAD (2).png
 

CHRISTY-DANIELLE

Ideal_Rock
Joined
Jul 10, 2017
Messages
2,551
How exciting!
Dk always tells me he doesn't mind if you draw on CADS, it really helps him. My CAD edits back to him look like a 3rd grader got into the marker box. .. but he makes sense of it. You are really in good hands!
 

sledge

Ideal_Rock
Premium
Joined
Apr 23, 2018
Messages
5,791
Just reposting the original pictures so we have a comparison that is inline with the CAD's.

At this point, I'm struggling to know if the measurements shown on the CAD's are the same as the one in the actual pictures, or how they compare (larger or smaller).

A5AF5016-4143-4441-8022-25F653DE71A7.jpeg
0D887EB7-C946-400E-B07B-DA4E10F5C161.jpeg
5B3465AB-0EEE-4025-9106-F439F9B4B34C.jpeg
626D6A55-D541-405E-A7BB-E7F54ED00EA9.jpeg
195DA48D-1C29-4DDB-96B4-C0452A185723.jpeg
6AE6E8EA-3D69-4480-BE7C-ED95A573F307.jpeg
844E0F68-6858-40F9-AB23-1D8DE5386A3F.jpeg
F473FFCB-1B48-483E-A901-0420A8CC0370.jpeg
update1.bw.jpg
update1.jpg
update2.bw.jpg
update2.jpg
update3.bw.jpg
update3.jpg
 
Last edited:

Tophat1

Brilliant_Rock
Premium
Joined
Feb 5, 2017
Messages
529
The combined shanks are 7mm at the bottom if I am reading the CAD right. Won’t that be really thick and uncomfortable?
 

sledge

Ideal_Rock
Premium
Joined
Apr 23, 2018
Messages
5,791
The combined shanks are 7mm at the bottom if I am reading the CAD right. Won’t that be really thick and uncomfortable?

I noticed this myself and what got me questioning the thickness measurements I mentioned earlier. Either way, I think the WEDDING BAND portion needs tweaked a little. If you look at the original inspiration band, you will see how the bottom tapers back to what I'm guessing is a 2mm.

On the DK CAD's, they currently show the wedding band as two separate bands with a total width of 3.80mm.

http://www.jared.com/en/jaredstore/...4-ct-tw-round-cut-14k-white-gold-041441003--1


195DA48D-1C29-4DDB-96B4-C0452A185723.jpeg
041441003_MV_ZM_JAR.jpg

041441003_O_ZM_JAR.jpg
 

blueMA

Brilliant_Rock
Joined
Aug 10, 2005
Messages
1,257
The swirl part will need to be less circular and more offset. The way it is on the cad, it's way too symmetrical and round overall, while the original piece is more egg/oval shape turned 11oc counterclockwise. Tilt the pave 20 degrees so that the whole thing doesn't look so angular but more flowy.
 

blueMA

Brilliant_Rock
Joined
Aug 10, 2005
Messages
1,257
584133-76b12915816b4065798b59a8998c9a83.jpg

Also, looking at this image, see how the channel band is much more offset - left side band bottom is at more level with the right side band top. Draw a straight horizontal line to elaborate this difference, then the swirl part will naturally need to accommodate to the new flow line.
 

sledge

Ideal_Rock
Premium
Joined
Apr 23, 2018
Messages
5,791
Excellent comments @blueMA. Thank you so much!

Below are some markups I think will send back (with a note to tilt the pave 20*). One thing I am not certain is it just the CAD drawing that makes the pave look like poop? Real pics look nice, but doesn't look the same on CAD.

It's hard to draw on the computer but hopefully with some descriptions I can illustrate my points. The bright green between the pave & channels appears to be bigger and more V-shaped to me than DK has drawn. You see this too?

1-1a.png
1-1b.jpg 1-2a.jpg 1-2b.jpg 1-3a.jpg
 

Attachments

  • 1-2b.jpg
    1-2b.jpg
    831.7 KB · Views: 14

blueMA

Brilliant_Rock
Joined
Aug 10, 2005
Messages
1,257
The bright green between the pave & channels appears to be bigger and more V-shaped to me than DK has drawn. You see this too?

Yes, the bright green space needs to be more separated with bigger gaps and be more independent flow from the channel band. In the cad, they look too adjoined.
 

rockysalamander

Ideal_Rock
Premium
Joined
May 20, 2016
Messages
5,105
Will write more later, but to show the tilt on the stones, this might help. You want a smooth transition from the shank where they are facing "up" to twist around to the 20-degree tilt beyond level. Can you see that here between the arrows. You want the metal and the stones to twists to allow a graceful transition. Once you do this, you need the stones in the wedding band to also tilt outward (they are now inward).


upload_2018-5-30_13-22-29.png

https://www.whiteflash.com/engageme...passion-diamond-halo-engagement-ring-4695.htm
 

sledge

Ideal_Rock
Premium
Joined
Apr 23, 2018
Messages
5,791
Thank you @blueMA and @rockysalamander. I have sent back my comments to DK, and included all the things listed above including the pic of the example tilt on the pave stones & metal (special thanks for including as it's hard to describe or draw).

Back to the waiting game for a response & revised CAD's. *tick tock, tick tock*

In the interim, if you happen to see anything else go ahead and post and we will catch in the next round of scrutiny, lol. ;)2
 

farrahlyn

Brilliant_Rock
Premium
Joined
Sep 22, 2015
Messages
1,170
you are in good hands @sledge! Great comments on the changes needing to be made, i like the pic that @rockysalamander posted on the tilt of the halo, that is a perfect interpretation! You commented on the pave.... it will look much more refined IRL vs what you see in the CAD.
 

sledge

Ideal_Rock
Premium
Joined
Apr 23, 2018
Messages
5,791
you are in good hands @sledge! Great comments on the changes needing to be made, i like the pic that @rockysalamander posted on the tilt of the halo, that is a perfect interpretation! You commented on the pave.... it will look much more refined IRL vs what you see in the CAD.

Thank you for continuing to check in @farrahlyn. You have been one of the constant staples in my entire purchase process, and I am very grateful and thankful for your help and guidance.
 

sledge

Ideal_Rock
Premium
Joined
Apr 23, 2018
Messages
5,791
Okay boys and girls.....round 2.....and GO!

PS - I'm in operation meetings this afternoon and just throwing this up without much review. One oddity that caught my eye is I need to add or trim some metal somewhere...I don't like the 6.66 weight of the 14k. :evil2:

Hi Sledge,
Let me know any other changes you might want to see? Once we get close to what you think you might like I can send you a plastic model. There will be a tilt on your halo, a little less than the picture you sent as you have one versus the double curl. Thanks David

44836-QUAD.jpg
 

sledge

Ideal_Rock
Premium
Joined
Apr 23, 2018
Messages
5,791
Had a quick minute to do another comparison....*sigh* :(2

44836-QUAD.jpg
 

sledge

Ideal_Rock
Premium
Joined
Apr 23, 2018
Messages
5,791
I know all you have already done so much to get me to this point, and I greatly appreciate it; however, if you could offer a few more opinions I sure would appreciate it.

@rockysalamander
@blueMA
@farrahlyn
@mrsgreeneyes
@bludiva
@msop04
@PintoBean
@LLJsmom
@TreeScientist

Apparently I am really struggling to properly articulate to DK how to modify the ring so that it aligns with the original inspiration piece. You will see that in post #72 above that I drew horizontal lines of different colors on the original piece and then I used the same color of lines in the initial CAD rendering. You can clearly see there is a difference. DK acknowledged and presented the above updated CAD drawing. While I can see they made some of the changes, this alignment issue is still not correct.

Am I losing my mind? Or is this possibly an optical illusion because the CAD is at a dead on angle whereas the real photo is at some sort of a skewed angle, making the horizontal lines appear differently?

I welcome other comments too. Just really trying to get this right, as you know the journey has been long & tedious and I'm ready to see it come to a happy ending.
 

rockysalamander

Ideal_Rock
Premium
Joined
May 20, 2016
Messages
5,105
Massive image to follow because I can't make them smaller. :) Gonna post in a few pieces.

#1. The shank of the ering needs to be more twisted.
The image on the left is your inspo and I aligned a X over it so that the lines meet the center of each channel band. When I took that over to the CAD, you can see that the channel band need to arc more steeply from the center and then level off.

Edited to add. I think this is caused, in part, by the removal of the graduated stones (probably my fault). If you add them back in, that should make this area more similar with the added twisted noted above.

upload_2018-6-1_21-21-59.png
 
Last edited:

rockysalamander

Ideal_Rock
Premium
Joined
May 20, 2016
Messages
5,105
#2. The inspo is rotated more to the viewer than the CAD, so ignore the bottom part. But, the pave diamonds are very sharply angled as compared to the minor dip of the CAD. Orange Arrows.

#3. The pave band begins to arc outward starting at about the third stone up. The CAD has a flat shank. That entire shank should be twisting from the red to the orange arrows. Then, it twist back to the 20 degree tilt by the time that shank crosses the channel band.

upload_2018-6-1_21-41-41.png
 

Attachments

  • upload_2018-6-1_21-38-41.png
    upload_2018-6-1_21-38-41.png
    549.5 KB · Views: 9
Last edited:

rockysalamander

Ideal_Rock
Premium
Joined
May 20, 2016
Messages
5,105
#2 & 3 (cont.). The yellow lines are to show the plane of the table of the ering pave diamond (ignore the wedding band). They twist outward. But, can you see how the last one drops the table plane more quickly to the 20 degree tilt? Basically, the stones take a long distance to twist outward, but twist back to 20 degree tilt over a very short distance.

Edited to Add. The entire paved shank is twisted. By this I mean, imagine you lay your hand level to the ground palm down. Just like if you pretending your hand was a airplane, you would hold your hand flat and rotate at the wrist to turn the plan. That is what this is doing. But, when the stones are very steep at the top. they cheat a bit and the lower part of the shank is not quite fully at the same angle.


upload_2018-6-1_21-49-54.png
 
Last edited:

rockysalamander

Ideal_Rock
Premium
Joined
May 20, 2016
Messages
5,105
#4. They changed the shanks as you requested at the bottom, but they look to skinny compared to the inspo. The boxes I placed are the same size and angle. So, the wedding band is a bit thinner than the Ering, but not much. Can you run back to Jared alone and ask them to tell you how wide the shank is at the bottom? You can say your worried its too wide for your girl.;)2

upload_2018-6-1_22-0-41.png

Those seem to be the biggies to my eyes. Did I miss something?
 

blueMA

Brilliant_Rock
Joined
Aug 10, 2005
Messages
1,257
584133-76b12915816b4065798b59a8998c9a83.jpg

Also, looking at this image, see how the channel band is much more offset - left side band bottom is at more level with the right side band top. Draw a straight horizontal line to elaborate this difference, then the swirl part will naturally need to accommodate to the new flow line.
I’m traveling and can’t draw, but as in the previous reply, elaborate that the left channel band bottom edge is actually slightly above level from the right side’s top edge. Neither the left nor the right side curve back down/up from the top view unlike how it is on the cad. Draw the horizontal line right through the gap area to demonstrate the difference.
 

luv2sparkle

Ideal_Rock
Premium
Joined
Feb 3, 2008
Messages
7,950
Hi Sledge! I have enjoyed following your story from stone to ring. I am so glad you decided to go with David Klass. I am sure you will be happy with the results. If not, (although I am sure you will be happy), he would fix it for you. I would also like to add this for future reference, David is a jeweler who can do excellent repairs. I have found out the hard way that making a beautiful ring and fixing a ring are not the same thing and a jeweler who can make something from scratch may not be able to repair something beautifully as well. David Klass can do both and that is a tremendous find to me.
Also, just a fun aside- David and Brian Gavin were boyhood friends and went to school together in South Africa. Amy shared that fun fact with me the last time I was there. So your ring is a wonderful collaboration all the way around. Can't wait to see the final product and here your proposal story.
 

sledge

Ideal_Rock
Premium
Joined
Apr 23, 2018
Messages
5,791
Damn you're good @rockysalamander. I am still digesting all this and have my girl near me so hard to reply. Will try tomorrow. But thank you so much, you freaking rock!
 

bludiva

Ideal_Rock
Premium
Joined
Sep 23, 2017
Messages
3,076
great analysis by RS. i think other than the graduated stones giving it a more rounded look, the rest of the changes in the DK Jversion improve the flow of the ring and wearability. Is it possible to give him a little leeway to make it more cohesive? Or does it need to be an exact copy?

there's also that they may not want to repeat some of the design mistakes of the jared ring that make it clunkier...like the way some tattoo artists will refuse to do certain designs because they don't want people thinking that's the artwork they came up with :lol-2:
 

sledge

Ideal_Rock
Premium
Joined
Apr 23, 2018
Messages
5,791
Massive image to follow because I can't make them smaller. :) Gonna post in a few pieces.

#1. The shank of the ering needs to be more twisted.
The image on the left is your inspo and I aligned a X over it so that the lines meet the center of each channel band. When I took that over to the CAD, you can see that the channel band need to arc more steeply from the center and then level off.

Edited to add. I think this is caused, in part, by the removal of the graduated stones (probably my fault). If you add them back in, that should make this area more similar with the added twisted noted above.

upload_2018-6-1_21-21-59.png

Thank you! I think I am going to use this image and send to DK. And yes, I think removing the graduated stones played into part of this. Also, as @blueMA mentioned, the CAD curves back more as well.


#2. The inspo is rotated more to the viewer than the CAD, so ignore the bottom part. But, the pave diamonds are very sharply angled as compared to the minor dip of the CAD. Orange Arrows.

#3. The pave band begins to arc outward starting at about the third stone up. The CAD has a flat shank. That entire shank should be twisting from the red to the orange arrows. Then, it twist back to the 20 degree tilt by the time that shank crosses the channel band.

upload_2018-6-1_21-41-41.png

Excellent catch. That escaped my eyes, but part of what I think looks very different. Also with the way it twists and rotates, part of the pave band appears to "tuck" under the other pave swirl. I think this makes it look smaller IRL than the CAD.

Also, look at the image below and the blue arrows. I think it's just a visual illusion because the CAD is rotated slightly different than the inspiro picture. But the part of the pave twirl that wraps around the stone appears to be tilting down more. Pretty sure it's just a visual thing, but double checking with you all.

upload_2018-6-1_21-41-41.png

#2 & 3 (cont.). The yellow lines are to show the plane of the table of the ering pave diamond (ignore the wedding band). They twist outward. But, can you see how the last one drops the table plane more quickly to the 20 degree tilt? Basically, the stones take a long distance to twist outward, but twist back to 20 degree tilt over a very short distance.

Edited to Add. The entire paved shank is twisted. By this I mean, imagine you lay your hand level to the ground palm down. Just like if you pretending your hand was a airplane, you would hold your hand flat and rotate at the wrist to turn the plan. That is what this is doing. But, when the stones are very steep at the top. they cheat a bit and the lower part of the shank is not quite fully at the same angle.


upload_2018-6-1_21-49-54.png

Again, I think this is good picture and plan to forward your picture & words as I think you've described it pretty well.


#4. They changed the shanks as you requested at the bottom, but they look to skinny compared to the inspo. The boxes I placed are the same size and angle. So, the wedding band is a bit thinner than the Ering, but not much. Can you run back to Jared alone and ask them to tell you how wide the shank is at the bottom? You can say your worried its too wide for your girl.;)2

upload_2018-6-1_22-0-41.png

Those seem to be the biggies to my eyes. Did I miss something?

I also regretted having them skinny up the bottom. Although I am not certain those red boxes are the skinniest points. I think as the ring hits the bottom of the finger, it gets even more skinny. Either way, I know the way it was done in the revised CAD looked off to me as well.

I still think that wedding band needs some work. I can't pinpoint all the elements, but one thing that looks off to me is I think the tail of the solid piece needs to die into the pave sort of how I tried to show in red.

upload_2018-6-1_21-21-59.png

Also, although I don't like the messy "hand carve" look of the lines in the inspiro, I think the CAD needs some lines to keep the same flow. See the green boxes. You agree?

upload_2018-6-1_21-49-54.png

I’m traveling and can’t draw, but as in the previous reply, elaborate that the left channel band bottom edge is actually slightly above level from the right side’s top edge. Neither the left nor the right side curve back down/up from the top view unlike how it is on the cad. Draw the horizontal line right through the gap area to demonstrate the difference.

Agree, and think that is part of what has it messed up. Overall, I think he is trying to provide a more symmetrical version of the ring and I think part of what my girl likes is that it curves & flows in a non-symmetrical manner.

This is really, really rough but tried to put them side by side.

upload_2018-6-1_21-21-59.2_LI.jpg

Hi Sledge! I have enjoyed following your story from stone to ring. I am so glad you decided to go with David Klass. I am sure you will be happy with the results. If not, (although I am sure you will be happy), he would fix it for you. I would also like to add this for future reference, David is a jeweler who can do excellent repairs. I have found out the hard way that making a beautiful ring and fixing a ring are not the same thing and a jeweler who can make something from scratch may not be able to repair something beautifully as well. David Klass can do both and that is a tremendous find to me.
Also, just a fun aside- David and Brian Gavin were boyhood friends and went to school together in South Africa. Amy shared that fun fact with me the last time I was there. So your ring is a wonderful collaboration all the way around. Can't wait to see the final product and here your proposal story.

I'm glad to hear my journey has brought you some joy. Despite some of the frustrations & challenges I've faced, I have also had a really fun time with all this. People like you make the process bearable and gives me hope when I want to toss in the towel, so thank you very much for the kind words!

Funny about BG and DK being friends. I had no idea. It definitely sounds like I have the right team on my side, am thankful to you and several others who have echoed this to me.


great analysis by RS. i think other than the graduated stones giving it a more rounded look, the rest of the changes in the DK Jversion improve the flow of the ring and wearability. Is it possible to give him a little leeway to make it more cohesive? Or does it need to be an exact copy?

there's also that they may not want to repeat some of the design mistakes of the jared ring that make it clunkier...like the way some tattoo artists will refuse to do certain designs because they don't want people thinking that's the artwork they came up with :lol-2:

LOL, I totally get what you are saying. And I agree, I think he is trying to clean it up some and I am being picky. Unfortunately, if we don't get the swoopy, flowy stuff right I am fearful the future Mrs won't love it. While I want him to improve it, I want to be careful not to take out the stuff that made her love it. That is becoming more tricky than I initially realized.

But I do agree, at some point, I have to say "take the wheel" and let him be the driver. It's not lack of trust in him that concerns me, it's the journey to get to this point and wanting my girl to absolutely LOVE her ring!
 
Be a part of the community Get 3 HCA Results
Top