shape
carat
color
clarity

CAD images from DK

sledge

Ideal_Rock
Premium
Joined
Apr 23, 2018
Messages
5,791
Wow @ellebelle, congrats on the stone upgrade! That is awesome news, and I am sure you are excited!

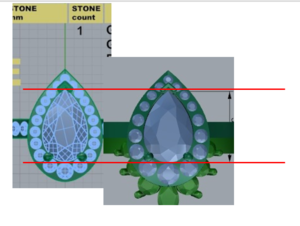
As I mentioned before, I have my own project going with DK right now. I mention this because I had a similar concern/question about the number of stones being used in a pave section and also a channel set section. You are already asking for corrections/clarifications, but maybe this will provide a little reassurance and/or better understanding:
  • Computer diamonds shown in pave section was for presentation purposes only. When they do the actual work they squeeze in as many as possible and feel the space appropriately.
  • On the channel set section, my girl requires a bigger ring size than the inspiration piece and consequently the number of stones had to be altered to keep the proportions of the overall ring.
Because of the drastic changes you have had in size, I think some of these elements may come into play for you as well. They are definitely worth clarifying with Amy, but I think you will be okay.

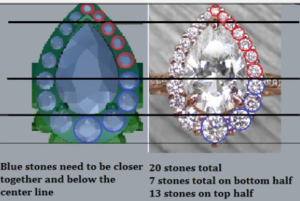
I agree with all your comments on the petal work.
 

ellebelle

Shiny_Rock
Joined
May 23, 2018
Messages
157
@rockysalamander
Is it usual to have holes under the stones on the halo? Because the tips of the flower connect with the underside of the halo. Not sure if it could fit holes too? I don't have stones along the cathedral shank anymore.

Also with closing the curls in the gallery, the way i picture it in my head, I'm afraid it will make the flower look too much like Cinderellas carriage. Lol
@sledge
I've been following your progress since we are both working with Amy, and I confess it makes me a bit jealous when you get CADs and I'm still waiting. I'm on a bit of a time crunch as well. Also I've mentioned you to my bf to show him how lucky he is that I'm designing my own ring! :lol:

Anyway, now I'm nervous that my halo won't turn out right.....
I understand that for normal pave they just use the amount of stones needed to cover the area from point A to point B. But my halo needs to have particular size and placement to achieve the graduated look I'm going for. This is one of the main reasons I went with a custom setting so I'm really particular that this needs to be just right.
Also this CAD is actually the second one since increasing the stone size. The first I didn't post. But somehow bigger center has less halo stones than the original... :think:
 

sledge

Ideal_Rock
Premium
Joined
Apr 23, 2018
Messages
5,791
[USER=101290]@sledge
I've been following your progress since we are both working with Amy, and I confess it makes me a bit jealous when you get CADs and I'm still waiting. I'm on a bit of a time crunch as well. Also I've mentioned you to my bf to show him how lucky he is that I'm designing my own ring! :lol:

Anyway, now I'm nervous that my halo won't turn out right.....
I understand that for normal pave they just use the amount of stones needed to cover the area from point A to point B. But my halo needs to have particular size and placement to achieve the graduated look I'm going for. This is one of the main reasons I went with a custom setting so I'm really particular that this needs to be just right.
Also this CAD is actually the second one since increasing the stone size. The first I didn't post. But somehow bigger center has less halo stones than the original... :think:[/USER]

Awww, I'm sorry hun. Didn't mean to make you feel like less of a priority. I'm not sure your time frame, but have you talked through all those details with Amy yet? If not, then I suggest reaching out to her. When you speak to her again, ask for her cell phone. This was a critical step that helped improve our communication. Calling the main number seemed to take forever.

Also my comments earlier was not meant to dismiss your concern with the stone placement, but to provide reassurance that Amy and her team is looking at more than we see on the CAD's. I absolutely think you should send through what you sketched up so everyone is clear. Just understand the CAD may not ever be 100% right to that perspective and it may change some for the actual size. But the proportions and graduated stone needs to remain to keep your overall design. If you haven't looked at my last version of CAD's please do so. You will see where Amy has picked up graduated stones on the pave and channel set bands. She can and will make it happen for you. ;)2

LOL, and yes, tell your BF he is a lucky guy you are doing all the work. I say that. I've found I do this in all facets of life...taking the road less traveled and much harder than the average Joe. Hopefully it pays dividends in the end when I see her light up with a smile and delight.

One last question -- your w-band looks much different than last time I saw it. Last iteration I saw was it followed the halo and had a fancy stone in the end. I guess you decided to change that?
 

ellebelle

Shiny_Rock
Joined
May 23, 2018
Messages
157
Awww, I'm sorry hun. Didn't mean to make you feel like less of a priority. I'm not sure your time frame, but have you talked through all those details with Amy yet? If not, then I suggest reaching out to her. When you speak to her again, ask for her cell phone. This was a critical step that helped improve our communication. Calling the main number seemed to take forever.

Also my comments earlier was not meant to dismiss your concern with the stone placement, but to provide reassurance that Amy and her team is looking at more than we see on the CAD's. I absolutely think you should send through what you sketched up so everyone is clear. Just understand the CAD may not ever be 100% right to that perspective and it may change some for the actual size. But the proportions and graduated stone needs to remain to keep your overall design. If you haven't looked at my last version of CAD's please do so. You will see where Amy has picked up graduated stones on the pave and channel set bands. She can and will make it happen for you. ;)2

LOL, and yes, tell your BF he is a lucky guy you are doing all the work. I say that. I've found I do this in all facets of life...taking the road less traveled and much harder than the average Joe. Hopefully it pays dividends in the end when I see her light up with a smile and delight.

One last question -- your w-band looks much different than last time I saw it. Last iteration I saw was it followed the halo and had a fancy stone in the end. I guess you decided to change that?

Its not your fault at all, I'm just getting antsy over this project. Feeling alittle bit like I'll always be tweaking the details. I want to have the same excitement as your girl when I see it, but I'm afraid when I wear it I'll only rememeber the stress of the last few weeks...:(
Originally my BF was going propose this weekend but got assigned a business trip so he'll be out til next week. Ideally, I'd like to have the design finalized and ready to cast when he returns on June 27th. So as soon as your ring leaves the bench, mine is next up! :lol:
I too have tendancy to make things alittle complicated than they have to be. When we were originally shopping in the DTLA Jewelry Distict, i turned down hundreds of settings because nothing was excatly what I wanted. The design we've created is basically elements of three settings smashed into one.
Yes we have Amy's cell phone as well. Only had to call her once so far but we've made a few visits into the shop and discussed in person (perks of living 5 miles away) It really helped to get this last CAD. Its almost done but it seems everytime one thing gets fixed, another thing is off...
For the band, this is shape I want (with some tweaks) but I'm still undecided if the marquise will be a diamond or opal inlay. Oh well, got time to think on that one.
 

rockysalamander

Ideal_Rock
Premium
Joined
May 20, 2016
Messages
5,105
@ellebelle

"cindarella's carriage". Now I can't get that image out of my head. LOL. If you are ok with the curls being open than go for it. I have curly, fine hair and could only image the huge amounts of hair I'd lose to open curls in the gallery. I was hesitant to have prongs, at all, on my daily ring. But, DK made them so lovely that almost two years later and not a single hair snagged.

Diamond Count/proportion. I think I see where the difference is coming from. CAD for casting is used to make the metal have the right shape and material to allow you to get to your finished product (after losing about 20% of the metal from forming, buffing and polishing. So, most CAD will not allow you to put a big diamond "on" a prong. You won't have the metal for it. So, it forces you to shift the "big" diamond slight off to the side because it assumes you need to "set" that diamond. But, the reality is that there is enough metal and space due to 3-D metal from below that will be pulled up to make the bead. So, I think you are seeing one of the PITA effects of the CAD.

I think that if they temporarily remove the two lower prongs (or remove the offset rule that you can't set "on" a prong) in the CAD, they can then place the diamonds of the correct size exactly as you want them. Even with that, I think they might need to reduce the size of diamond #3 and then graduate from there (red arrow/yellow fill). They may be able to show you the desired spacing as a rendering not a CAD. Depends on their software.

upload_2018-6-20_18-42-4.png


I also wonder if the change from prong-set pave (inspiration) to bead set pave (your design) may affect the spacing. You might ask.
 

Attachments

  • upload_2018-6-20_18-1-28.png
    upload_2018-6-20_18-1-28.png
    241.6 KB · Views: 10
  • upload_2018-6-20_18-5-23.png
    upload_2018-6-20_18-5-23.png
    248 KB · Views: 14
  • upload_2018-6-20_18-5-56.png
    upload_2018-6-20_18-5-56.png
    248 KB · Views: 8

rockysalamander

Ideal_Rock
Premium
Joined
May 20, 2016
Messages
5,105
I think you have this detail sorted, but I played with making the upper curl a bit taller and skinnier to pull the lower curl up the shank. That gave some room to curve the join with the shank in complimentary way.

upload_2018-6-21_17-12-20.png
 

Attachments

  • upload_2018-6-21_17-8-37.png
    upload_2018-6-21_17-8-37.png
    394.3 KB · Views: 8

ellebelle

Shiny_Rock
Joined
May 23, 2018
Messages
157
@rockysalamander That looks great and I incorporated some of it into my notes to Amy this afternoon. I got a new CAD last night, and sadly alot of the details were still off. This curl wasn't even adjusted at all! And the smaller curl was lengthen in a strange way.

Feeling really defeated that its never going to be just right. Is it always so difficult to design a custom setting? I know mine had the add complication of changing the stone size but I keep giving notes on the same areas and nothing changes or doesn't change the way I asked for. I thought it would be fun designing a ring but its just making me sad maybe it won't be right at the end...
 

rockysalamander

Ideal_Rock
Premium
Joined
May 20, 2016
Messages
5,105
@rockysalamander That looks great and I incorporated some of it into my notes to Amy this afternoon. I got a new CAD last night, and sadly alot of the details were still off. This curl wasn't even adjusted at all! And the smaller curl was lengthen in a strange way.

Feeling really defeated that its never going to be just right. Is it always so difficult to design a custom setting? I know mine had the add complication of changing the stone size but I keep giving notes on the same areas and nothing changes or doesn't change the way I asked for. I thought it would be fun designing a ring but its just making me sad maybe it won't be right at the end...

I think there is a point in every custom project where you feel defeated or ready to run away. Hang in there. I would tell Amy how you are feeling and that you really finding it frustrating. But, I don't think you can count the time before you changed the diamond in your frustration quotient. ;)2 My last custom project took a month of sketches, 4 CADS and a lot of explanations....and it was way simplier.

In a single clear email, in as few words possible make the "big" changes.

1) Can they assure you that your halo will have the same number of stones and in the same locations relative to the below guide lines (i.e., 3 just about below the purple, 2 between the purple and yellow, and just about 5 between yellow and orange and 3 above the orange? If they email assure you on this, then I'd personally be satisfied given the PITA issue with CAD and the prongs.
2) The pear halo will be centered over the shank as show in your inspo below, just a little raised from the center of the yellow line (correct as you like... ). Again, looking for assurance as to the final product since they are not showing rendering, they are showing CAD.
upload_2018-6-21_22-3-37.png

3) The pave in the halo will be bead set and look like the DBL halo to the extent possible with the graduated stones. Looking for assurance as to the final product since they are not showing rendering, they are showing CAD.
4) Once finished, there will be a visible 'faux bezel' like the DBL setting. Your pear center will be entirely interior to the inner rim of the metal rim such that you can see the entire perimeter of the inner bezel. The pear center will not overlap that inner bezel, but be entirely contained within it visually. Again, looking for assurance as to the final product since they are not showing rendering, they are showing CAD.
upload_2018-6-21_22-6-20.png

If they can provide you this assure in writing, then I'd mark those as done. When you approve the CAD, you say "I approve this CAD dated X with the details described in your email dated Y, pasted below for your convenience."

That leaves the gallery, right? I can't understand your drawing of the petal center with rounded and V. If you like the 6/7 gallery, just say, I want the petals to be exactly like the 6/7 model with the addition of the lower curl . Is that possible? Can you show that in the CAD? Then, focus on that area of the design. {don't yet ask for the change here, you want a solid CAD to work off first}.

Did I miss something?
 

Attachments

  • upload_2018-6-21_21-56-37.png
    upload_2018-6-21_21-56-37.png
    227.3 KB · Views: 8

ellebelle

Shiny_Rock
Joined
May 23, 2018
Messages
157
Alright, thank you for the reassurance, @rockysalamander. Hopefully only one or two more CADs. I sent in notes tonight so after the next CAD hopefully we'll be closer and I can focus the "big" issues you've laid out.
 

sledge

Ideal_Rock
Premium
Joined
Apr 23, 2018
Messages
5,791
I think @rockysalamander did a great job covering the main points. I just wanted to offer some encouragement. I had a similar moment in my own journey. As suggested, I tried to really throw together detailed, yet simple, emails with issues clearly identified and good sketches. Additionally Amy and I started verbally discussing more items, which sped up the process and ensured we got stuff covered that just wasn't coming through on the CAD.

In particular, what hit home is the deal with your "faux bezel". On my girl's ring, there are two swirls that create a halo of sorts. When she saw the inspiro she was very specific that she liked how a smaller diamond fit in it because there was no overlap onto the "halo" melee and had a tiny gap between the stone and melee. Of course, the stone I had already purchased was larger and although I considered swapping the stone, I ultimately decided to make sure the setting got adjusted to the stone instead. Amy and I talked about this at extent and she assured me she nailed this and it would be perfect despite the CAD rendering we had.

Also, when she created the wax mold, there was a detail where the ring twisted & curved to create a gap where you could see skin underneath. Previously this had been a struggle. And even the revised CAD appeared to have caught it but left doubt. Amy reassured me. Then the wax mold confirmed it was done perfectly.

These are just a few items that was a turning point in my own project that restored my faith. So definitely send a new email. Be honest about what is going on, but respectful. Be open to more phone & text communication and I think you will see a vast improvement. Soon we will be reading about your perfect CAD, wax molds, casting and the finished product. Head up girl, you got this! :cool2:
 

rockysalamander

Ideal_Rock
Premium
Joined
May 20, 2016
Messages
5,105
Hey there! Any update?
 

ellebelle

Shiny_Rock
Joined
May 23, 2018
Messages
157
Should be getting my new CAD today! :whistle:
 

ellebelle

Shiny_Rock
Joined
May 23, 2018
Messages
157
Alright, here it is! I got it as soon as I got home from work! I actually really like it! I think I'm ready to get a wax model of this one. There's just two small things that I'm not sure. I don't know of I'm being too picky at this point, or if these should be adjusted before the wax model?
Concerns:
1. The halo is looking alot better with graduation and stone size but still little wide to me. In the last revision, I asked her to make the upper half with smaller stones and thin down the width. Stones are definately smaller, but width is the same I think. Not even sure if it can be thinner with the way it graduates? Maybe the bottom half needs to be sized down alittle?
2. Should the curl be lower alittle so that the flower sits on top of it? This verison is curlier which I like but the curl seems to be coming out of the middle of the petal.
1529980702944_44891-QUAD.jpg
 

ellebelle

Shiny_Rock
Joined
May 23, 2018
Messages
157
Ok, I think this is the final CAD! Bottom half of halo reduced alittle and I really like it. I mentioned to Amy slightly changing the filagree but i dont see any difference..
1530122549154_44891-QUAD.jpg

Any last details before I sign off on the wax model?
 

sledge

Ideal_Rock
Premium
Joined
Apr 23, 2018
Messages
5,791
Not sure any of this makes it "better", but just asking before you get into production...

1. I like the graduating halo, but it feels out of whack to me on the upper portion. IMO, it needs to thin out and blend back to the lower half better. Or maybe it's just the effects of a CAD drawing? Either way, it just looks looks off to me. Your thoughts? Drawing below is very crude but represents the point I was trying to make.

1530122549154_44891-QUAD - Copy (2).jpg

2. Assuming you make any changes as noted in #1 above, then you probably need to redefine the center line which you want the ring to set. As shown below, the green line is the center of the ring and is aligned to the center of the halo. The orange line signifies the approximate center of the main stone. Because the top of the halo is so much bigger as noted in #1, it really throws off the look in the side profile.

1530122549154_44891-QUAD - Copy.jpg

3. Was you going to take advantage of @rockysalamander's comments about smoothing out the transition where the swirls meet the shank? Right now it's closer to a 90* angle. I think it actually meets the inspiration piece fairly close in that regards, but previous conversations led me to believe you wanted that smoothed out more, similar to how I've marked up below.

1530122549154_44891-QUAD.jpg
 

ellebelle

Shiny_Rock
Joined
May 23, 2018
Messages
157
@sledge Yeah the halo still feels alittle off to me too, so you're just confirming my suspicions. Guess I was yoo eager to get the model done already!

1. I've been asking her to reduce the width of the overall halo but it only reduced by 0.5mm since the last CAD. I think if these 6 stones were reduced proportionally (to keep the graduation effect) it would help...
20180627_125053.png
2. Ive tried adjusted the location of the band relative to the halo before but it seems useless until the halo is 100% finalized in shape. I get what you're saying and once the shape is down I'll see if this move is needed.
3. You're right on both accounts, this matches the inspiration and orginally I thought I wanted a smoothed out transition. But I actually this positioning now and I feel like it looks more intentional. I'm hoping it will be increase the stregth of the connection between the two metals. Does that make sense?

4. The detail with the filagree I was still looking for was to have the curls on each side be connected and visible under the flower. Like this...
20180627_125124.jpg
 

sledge

Ideal_Rock
Premium
Joined
Apr 23, 2018
Messages
5,791
@sledge Yeah the halo still feels alittle off to me too, so you're just confirming my suspicions. Guess I was yoo eager to get the model done already!

1. I've been asking her to reduce the width of the overall halo but it only reduced by 0.5mm since the last CAD. I think if these 6 stones were reduced proportionally (to keep the graduation effect) it would help...
20180627_125053.png

Agree the 6 stones you circled need shrunk, but so does the big one at the top. It is actually controlling the width/thickness of that upper portion. Reducing it will allow you shrink the top as I sketched up in my original comment.

2. Ive tried adjusted the location of the band relative to the halo before but it seems useless until the halo is 100% finalized in shape. I get what you're saying and once the shape is down I'll see if this move is needed.

I agree. Until the halo is nailed down, it does you little good to keep moving it. However, I would ask Amy what is more common and why it's common. If it's preference or some other structural or comfort thing. I could see how the ring might feel off balanced if more weight is on one side vs the other. Or that could just be me way over analyzing things and being too nit picky. :lol:


3. You're right on both accounts, this matches the inspiration and orginally I thought I wanted a smoothed out transition. But I actually this positioning now and I feel like it looks more intentional. I'm hoping it will be increase the stregth of the connection between the two metals. Does that make sense?

I actually prefer the look how it is now too. I almost didn't include this comment & sketch because in my head it provides a lip for the filagrees to "land on" and be supported. In reality, I doubt it provides much structural integrity but I liked it for that reasoning nonetheless.


4. The detail with the filagree I was still looking for was to have the curls on each side be connected and visible under the flower. Like this...
20180627_125124.jpg

I see what you are saying. Not sure I have a preference. I can see how both would look good. One thing to keep in mind though. If you decide to put the filagree underneath the petals, you will need to raise the overall height of the ring. Notice the red circle that your blue line is drawn under? That circle represents your ring size and where your finger will go. So you have to get the filagree to fit ABOVE the red circle line. The only way to do that is to raise the ring by whatever thickness that filagree is. See the sketch below. Not saying the filagree is actually 1.50mm, but if it is then that is how much you'd need to raise it.

20180627_125124.jpg
 

sledge

Ideal_Rock
Premium
Joined
Apr 23, 2018
Messages
5,791

BlingDreams

Ideal_Rock
Premium
Joined
Jul 12, 2015
Messages
2,289
FYI, while reading through another thread I stumbled on a custom ring build by @ILikeShiny. What I really liked was how she incorporated a monogram of her (now) husband's last name and her maiden name (M & W). Not saying this works in your scenario, but I absolutely loved this element and thought it screamed totally custom one of a kind that had significant meaning.

https://www.pricescope.com/communit...ose-my-cads-wax-and-off-to-production.231834/

FullSizeRender 2.jpg
IMG_2346.jpg
Thanks for the mention Sledge. We love that element of my ring too :kiss2:. I even had that monogram embroidered on the “Mrs Box” we used to hold our wedding rings :mrgreen2:
 

Attachments

  • CF8CF447-9639-46BD-BC66-CCE77E6846CE.jpeg
    CF8CF447-9639-46BD-BC66-CCE77E6846CE.jpeg
    255.9 KB · Views: 7

msop04

Super_Ideal_Rock
Premium
Joined
Dec 3, 2011
Messages
10,051

I don't have anything to add, other than I love this style and the curved nesting bands are sooo cute! Do you mind sharing which vendor made this nesting band or where this photo came from??
 

ellebelle

Shiny_Rock
Joined
May 23, 2018
Messages
157
Just heard back from Amy...
Shes going to adjust the gallery(Which I understand will raise the height, hopefully not too much). But she doesn't want to change the halo until I see the model. She says the cad looks bulkier than in real life..

@msop04 I found that image on pinterest but here's a link back to the original item:
https://www.localeclectic.com/produ...-button-0dab3444d-49a5-4796-9981-5a530759cf64

@sledge @ILikeShiny
The monogram on that ring is so beautiful and thoughful! I love that!
A little storytime on my design, the flower detail is a six petaled white gold flower to represent a white jasmine flower, the national flower of my BF's home country of Indonesia. The center stone is a garnet for his birthstone and my weddong band might have a little Australian opal to represent his upbringing in AUS. His band will also be done by Amy in matching white and rose gold and will incorporate a batik pattern, another symbol of Indonesia.
 

sledge

Ideal_Rock
Premium
Joined
Apr 23, 2018
Messages
5,791
Wow that is so awesome all the meaningful things you designed into your ring. I had no idea but love hearing the backstory. Thank you for sharing with us!

I'm sure Amy is correct about the halo being bulky in the CAD. For me I think the issue is the proportions of the upper half don't compliment the lower half. As silly as it sounds everytime I look at it I see that silly alien head image. When the proportions are right I don't see that image.

But in fairness she designs for a living and I'm a nobody in comparison. I do hope she's right.

Can't wait to see the plastic model. Be sure to show us pics!
 

ellebelle

Shiny_Rock
Joined
May 23, 2018
Messages
157
@sledge I know, I struggle between being picking over details vs. taking her advice as a knowlegable jeweler. I'm still concerned about the halo and will be looking at the plastic model closely. I feel like the halo got out of control when the stone count/ proportion was off and now it needs to be scaled down alittle. I like dainty halos and I think we need to work back towards that
 

ellebelle

Shiny_Rock
Joined
May 23, 2018
Messages
157
@sledge Also, now I cant "unsee" the alien face! :lol-2:
Now I definitely have to get the proportions back in shape. More teardrop, less alien face!
 

sledge

Ideal_Rock
Premium
Joined
Apr 23, 2018
Messages
5,791
LOL, I'm so sorry. Should have kept my mouth shut. Just it was driving me bonkers, and I'd hate you to spend all that time & money and then yourself or someone else point it out. :confused2:
 

ellebelle

Shiny_Rock
Joined
May 23, 2018
Messages
157
It was bothering me too but the way you discribed it was spot on. I kept saying it was too wide or too heavy at the end. Its just I've gone through so many CADs and was feeling like this was as close as it was gonna get and I'm being obnoxiously picky.... now I know I'm not the only one feeling off about it.
 

meely

Brilliant_Rock
Premium
Joined
Jan 2, 2014
Messages
1,859
I think it's way too graduated and there needs to be a lot less difference between the smallest and largest of the halo stones :(2
I wonder if it's possible to do that whilst retaining the graduation maybe someone could measure the difference between each stone.
 

ellebelle

Shiny_Rock
Joined
May 23, 2018
Messages
157
Yeah I think they need to be scaled down first and then figure out the gradient. Hopefully if they are reduced proportionately it will work out. *fingers crossed*
 

sledge

Ideal_Rock
Premium
Joined
Apr 23, 2018
Messages
5,791
1. I like the graduating halo, but it feels out of whack to me on the upper portion. IMO, it needs to thin out and blend back to the lower half better. Or maybe it's just the effects of a CAD drawing? Either way, it just looks looks off to me. Your thoughts? Drawing below is very crude but represents the point I was trying to make.

1530122549154_44891-QUAD - Copy (2).jpg

Keeping the graduating stones, but making the proportions match better was exactly what I was trying to show in my above comments & sketch. I know the sketch is horrible, but it should illustrate the point to Amy.

Now that I know we are seeing the same things, I personally don't think you will be happy with a plastic model based on that last CAD. But it sounds like Amy has probably already made it and it's likely in shipping.

So before you open the package, take a deep breath. Brace yourself for the fact it will be a green chunky piece of plastic that isn't cleaned up very well and will need a little work. For me, this felt like a low point. But the good news is it allowed me to better see what needed corrected and I was able to articulate that and shortly after we were moving into production.

There is light at the end of the tunnel. Don't give up yet! Remember to be strong and know that even if you are being picky, that is your prerogative as it's a custom build that is all about you. :cool2:
 

ellebelle

Shiny_Rock
Joined
May 23, 2018
Messages
157
Im actually picking up the model from Amy herself and will be able to see the model with my stone placed in it! Hopefully I can address these issues face to face with her and really get it dialed in. No more alien face! 20180628_105825.png
 
Be a part of the community Get 3 HCA Results
Top