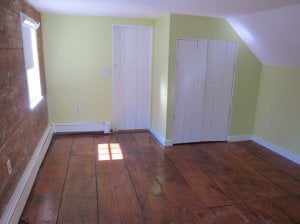
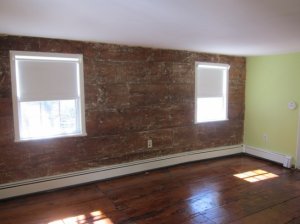
shape
carat
color
clarity

Wood wall has me stumped (har!)--need help!

Haven

Super_Ideal_Rock
Joined
Feb 15, 2007
Messages
13,166
I'm hopeless when it comes to paint colors and things like this, but I just had to pop in and say I'm doing the happy dance about you prepping a future nursery, NEL!
 

swimmer

Ideal_Rock
Joined
Nov 9, 2007
Messages
2,516
ha ha, you are waiting for your stripper!
 

Jen_91909

Shiny_Rock
Joined
Apr 24, 2009
Messages
185
Hi NEL, I don't post frequently but wanted to pop in and let you know that I stripped paint off of a stone fireplace a few years back using SoyGel and it worked beautifully. I was worried it wouldn't be as strong as the more "toxic" stuff, but it really was great. I hope you have similar results!
 

Haven

Super_Ideal_Rock
Joined
Feb 15, 2007
Messages
13,166
swimmer|1301962098|2887880 said:
ha ha, you are waiting for your stripper!
:bigsmile:
 

House Cat

Ideal_Rock
Premium
Joined
Feb 22, 2009
Messages
4,602
I love the direction you are taking with this room! Is it too early to put in a vote for a crystal chandelier? A little refined glitz would be perfect in this room IMHO.
 

lliang_chi

Ideal_Rock
Joined
Mar 13, 2008
Messages
3,740
Ooooh, Housecat you are such a glam girl I *love* it. Now I wanna have a chandelier!!! :)

NEL, hope the stripping (tee hee) goes well. You should update this thread with the apple green color you added to the walls!
 

NewEnglandLady

Ideal_Rock
Joined
Jul 27, 2007
Messages
6,299
My stripper has arrived :naughty:

Jen, I'm glad to hear the SoyGel worked well for you! I'm eager to get started now that I have the stripper. Just curious, how long did you leave it on? And how much did you end up using? I only ordered a gallon and now I'm afraid it's not enough...I guess I'll find out soon.

House Cat, can I just tell you how much I love the idea of a chandelier if we had a girl? I think it would work so well with this whole black/white toile and gingham idea I have in my head. The problem is that we'd have to rewire for ceiling lighting. In typical antique fashion, our house has very, very few ceiling lights--it's mostly wall sconces and lamps.

LC, I'm going to update this thread this weekend (hopefully) with the finished wall. My goal is to start tonight and have it done by tomorrow night. If I think the green is too bright, I may be repainting this Sunday :)
 

lliang_chi

Ideal_Rock
Joined
Mar 13, 2008
Messages
3,740
How about crystal wall scones? Love it! Can't wait to see the pictures.
 

Dreamer_D

Super_Ideal_Rock
Joined
Dec 16, 2007
Messages
25,505
You can always rewire a chandellier so it has a long cord, then hang it where you want, swag the cord to a corner and plug it in. Depending on its location, it looks cool sometimes like that!
 

PilsnPinkysMom

Brilliant_Rock
Joined
Oct 11, 2008
Messages
1,878
PSA: I'm about to threadjack (if NEL will take my bait, anyway :cheeky: )

NEL: I'm so intrigued by your old, antique house (and a weeee bit jealous!) Some of this info may be in the House Hunters thread, but how much do you know about its history? Have you posted any other interior photos? I'm dying to see more of it... though I understand if, for privacy reasons, you'd rather not post. I've you've already shared glamour shots, can you direct me to 'em? Please?! :naughty:
 

NewEnglandLady

Ideal_Rock
Joined
Jul 27, 2007
Messages
6,299
Dreamer and LC--you both have good ideas--I know I'm going to work some crystal lighting in somehow if we have a girl. I'm not a very girly girl (so the room won't be pink), but being a PSer, I can't resist all things shiny/sparkly.

PnPsMom, I've been piecing together the history of this house over the past several months. I still have more research to do at the historic society, but I've been going between two historic societies because when our house was built, it was actually in the neighboring town.

The house is listed by the town as being built in 1775, but that is an estimate--I think what happened is that they dated the house between 1750 and 1800 and split the estimate down the middle. I spent a few hours at the courthouse printing all of the old deeds, but they only go back to the 1800's (when the original property was split). The first deed refers to a house sitting on the property--this house--but there is no date given as to how long it had been there. There is one map from the early 1800's that shows our house, but I can't find a map from the 18th century that shows the town by house/land. Each historic society keeps pointing me in the direction of the other.

I've bought several books about antique architecture and using that, I do think the estimate of 1750 to 1800 is accurate. I pulled some nails from the rafters and they are all hand-cut, so I'm positive it's an 18th century house. The fireboxes, kitchen ceiling beams and the roof rafters validate that estimate. The doors, which are more federal in style, make me think it may have been built around 1780 - 1790, but there is no way to tell. Center-chimney capes (which is what we have) on our street date from the 1680's to 1760, so if our house was built after 1760, it's the newest center-chimney cape on the street.

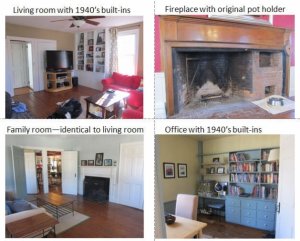
I think there was a small addition (an ell) built soon after the original house was built...probably early 1800's. The house was obviously modernized in the 1940's or possibly 1950's. The owners at that time put in modern heat, built one dormer in a bedroom upstairs and created several built-ins. I actually think they did a good job of updating it without making it too modern.

The last owners built a huge addition (garage, master suite, mudroom, modern staircase, laundry room) and updated the kitchen and baths. They didn't do an awful job, but they definitely stripped the house of some charm, so we'll be redoing some of that work at some point.

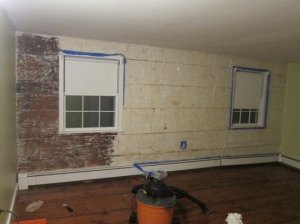
There are pictures here and there of the house. The pics on the House Hunters thread ([URL='https://www.pricescope.com/community/threads/the-house-hunters-thread.124473/page-42']https://www.pricescope.com/community/threads/the-house-hunters-thread.124473/page-42[/URL]) on page 42 mostly show the master bedroom, which I painted when we moved in. I'll attach a few pics below starting with an update on the wood wall, which is covered in saran wrap and should be ready to strip tonight!

Sorry for the long post!

Upstairs.jpg

Downstairs.jpg

Exterior.jpg

nurserybaking.jpg
 

NewEnglandLady

Ideal_Rock
Joined
Jul 27, 2007
Messages
6,299
This wall was a PITA.

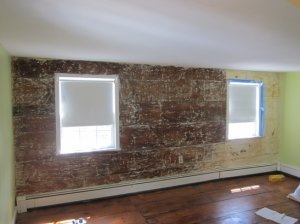
I'm done. For the most part. I still need to paint the trimming, but I'm going to tackle it next weekend because I'm so sick of looking at this wall that I can't even think of doing it this evening.

All in all, this wall took about 15 hours to strip. Not awful, but enough for me to not want to ever strip paint again. Plus it was a complete mess. I should have taken pictures of the mess instead of cleaning up before photos.

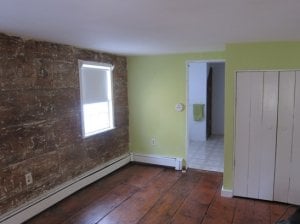
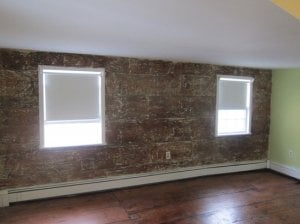
I don't think the final product would be very many peoples' cup of tea--it definitely does not look polished. But I have to admit I really love it. I still don't know if it was worth all of the work, but I'm happy with the final product. I just wanted to post a few final pics since y'all have been helpful through this process. I'm just glad the worst of it is over!

nursery10.jpg

nursery9.jpg

nursery8.jpg

nursery7.jpg
 

lliang_chi

Ideal_Rock
Joined
Mar 13, 2008
Messages
3,740
Man, that so looks like a PITA. I stripped a garage door before and I'd never want to do it again!

What else are you planning on doing with the wall? Are you going to leave it a little bit rough? Are you going to poly it? I like it. And man, you have some patience, lady.
 

NewEnglandLady

Ideal_Rock
Joined
Jul 27, 2007
Messages
6,299
If I'd known it was going to be this big of a pain, I probably would have left it, haha. The only thing I'm going to do to it is put some Tung oil on it. We have some in the basement because all of our floors have Tung oil, but I just don't have the willpower to do it today. D doesn't know if he likes it or not and D's dad said "NEL, that wall looks like sh*t", but I'm sticking to my guns and keeping it!

LC, I'm keeping my fingers crossed that your "office" isn't as big of a pain!
 

Dreamer_D

Super_Ideal_Rock
Joined
Dec 16, 2007
Messages
25,505
I like the wall! You know what could do a long way? Get a hand sander and then poly it after. I say this because this really helped the table I stripped. The sanding gave it a sort of white washed look, which was accentuated by the poly coat. You could even consider creating a white wash in the poly, by adding a little white paint to it. I think it would look cool, but you'd want to test it a little first.

At the least I'd ge tthe sander out to give it a nice even finish.
 

lliang_chi

Ideal_Rock
Joined
Mar 13, 2008
Messages
3,740
NEL, that's HILARIOUS!!! I got some teak planter boxes and table for my sister's roof deck (she and her BF had just moved in). He was totally anal about sanding down the table etc, and Sissy and I were doing the planter boxes. We left it "kinda rough" like you did for you wall. Sis's BF's reaction? "Those boxes look like sh!t" :lol:

A suggestion? How about dry brushing some white color on it, so it'll look like the white is there "on purpose". Here's a link from design*sponge for the technique on furniture, but don't see why the same thing can't work for your wall.

http://www.designspongeonline.com/2010/10/before-and-after-basics-dry-brush-painting.html


And no, the office is not as big of a pain. I still didn't box up my books, but got the sign off from DH about doing the ceiling trimmed shelving. Then it's paint. I'm having second thoughts about the color, I think it's too dark... We'll see.
 

NewEnglandLady

Ideal_Rock
Joined
Jul 27, 2007
Messages
6,299
You ladies have some good ideas! I do have a sander, so that is an option, Dreamer. I also like the brush technique in that blog, LC, in fact I was just reading a similar "whitewash" technique in a book recently and liked it. I'm going to step away from it for a week and rethink my options next weekend. I feel like I need a breather from it so I can look at it with fresh eyes.

And LC, hilarious about the teak boxes. And I'm sure the office will move fast once you get started--you have lots o' time!
 

Dreamer_D

Super_Ideal_Rock
Joined
Dec 16, 2007
Messages
25,505
I found that the sanding really made all the difference because it got rid of any bumps from the left over paint, and it sort of blended the color that was left into the surrounding wood. The effect was really pretty, and very subtle. You can always try a small corner and see how you like it. Same with the dry brush, you can always try a corner and remove it if it is not your taste.
 

Jennifer W

Brilliant_Rock
Trade
Joined
Jun 18, 2010
Messages
1,958
I would take the sander over it too - I'd start with a coarser grade sandpaper, then a medium, then finish with cabinet grade (or use cabinet wool, if you can stand the idea of going over it by hand). You're bringing back vivid (horribly vivid) memories of my stair case stripping. I think I had post-traumatic stress disorder from that one...

You've done a fantastic job, and I KNOW it wasn't easy. To say it looks like sh*t is just unhelpful, in the way that only an in-law can truly achieve. Don't you listen! ;))
 

MuffDog

Shiny_Rock
Joined
Jan 2, 2011
Messages
441
I think it looks INCREDIBLE! once you paint the rest of the room you will be SO happy you put in that work!

Good stuff - absolutely worth the effort!
 

stylish1

Rough_Rock
Joined
Mar 21, 2011
Messages
28
Just an idea after you do the walls. My wife builds puzzles like 1000 peice puzzles and when they are done, I glue them together and mount them as pictures on the wall. Actually they look pretty good and are easy to hang. At first glance they have a texture because of the peices all together. they are unique to look at and are easily moved around. An idea.
 

NewEnglandLady

Ideal_Rock
Joined
Jul 27, 2007
Messages
6,299
Thanks again, all. I was so intrigued by the sanding idea that I couldn't wait until this weekend to try it. I used 60-grit paper and sanded a 4-foot section...I really liked the final product. The wood on the wall has a pretty heavy grain, so there is still going to be quite a bit of white left in the grain, but it still blends better than before I sanded. I was mostly worried about losing the patina of the wall by sanding it, but whatever, I lost patina with the chemical peeler, anyway.

Once I'm done going over the wall with the 60-grit, I'm going to go back over it with 100-grit, but because the wall is so rough to begin with, I don't need to make the finish very fine. I wasn't planning on posting any more pics because this thread has been so self-indulgent, but I might post one more after I've sanded it down, painted the trim and oiled the wall.
 

janinegirly

Ideal_Rock
Joined
Sep 21, 2006
Messages
3,689
NEL: Wow, when you put your mind to something, it gets DONE! Please keep posting pictures, this is your thread and we're all following ;-).

My parents have an antique house too (huge fireplaces in every room, no overhead lighting,etc). It is fascinating but never straightforward when it comes to maintenance. No one on my side is handy though, at all. I think the wall (presanding pics) looks much better than before with that weird white paint, so based on that alone you've accomplished alot!
 

partgypsy

Ideal_Rock
Premium
Joined
Nov 7, 2004
Messages
6,628
Nel I think it looks Great! But I'm someone who likes things a little rustic or as we say around our house, wabi sabi.
 

somethingshiny

Ideal_Rock
Joined
Jul 22, 2007
Messages
6,746
NEL~ Good job! I'd take a sander to it, too. I just like a more even appearance. But, it is definitely a rustic chic kinda feel.

Jen~ OMG, you brought back horrid memories of me stripping a staircase at my brothers house. Oh the horror. Worst days of my life. Never again. And, he didn't even like it when I was done. Said the wood was too light, and PAINTED it. jerk
 

NewEnglandLady

Ideal_Rock
Joined
Jul 27, 2007
Messages
6,299
I spent a few hours sanding and really liked the finished product--there is still some white, but only the white that is deep in the grains and I like it like that. I touched up some paint yesterday, am plannning on touching up more tonight as well as washing the wall down so all the sawdust is gone before putting Tung oil on it this weekend. I'm hoping I can paint the trim on Sunday and be DONE! I promise pics of the final product.
 

Dreamer_D

Super_Ideal_Rock
Joined
Dec 16, 2007
Messages
25,505
NewEnglandLady|1302816147|2896256 said:
I spent a few hours sanding and really liked the finished product--there is still some white, but only the white that is deep in the grains and I like it like that. I touched up some paint yesterday, am plannning on touching up more tonight as well as washing the wall down so all the sawdust is gone before putting Tung oil on it this weekend. I'm hoping I can paint the trim on Sunday and be DONE! I promise pics of the final product.

Yes! This is exactly what I likes so much about sanding my stripped table -- the paint was still in the nicks and scratches, and a little in the grain (it is maple so not much grain) and it really made it look great.

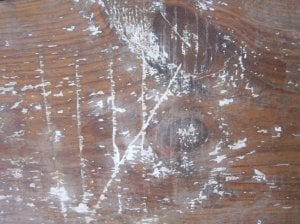
Please do post photos! All of our threads on PS are self-indulgent, so indulge away, you have a captive and interested audience. I would really like to see some close ups that show the grain and the effect of the remaining paint.

You are like me, NEL, a hellion on fire to finish a project once started. Do it now, and any other ones, because once you have kids it becomes so hard to have that single minded focus to finish anything. It is hard to paint a room in 1 hour bursts whe na kid naps, ya know? That is why out house remained unpainted for a year until we hired people :rolleyes: Pre kiddo, I would have painted the whole darn thing myself in a week.
 

NewEnglandLady

Ideal_Rock
Joined
Jul 27, 2007
Messages
6,299
Oh yes, Dreamer, once the seed is planted in my mind, I become obsessive. Actually, D calls it obsessive, I just say I'm "motivated".

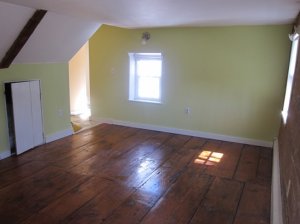
I'm DONE! I just took down the tape from painting the trim this morning. I ended up putting Tung oil on the floors because some of the stripping agent got on the floors, so that took more time than I anticipated. I do have a little bit of touching up to do on the floors, but it's very minor. In any case, here is the final product and one shot that is a close-up of the grain for Miss Dreamer.

nursery12.jpg

nursery14.jpg

nursery13.jpg

nursery11.jpg
 

Dreamer_D

Super_Ideal_Rock
Joined
Dec 16, 2007
Messages
25,505
Love it! The sanding changed the appearance subtly and it works. I bet it is even more noticable in person.

What does everyone else think now? You had some cay sayers ::)
 
Be a part of the community Get 3 HCA Results
Top