shape
carat
color
clarity

Visualizing roundness and table percentage issues

Status
Not open for further replies. Please create a new topic or request for this thread to be opened.

oldminer

Ideal_Rock
Trade
Joined
Sep 3, 2000
Messages
6,745

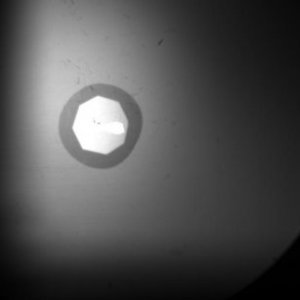
This is the image of an actual diamond that I own. It is not perfectly round, as you can readily see by the dark outer outline, and even has a bit of a flat spot on one side, as you can see in the photo of it taken from the top view. It is not an exceptional diamond or a super fine stone, but it is a regular, commercial cut diamond. When measures of diameter are taken with this top view one can see indentations or flat places clearly. If one was to ask for a 3D model of this stone in one of the drawing programs generated from a Sarin, Ogi, or Helium device, would the rendering in 3D handle this correctly? Since the side view approach taken by the devices mentioned is what is utilized and not a top view, the flat spot is far less likely to be exactly detected. These devices do not take an infinite number of views, but only every few degrees. Who is to say if a flat was exactly viewed or a bit of the curved part ahead or behind the flat spot was measured?


We believe this diamond is an excellent example of a basic problem with using a side image for obtaining correct diameter and correct table measures. The side view may get the maximum diameter most of the time, but it may fail to determine the actual minimum diameter a great deal of the time. The minimum diameter will be over-estimated most of the time.


When one over-estimates the minimum diameter, the average diameter is also increased. Following that error, a subsequent error then occurs. The table percentage calculation for a 3D model or a grading report then becomes a smaller percentage than the actual percentage. Any ray tracing calculation would also skewed from these combined errors.


Going further, the question arises how does this side view method do the job with table measurement? A table has 8 flat sides and 8 points (junctions). Table diameter is measured from one point to its opposite point. In effect, it is four maximum table widths. In the failure to exactly be able to visualize the flat sides there is a corresponding inability to be certain the maximum widths of the table (the opposite points) are equidistant from the lens when the measure is taken. Therefore, the table measure may often be underestimated. This leads to a second reason for underestimating the correct table percentage.


ImaGem was been asked why its reported table percentages are somewhat larger than other methods. This should clear the air on that topic. The side view method does not consistently see the minimum diameter nor the maximum table width.


What should be of even greater concern than a percent or two in table diameter or a tenths or two mm difference in minimum, maximum and average diameter, is what seems an unscientific, more or less blind, acceptance of the improper measures in creation of light handling models. Substantial error in measurements will result in flawed calculation of light performance. There is no way around this fact when using a side view.


Going into the future, how will a side view ever measure the cleft of a diamond such as found in a heart shape? This is even more of a problem than just a flat spot on a round shape. Any out of roundness that actually indents cannot be viewed from a side view at all. A flat spot may only be correctly measured occasionally, but not with the consistency one would expect of such high cost devices.


Without an ability to model such common diamonds correctly, how can we just rely on the calculation of light performance? A flat or an indenting diamond cut defect is far more noticeable than any yawed facet might be, and it seems logical it must create a light return issue of greater magnitude, too.


Has anyone addressed this issue in some way that I have missed? Are there any comments?

S16_92505.jpg
 
Dave,
Man I told myself i was gonna take it easier on you but then you go and post this.
Why is it that people that have no clue what helium can do keep attacking it for their own gain?
Did you even bother to find out what it can do?
Serg has proven it can measure indented naturals bigger than 100 microns so you think it will miss a big flat?
No machine is perfect dont get me wrong there but sheesh.

So some measurement s dont agree with other scanners prove yours is right by other means of measuring not by goundless attacks.

sheesh what is wrong with people lately???
 
It isn't "groundless". Let a response from someone doing this work give a good answer rather than attacking me. That approach won't work as well as a meaningful response, although you have made me as careful as I can be when I ask a question. I do thank you for that.

How many flat sided diamonds have YOU measured with a Sarin or Ogi? I own both devices. Which ones do you have? The guys here are all adults and each can answer or ignore a question if they choose to. I'm no bully, but I'm not afraid of one, either. You obviously did not like the question, so forget about it. That's a good option and pretty friendly, too.

"Serg has proven it can measure indented naturals bigger than 100 microns so you think it will miss a big flat?"

Is 95, 85, or 65 microns not a significant error that nothing will be altered in the overall? What is the advertised error of Sarin, Ogi or Helium? Helium is far superior to the other two, but what is an acceptable degree of error when creating a lighting model or 3D digital image? I do think it can miss a rather large flat. That's part of the reason I made this posting. I am being sincere, not just looking for a problem with anyone who wants to tangle.

If you see me post something, why not just skip the thread if you have nothing positive to add. I can take constructive criticism, but I won't sit back to being frontally attacked for no reason, either. It isn't as if a post from me commands a response. If it is of interest it generates responses. If not, then it rapidly dies anyway. If I did not believe there was educational value in the question, I would never post it in the first place. I respect what Leonid and Pricescope is all about.....sharing.

Relax and let's see if this thread has some legs or not. The one I posted about "Another opinion on princess cuts" has gone a long way although it veered off course many posts back. It is fun to see how the forum works and we all learn, too. As one of our other particpants says "PEACE".
 
The problem Dave is that you have enough respect around here that someone is going to take your post as being the whole truth and nothing but the truth.
You have an obligation as an "expert" to be as accurate as possible or to note when you are presenting a theary for discussion.
You laid out a untruthful post as too why your machine is better.
You presented it as fact when its far from it with no research.

If you had actualy posted a question on would another scanner pick it up then I would have had no reason to comment.
 

It was high time to put together a thread about measurement error around here!
There were a couple others (including at least one about diameter deviations based on an article from OctoNus), but not as many as questions about how come that AGS and Sarin reports do not match or some do not make sense etc. Sure enough, I do not have what it takes - diamonds, devices and experience - to get anywhere with this on my own. If anything, I hope this thread endures and gets busy
1.gif

I would like to add a couple of questions (in bold below).


Do measurements for diamond models come from side-view projections only !?
14.gif

I have to agree on both counts that total diameter and table diameter are likely to suffer from these two specific sorts of bias (underestimating minimum diameter and random bias for the table measurements).


A simple measure may give an idea how probable this bias is for side-view parallel projections - I am thinking of the probability to observe the min, max on either given a speed of parcourse of a complete rotation of the thing in front of the observer. The 'singularities' that make the table points are in sight a split second (so they can be missed by a device making discrete recordings of some sort) and the fewer the views that give reasonable error for the observation of the diameter at girdle... the worse, following the same logic. However, it seem that the average diameter at girdle would come through, only the variation gets under-estimated. Perhaps the table width may be understated all the time by the same rationale.


Just a random thought, really. I am sure someone has already done thing is a more sophisticated and meaningful way.


If there is consistent error (i.e. predictable and hence correctable) all for the better.


I have no good answer why approximate (or otherwise said: imperfect) measures would be used to describe allegedly perfect diamonds. There must be a 'good enough' level given that the final judge (direct observation) is an imperfect measure too.


Is the current level of measurement precision of diamond measuring devices (the Sarin and Helium lot, what else is out there?) rotten silly?

I wish someone would take time and determine what is a useful level of precision for these models and spread the word. Perhaps the precision of each diamonds' measures on AGS and what not reports will never come with a confidence interval attached, but a model of ideal diamond can easily have one so that the quality classification attached comes with a known tolerance to likely (I know, this is a hard word) measurement error.


Is there a tradeoff between measurement based and direct observation devices (i.e. anything that permits communicating the looks of these stones remotely)? Or is either redundant in the presence of the alternative ?


Hope this is not the most boring post I ever wrote! I did try hard to take the perspective of an environmentalist in the recicling business over such words of wisedom as 'garbage in, garbage out' that some may rightfully find appropriate for the matter.
31.gif


Date: 9/26/2005 2:23:41 PM
Author:oldminer
These devices do not take an infinite number of views, but only every few degrees.


As an example of false information:
The default mode on helium is 400 pictures for .9 degrees.
the fine mode is 800 pictures for .45 degrees.
Even the fast mode 200 pictures is 1.8 degrees.
To me a few means more than 2 so I dont see how the term even applies to the fast mode much less the better modes.
 
"You laid out a untruthful post as too why your machine is better.
You presented it as fact when its far from it with no research."

You are really over your head in these deep waters. Take a chill, man!


I appreciate having a position of respect here, but I have earned it and never claimed it as something due me. You are saying I am making an untruthful post. Wow! Where did that come from? I have asked specifically if there is something wrong with what I posted and am looking for someone who knows another set of facts to come and tell me where I am mistaken. This is not a lying contest. My oh my, you have me all wrong.


As far as "research" goes, you just have no idea how many millions of real dollars have gone into what you would now claim as "no research". Many more millions of free labor have been expended, also. None, not a penny of this was my money. I have never been paid a red cent from ImaGem and I now own a princely 1/4 of 1 percent of non-voting stock in this start-up company. What a bloody fortune! I am not doing this for money, but for the love of increased knowledge and sharing.


I have done work with ImaGem because I love the challenge of new thinking. You have to go to the dance with someone willing to invite you. You don''t think for a minute GIA or AGS ever thought of inviting me or you, right? If you are lucky enough to be invited to work with the new technology world it can be the most mentally rewarding of all the daily activities. That''s how it is for me, anyway.


Sure, I have an open agenda, but I am also a very fair and open minded person. I welcome information and have raised a valuable set of questions. If no one responds I will assume the questions were poorly worded or did not make their points. Your responses are so defensive that one might question if you have a hidden agenda. Gee, I never said anything about your good posts, or strange ones. Where is this going to take us?


I''d prefer to get back to the questions I raised than make you further distressed with me. It seems so pointless to fight this way.
 
Ok, oK!

Calm down guys.

Dave, can you send the stone to Rhino please?

Maybe we can ask Bruce Beryl to do some instrumental measurement if he still has access to some engineering workshops? He certainly understands the issues and has asked similar questions in a recent thread, so he is quite neutral.
 
Yes, I can send the diamond to Jonathan. I will contact him about it tomorrow. Is sure was hoping that the two of us did not scare everyone else away. I feel like I just ran a fast mile.
 
"the fine mode is 800 pictures for .45 degrees.'

Super. This is good information. If one takes a photo approximately 1/2 a degree off of perfectly focused, wouldn't you see some lack of sharpness in the photo? Would you be able to detect if you have indeed measured the flat spot or a spot in front of or behind the flatest spot? If you had measured other than the flat spot itself, you would ALWAYS over-estimate the diameter at that point.

The error I am asking about is ALWAYS over-measuring the minimum and NEVER under-measuring the minimum. It is not fixed by "averaging" all the measures, even 800 of them. The only way to get to a correct average is to do it perfectly or to be under AND over due to error or strategy along the way of doing all these 800 measures.

Ana; Sarin, Ogi and Helium take side views to create measures. ImaGem takes a top view. In this way, the devices differ. We believe it is an important difference, and worthy of discussion.

The level of accuracy with current Sarin and Ogi tools is good enough if we were not advancing on other fronts. However, the measures from these tools is inadequate to create accurate lighting models or accurate 3D models. What Helium can do is something I know far less about, but I am always curious to know whatever can be shared on the subject.
 
Date: 9/26/2005 4:32:49 PM
Author: oldminer
'the fine mode is 800 pictures for .45 degrees.'


Super. This is good information. If one takes a photo approximately 1/2 a degree off of perfectly focused, wouldn't you see some lack of sharpness in the photo? Would you be able to detect if you have indeed measured the flat spot or a spot in front of or behind the flatest spot? If you had measured other than the flat spot itself, you would ALWAYS over-estimate the diameter at that point.


The error I am asking about is ALWAYS over-measuring the minimum and NEVER under-measauring the minimum. It is not fixed by 'averaging' all the measures, even 800 of them. The only way to get to a correct average is to do it perfectly or to be under AND over due to error or strategy along the way of doing all these 800 measures.


Ana; Sarin, Ogi and Helium take side views to create measures. ImaGem takes a top view. In this way, the devices differ. We believe it is an important difference, and worthy of discussion.


The level of accuracy with current Sarin and Ogi tools is good enough if we were not advancing on other fronts. However, the measures from these tools is inadequate to create accurate lighting models or accurate 3D models. What Helium can do is something I know far less about, but I am always curious to know whatever can be shared on the subject.


How would you measure the with any accuracy the pavilian from a top view should that read a top and bottom view?

edit: My view follows could be wrong as to what they are doing but if measuring a slope opticaly the info is currect :}
What the scanners are measuring is slope in referecne to a flat.
This is best measured opticaly at right angles to the slope.
it is easy to see what the angle is of a line when looked at like this / than a top view. | <--- this line is angled tell me how much? hint its the same line as before now can you tell me?
 
ImaGem does use side views for many measures, such as; pavilion depth and angles, girdle thickness, culet size, crown height and angles. All the logical stuff that one would expect. It is the question of accuracy of diameter and table width that research has brought into question.

I am pretty sure that Helium measures several more features than what ImaGem measures. To build a 3D model requires much more detailed measurements. No doubt most of these are highly correct. It is only the incorrect ones that are addressed in this thread.
 
Date: 9/26/2005 6:31:53 PM
Author: oldminer
ImaGem does use side views for many measures, such as; pavilion depth and angles, girdle thickness, culet size, crown height and angles. All the logical stuff that one would expect. It is the question of accuracy of diameter and table width that research has brought into question.

ah ok that makes much more sence.
Thanks.
 
Greetings Dave,

Hope you had a great weekend. I''m gearin up for tomorrow here after a nice relaxing weekend myself. I''ll answer this as I do my emails ... thought for thought.


This is the image of an actual diamond that I own. It is not perfectly round, as you can readily see by the dark outer outline, and even has a bit of a flat spot on one side, as you can see in the photo of it taken from the top view. It is not an exceptional diamond or a super fine stone, but it is a regular, commercial cut diamond. When measures of diameter are taken with this top view one can see indentations or flat places clearly. If one was to ask for a 3D model of this stone in one of the drawing programs generated from a Sarin, Ogi, or Helium device, would the rendering in 3D handle this correctly?

Only one way to find out and I am happy to oblige. The hardest facets for any of these scanners to see Dave are those whose facets are very close to their adjoining facets. At our recent Alumni meeting Al Gilbertson talked about what cutters refer to as "painted upper girdles", "dug out upper girdles" and then normal girdling. The painted uppers are generally always the hardest to measure. If you can forward me in email a reflector image of this stone I can positively identify this feature for you. Better if you can forward me the stone unless it is tied up somehow. I have 2 princess cuts coming to you for measurement Dave. I would like to also offer my assistance in helping you determine where the Imagem fits into the new cut systems and what metrics it is accurately showing too. I know you guys are getting hammered with questions and I would like to do anything I can in my power to help. This week I am working with our web designer to complete some major tasks but if I can come on a weekend or perhaps ship some test stones back and forth, we can work together on this.

If you see any rounds or fancies in our inventory that you''d like to run tests on too we can send those.

With the release of the new cut systems I am currently conducting further research into the metrics considered, how they are defined and where all these things fit into the scheme of it all. What has recently thrown me for a loop, on a personal level Dave ... if a princess cut does not score well on the Bscope we generally send it back. Call me spoiled. :P An AGS "0" was sent over that looked just fine to me ... low/medium/low on Bscope (or around that). I conducted an instore experiment with consumers not even looking to purchase a diamond to get their pure unbiased opinion under various lighting conditions.

Not only have I decided to purchase the stone but this lil study which has driven me deeper into the study of ASET, the Reflectors and human observations on diamonds I typically do not purcahse for stock has given me new perspectives. I have also developed a way of determining the sensitivity of some of these devices ... even if there is only shift in azimuth on one facet of an ideal cut diamond. Profound. I would not have discovered this were it not for Helium.


Since the side view approach taken by the devices mentioned is what is utilized and not a top view, the flat spot is far less likely to be exactly detected. These devices do not take an infinite number of views, but only every few degrees. Who is to say if a flat was exactly viewed or a bit of the curved part ahead or behind the flat spot was measured?

I''ll forward you a model once I get it man. Wait till you see. For your own purposes Dave I can send you a scan from each so you can see the accuracy produced from Sarin and Helium. Our OGI was sent back due to a techniical difficulty. BTW Sarin has been very responsive to me and have made updates that are quite good I think. Each technology has its strengths. haha... I got a lot of writing to do! :P


We believe this diamond is an excellent example of a basic problem with using a side image for obtaining correct diameter and correct table measures. The side view may get the maximum diameter most of the time, but it may fail to determine the actual minimum diameter a great deal of the time. The minimum diameter will be over-estimated most of the time.

I understand why you might draw this conclusion. I may have a stone on the site that might demonstrate the answer to this for you. Na... can''t find one this extreme. Send it over.


When one over-estimates the minimum diameter, the average diameter is also increased. Following that error, a subsequent error then occurs. The table percentage calculation for a 3D model or a grading report then becomes a smaller percentage than the actual percentage. Any ray tracing calculation would also skewed from these combined errors.

Going further, the question arises how does this side view method do the job with table measurement? A table has 8 flat sides and 8 points (junctions). Table diameter is measured from one point to its opposite point. In effect, it is four maximum table widths. In the failure to exactly be able to visualize the flat sides there is a corresponding inability to be certain the maximum widths of the table (the opposite points) are equidistant from the lens when the measure is taken. Therefore, the table measure may often be underestimated. This leads to a second reason for underestimating the correct table percentage.
I hear where you''re coming from Dave. I think you''ll be happy when you see the results. The modeling accuracy of the Helium is blowing me out of my boots here. Only in some extreme cases is it having a little difficulty seeing painted uppers. Sergey just sent me a file to update my Helium. After I install that tomorrow I''ll run a check on one with painted ugs.


ImaGem was been asked why its reported table percentages are somewhat larger than other methods. This should clear the air on that topic. The side view method does not consistently see the minimum diameter nor the maximum table width.

With the tests we perform here Dave we will help you determine the problem if any so Imagem (or if it proves Helium & Sarin) will make the necessary steps to fix whatever minor problems they are having. We can, if you like, in email compare the results of all 3 for a side by side.


Going into the future, how will a side view ever measure the cleft of a diamond such as found in a heart shape? This is even more of a problem than just a flat spot on a round shape. Any out of roundness that actually indents cannot be viewed from a side view at all. A flat spot may only be correctly measured occasionally, but not with the consistency one would expect of such high cost devices.


Without an ability to model such common diamonds correctly, how can we just rely on the calculation of light performance? A flat or an indenting diamond cut defect is far more noticeable than any yawed facet might be, and it seems logical it must create a light return issue of greater magnitude, too.


Has anyone addressed this issue in some way that I have missed? Are there any comments?

Excellent questions. Man I''d really like to get out there to ya Dave so we could discuss but actually there is more research I must conduct on my end before I procure certain answers to things that will help you determine the metrics the Imagem is *seeing* and what human response is to those metrics. Since I''ve got the ASET photography down I am now constructing a database of ASET images that portray certain metrics that people see (as well as myself) regarding these individual metrics I am speaking of, ie. contrast brilliance, dispersion, scintillation and leakage. I know the Imagem also has a metric for *intensity* which could also be interpreted as *brightness* and I may also be able to help you with that. I can share with you my perspective on this and see, if at all, if it correllates to the metric I am observing and recording here. I look forward to working with you.

Garry ... I didn''t get a chance to check your answer to my question about those 2 rounds regarding *brightness* but this relates somewhat to this subject.

One more note ... Dave, after taking with Chris about a particular stone we sent over (as well as the stones I brought over during my visit) I have a very strong inkling I can tell you some more about Imagem and the metrics it is reporting.

Best regards,
Jonathan
 
Date: 9/26/2005 2:44:57 PM
Author: strmrdr
Dave,
Man I told myself i was gonna take it easier on you but then you go and post this.
Why is it that people that have no clue what helium can do keep attacking it for their own gain?
Did you even bother to find out what it can do?
Serg has proven it can measure indented naturals bigger than 100 microns so you think it will miss a big flat?
No machine is perfect dont get me wrong there but sheesh.

So some measurement s dont agree with other scanners prove yours is right by other means of measuring not by goundless attacks.

sheesh what is wrong with people lately???
Easy now!
23.gif


I don''t see harsh criticisms in Dave''s questions bro. He has good honest questions that need answers. If an honored colleage like Dave is thinking about this, think how many other professional''s may be wondering the same thing? I say we work as a team and find the answers together. Other forums laugh when we pit against each other.
38.gif
I don''t know about you guys but with the amount of time I put in work and try to help folks here on the forum, I have grown to know many regulars here (both consumers and fellow peers) some who have developed into good friends and then I also see clicks and groups forming that seem to pit this one against that one. I get emails from folks who here who see this too. This is immature and will be the demise of this forum if it continues. I''m sure I''ve been guilty as well... but my vision for this forum is to see the incredible minds at play here working *together* you included strm. Like Dave, strm... it is impossible to read all the content on these forums. I am SURE Dave missed Sergey''s posting as well as some material I''ve published on Helium and what a scanner sees but lets not get excited over good honest questions.
1.gif
I know you didnt'' mean harm and I also know what its like to stick my foot in my mouth so I speak from experience.
9.gif
41.gif


Warm regards,
 
Date: 9/26/2005 2:44:57 PM
Author: strmrdr
Dave,
Man I told myself i was gonna take it easier on you but then you go and post this.
Why is it that people that have no clue what helium can do keep attacking it for their own gain?
Did you even bother to find out what it can do?
Serg has proven it can measure indented naturals bigger than 100 microns so you think it will miss a big flat?
No machine is perfect dont get me wrong there but sheesh.

So some measurement s dont agree with other scanners prove yours is right by other means of measuring not by goundless attacks.

sheesh what is wrong with people lately???
Storm........seriously.......wean off the French Roast. The high test is stringing you out.
2.gif


Dave didn't make any derogatory statement at all about Helium from reading his post. It's you who is interpreting it badly.

Every device has its high points and its limitations.......you've so noted that yourself from time to time. Why the knee-jerk on this one? And what has Dave done to your Cheerios that you're loaded for bear with him lately?
 
Dave,

Please publish Imagem report this 0.28 ct diamond and send this diamond to Rhino tests.
Rhino, please publish Helium reports for this diamond.
 
Dave remeber I asked Dr Aggawrl about producing 3D models. he scoffed and said "Why should we?"

Well one reason is that it tests the accuracy of a scanner.
20.gif

And non rocket scientists can check them easily.

As i remeber he said it was easy to do. So why not send an .stl file to us on your wobbly stone?
 
We will get it to Rhino shortly. No problem in doing that.

Does the 3D model builder create a diamond with an out of round girdle? I just don''t know if it does.
 
Yes Dave - it builds the model as the stone is. And it makes assumptions on the facets being flat, which is normal for a diamond.
There was a discussion Beryl started recently - but many of these have become silly and over technical (and there have been some complaints about that).
 
I owe Dave an apology.
Sorry Dave,
I will try and cut you more slack in the future.
I guess im better at saying it than doing it but ill try.
 
No problem. We''ll go on as before.
 
Date: 9/27/2005 7:32:41 AM
Author: oldminer
We will get it to Rhino shortly. No problem in doing that.

Does the 3D model builder create a diamond with an out of round girdle? I just don''t know if it does.
Dave,

I have not data for round diamond with nonround girdle. It is rare.

See report for semicut. Do you need model?

SemiCutPAcor2002.gif
 

Re: These devices do not take an infinite number of views, but only every few degrees.


BTW. Dave do you think ImaGem use infinite number direction for measuring diameters?
If not( I am sure Imagem use finite number. BTW camera has finite number of pixels), what is principal difference? Sorry I do not see it. I see principal difference between infinite and finite, but I do not see principle difference between one number and other number.
And for our tests , Helium accuracy is better than ImaGem accuracy.
 
Status
Not open for further replies. Please create a new topic or request for this thread to be opened.
GET 3 FREE HCA RESULTS JOIN THE FORUM. ASK FOR HELP
Top