VapidLapid
Ideal_Rock
- Joined
- Feb 18, 2010
- Messages
- 4,273
In another thread I mentioned the military specifications for polished optical surfaces. Minous asked what was meant by the term I used. Rather than jack that thread I am putting it here.
Surface Quality
Scratch–Dig Specification
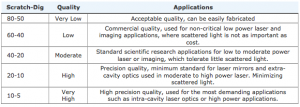
The most common specification used to describe the scratch-dig specification is the one used from MIL-REF-13830B in the U.S. Military. Only a few of people understand this specification, but it has become the standard for small optics in the united States. There are multiple inspection methods to classify the scratch-dig specifications. These methods include using a reticle, a scratch-dig paddle, or scratch/dig standards. One important thing to note is that the assessment of scratches and digs is performed using a purely visual, non-quantitative comparison to a set of standards which conform to the U.S. Military Specification MIL-O-13830B. Therefore the numbers on the specification is not the actual width of the scratch that is ascertained, but the appearance of the scratch as compared to the standards.
The imperfections are specified by the typical designation of “20-10”, “60-40”, or “80-50”. The first number indicates the maximum width allowance for a scratch measured in microns, and the second number is the maximum diameter for a dig in hundredths of a millimeter. Thus, 60-40 means the apparent width of the scratch is 60 microns and the diameter of permissible dig is 0.4 mm.
Scratches
A scratch is a marking or tearing of the polished or coated surface. The scratch designation is measured by comparing appearance with standard scratches under controlled lighting. The combined length of the largest scratches on each surface cannot exceed ¼ of the diameter of the element. If maximum visible scratches are present, the sum of the products of the scratch numbers times the ratio of their length to the diameter of the element can not exceed half the maximum scratch number. If no scratch are present, the sum of the products of the scratch numbers times the ratio of their length to the diameter of the element can not exceed the maximum scratch number.
Digs
A dig is a small rough spot or pit on the polished or coated optical surface, originated from defect in the raw material or from the grinding process. Digs are defined by the actual diameters in tenth of a micron, or in hundredth of a millimeter. The number of maximum digs shall be one per each 20 mm diameter on a single optical surface. The sum of the diameters of all digs shall not exceed twice the diameter of the maximum size specified per any 20 mm diameter. Digs less than 2.5 microns are generally ignored. For surface whose dig quality is 10 or less, digs must be separated by at least 1 millimeter.
Fractures and Edge Chips
Fractures which do not encroach on the clear aperture of the lens shall be allowable, given that the chips do not interfere with the sealing of the lens in the mount. Edge chips which extend into the clear aperture shall be considered as digs. Chips that are larger than 0.5 mm shall be grounded to reduce the possibility of reflections and additional chipping. The sum of the widths of chips larger than 0.5 mm shall not exceed 30% of the lens perimeter. Fractures in any face or edge need to be ground out. The sum of grounded chips and fractures in the grounded areas can not exceed 2 % of the grounded area or should be rejected. Edge chips which do not encroach on the clear aperture of the prism shall be allowable as long as the sum of the chip widths do not exceed 30% of the length of edge on which the chips occur. Chips shall be measured from the beveling edge instead of the sharp edge. Chips less than 0.5 mm can be ignored and for those larger than 0.5 mm need to be stoned or grounded.
Bubble and Inclusions
Optical glass in general is nearly free of bubbles and inclusion comparing to other technical glasses due to sophisticated production process, which are optimized for low bubble content. Bubbles on pupil plan do not disturb the shape of the final image but the image contrast and brightness are reduced due to part of the light scattered. If the inclusion appears on the image plane, then the defect will show up in the final image directly, and contaminate the final image.
The inclusion quality check is done by the visual inspection. The glass is placed on a black background and illuminated from the side. Any bubbles and inclusions become visible as bright spots when viewed from the top. Any inclusion in the glass, such as stones or crystals, shall be treated as a bubble and bubbles need to be classified as surface digs. The size for inclusions with irregular shape shall be considered as ½ the sum of the maximum length and the maximum width. The allowable number of maximum size bubbles shall be one per 20 mm of light path, or fraction thereof, of any single element. The characterization of bubble content of a glass is performed by reporting the total cross section in mm2 of a 100 cm3 glass volume, calculated as the sum of the detected cross sections of bubbles. The customer should always indicate if the bubble and inclusion specification is only valid for the fabricated piece of glass or for the raw piece.


300x240.png)