shape
carat
color
clarity

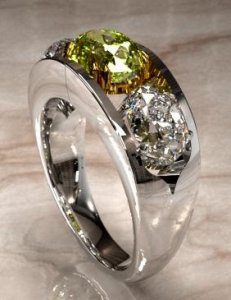
Preliminary CAD''s from Michael E

yes, I agree! That was my original idea and I think I need to sick w/it. I can''t get the semi bezels to work in my mind..I keep coming back to the prongs so that''s just telling me something.

The gallery stumps me..if it''s not open, will it be hard to clean in side there? I can''t remember how much room there is in the gallery..3 or 4mm I want to say. He said the scroll work would be about .5mm or less thick, so seems like it would be super delicate anyway.
 
Prongs it is, sounds like ;-)

I think with the rails, you gotta keep the gallery open. Scrolliness is nice but the rails are so modern. I think even with prongs, it''ll all come together.
 
I also liked Ma Re''s idea about the shape of the opening. You could experiment with that and keep it open?

Although if you wanted to do something decorative in there, you could do, like, diagonals or something... just not scrolls-with-rail, IMHO.
 
I really really like the prongs better, it just looks more delicate.
 
Thanks! I''ll email Michael and ask about keeping the gallery as open as possible. I think the ring is going to be so big and "hey look at me" that I''d rather keep it as simple as possible, if that makes sense!
 
Date: 4/17/2010 10:14:33 AM
Author: packrat
Thanks everyone! AJ, ha, I was positive the bezels were the other way-so positive in fact that I didn''t bother to double check hahaha that''ll teach me eh? I so love your ring too, so you''d think I''d remember correctly. I''ve had it saved in my inspiration file for a long time!


Sure, do you mind checking the dimensions on the stones?? How wide is the ring on your finger?

hey pack - my bad! sorry, I didn''t see this reply.
Sure, I''d be happy to look up the dimensions for you tomorrow if you still like?
Or have you decided to go with prongs do you think?

The ring is quite substantial on my finger - takes up most of my knuckle; but then again as you can see
from the pics I don''t have the longest digits
2.gif

I believe that is a size 7..it is completely 100% comfortable though.

just let me know if you still need the measurements, happy to help
5.gif
 
I love the open gallery that has several cut outs rather than just one open space. I don't think the scroll work fits in with the modern look of the ring. I much prefer the prongs to the bezels. The stones will really pop in this setting, packy. I can't wait to see how this ring turns out. You must be very excited and I'm excited for you. Charge your batteries now
2.gif
 
Thanks AJ! I''m going to stick w/the prongs, but actually if you wouldn''t mind digging up the sizes, it would give me a reference on how big this will look on my hand. Ha, I don''t have long fingers either! I''m a short and stubby.

Hey Marian! I emailed Michael just now about switching the scrolls to bars. He said it''s like 2.5mm or so space in the gallery, so it''s really not going to be noticeable if they''re scrolls. I love scrolls and swirls but I agree w/the rest of you it doesn''t work w/this one.

So..yippee for getting everything figured out!
36.gif
Well, I think it''s all figured out anyway!
 
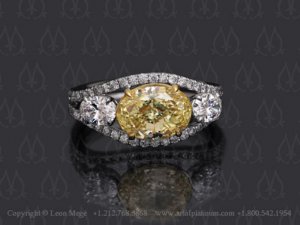
Not much new to add-should hopefully get pics of the chryso soon! Maybe tomorrow?? Fingers crossed. Anyway, I HAD to post this picture!!! Haha, I saw it and thought well heeeey now, this is my ring but w/pave in the rails! The stone proportions aren''t the same but still, it made me smile!

r1153_047Ww1.jpg
 
I can''t wait! It''s going to be soooo pretty!
 
I agree with everyone else - the prongs seem to be the best choice - and that Leon ring you just posted - heavenly! :)
 
Do you have a photo of the chrysoberyl? I''d love to see it. Nice ring design!
 
Thanks! Nope, no pic yet! I finally broke down and emailed Michael Wednesday..It''s not like I''m in an all fired hurry timeline or anything..I''m just antsy now that it''s started! Amethyste''s ring took a lot longer than he figured, so maybe today there will be pictures?? I''m dying to see it!
 
This is the newest from Michael! I think I like it better the other way. I think b/c the stones are so much bigger than the LM inspiration ring the sides/rails are going to end up different. My guess anyway. Any thoughts or suggestions?

newcad.jpg
 
looks very beautifully done.
is it going to be bulky?
 
Thanks! No, I think the CAD''s make things *look* bulkier than what they are/will be IRL. The top rails, if I remember correctly are only a little over 1mm wide..I *think*. Or 2.
 
Another hands down for prongs! Also love your inspiration pic of leon!

Can''t wait to see the finished ring!
 
The shank looks really wide...
 
Date: 5/18/2010 4:54:04 PM
Author: FrekeChild
The shank looks really wide...

Agreed.
 
I think so too. Is it b/c of the stone sizes that it needs to be that wide? I''d rather have it all open like the other ones instead of having all the metal. He said I could do engraving etc on the gallery/shank, but I don''t think I want that. It looks better to me to have less metal.
 
I love the newest CAD pack- best one by far imho..
 
The prong set is a lot sleeker with the bezel design adding more bulk to the overall flow. I’m also in the open gallery camp to keep with the smooth open feel.

ETA
I just saw the CAD and I’m very surprised to see how thick the shank is. Can he not leave the shank open (leave it a split shank) until it comes down to around 2 mm or so where they join up?
 
Date: 5/18/2010 4:54:04 PM
Author: FrekeChild
The shank looks really wide...

I agree, it''s a bit masculine for my taste. Sorry
8.gif
 
Your sidestones appear a bit on the large size for the design, perhaps? Maybe a more classic three stone design would work. Are you doing pave'' and the cad just does not show the pave''? That could make the ring look more dainty.
 
Date: 5/19/2010 9:38:03 AM
Author: Chrono

I just saw the CAD and I’m very surprised to see how thick the shank is. Can he not leave the shank open (leave it a split shank) until it comes down to around 2 mm or so where they join up?


The beauty of Computer Automated Design is that anything can be shown...even things which can not be made or can be made, but would end up as something which was lacking in durability. The set of images that packrat has shown are a small part of the total images which have been done for this exercise and they have varied pretty widely, (some of them she hasn''t seen, since they were not workable).

The creation of a design is very much the same for all designers, regardless of the medium which they use...pen, pencil, CAD the process is all the same. The only difference is that once the CAD model is finished another machine can "grow" or machine the wax for the casting mold, making the whole process, post design to rough casting, faster. This is short step by step of the ongoing process for packrat''s ideas:

1.Decide on stone sizes, shapes and a basic outline. In this case the initial design idea was an open two part band just as you have described Chrono. The sides were flat in order to allow another ring to sit flush against this without gaps.

2. The design then changed to a wide metal band contacting the finger, with sides which protruded up to hold the stones. These sides were then shown with cutouts removed from them in varying shapes or colors of inserted metal filigree.

3.packrat then suggested bringing the metal "closer together", which I misunderstood to mean smoother and more filled in on the top surface while still leaving the sides flat and so you end up with the last image shown.

4. After some further discussion with packrat I woke up and realized that she didn''t want the sides to be flat, but curved. I''ve since sent her another set of images which show the sides of this pieces as being more flowing and curved around the stones.

5. Who knows where it goes next ? A tweak here, a bend there, change the stone color or shape...no problem. The sharpness of any curves, the height of the sides, the sizes of the stones and anything else can all be changed easily.

This method of doing design is so fast, the images so close to reality and the resulting jewelry so much like the images that you see, that if you are going to have a custom piece made I would suggest asking your jeweler if they can do this for you. If they don''t use this themselves, they can certainly find someone who can do it for them quite easily.
 
Date: 5/19/2010 1:52:12 PM
Author: Michael_E

Date: 5/19/2010 9:38:03 AM
Author: Chrono

I just saw the CAD and I’m very surprised to see how thick the shank is. Can he not leave the shank open (leave it a split shank) until it comes down to around 2 mm or so where they join up?


The beauty of Computer Automated Design is that anything can be shown...even things which can not be made or can be made, but would end up as something which was lacking in durability. The set of images that packrat has shown are a small part of the total images which have been done for this exercise and they have varied pretty widely, (some of them she hasn''t seen, since they were not workable).

The creation of a design is very much the same for all designers, regardless of the medium which they use...pen, pencil, CAD the process is all the same. The only difference is that once the CAD model is finished another machine can ''grow'' or machine the wax for the casting mold, making the whole process, post design to rough casting, faster. This is short step by step of the ongoing process for packrat''s ideas:

1.Decide on stone sizes, shapes and a basic outline. In this case the initial design idea was an open two part band just as you have described Chrono. The sides were flat in order to allow another ring to sit flush against this without gaps.

2. The design then changed to a wide metal band contacting the finger, with sides which protruded up to hold the stones. These sides were then shown with cutouts removed from them in varying shapes or colors of inserted metal filigree.

3.packrat then suggested bringing the metal ''closer together'', which I misunderstood to mean smoother and more filled in on the top surface while still leaving the sides flat and so you end up with the last image shown.

4. After some further discussion with packrat I woke up and realized that she didn''t want the sides to be flat, but curved. I''ve since sent her another set of images which show the sides of this pieces as being more flowing and curved around the stones.

5. Who knows where it goes next ? A tweak here, a bend there, change the stone color or shape...no problem. The sharpness of any curves, the height of the sides, the sizes of the stones and anything else can all be changed easily.

This method of doing design is so fast, the images so close to reality and the resulting jewelry so much like the images that you see, that if you are going to have a custom piece made I would suggest asking your jeweler if they can do this for you. If they don''t use this themselves, they can certainly find someone who can do it for them quite easily.
Michael - you sound totally chilled out and very cool to work with! I hope at some point we can work together also.
 
Thanks for the explanation Michael!

LD-I''ve been having a blast with it, and I highly recommend Michael!

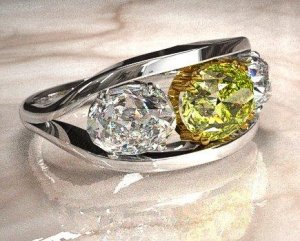
K, here''s the new ones from today! This is more curved.

curvedcad1.jpg
 
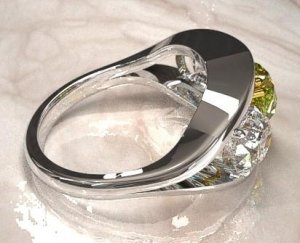
and then the sides. i have a question but I need to go grab a couple pics for reference so back in a sec.

curvedcad2.jpg
 
I love the swoop of where the rails split on the newest ones!
 
Thanks Novel! I like the swoop too! (Hey, haven''t seen you much-been busy?)

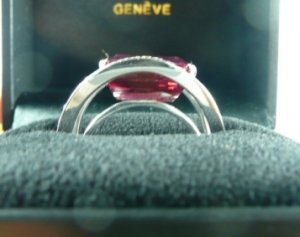
This is Megeve''s tourmaline ring-I''m wondering if the rails could be shortened up so the sides of the stones are more exposed and maybe put a band under like this?

megevetourmaline1.jpg
 
GET 3 FREE HCA RESULTS JOIN THE FORUM. ASK FOR HELP

Featured Topics

Top