shape
carat
color
clarity

DIY Galore - Putting together "Welcome" Bags

Status
Not open for further replies. Please create a new topic or request for this thread to be opened.

EricaR

Ideal_Rock
Joined
Dec 3, 2007
Messages
2,392
Three weeks to go and now I''m doing the "fun" stuff - putting together a schedule of events, fighting with FI''s dad about restaurants, etc etc.

But I do get to do the truly fun things now, like my super crafty DIY projects. Since we only have 8 guests coming, all couples, I''m only putting together 4 welcome bags and am putting quite a bit of time into each. Each welcome bag will have two greeting cards in it (what can I say, I like to make cards) and then each day the hotel will put a new card in the rooms.

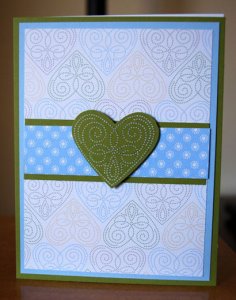
First up, a generic "Welcome and thank you for coming" card. It will have the schedule of events inside of it.
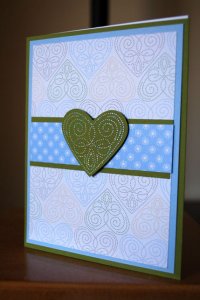
mexicocard1.jpg
 

FrekeChild

Super_Ideal_Rock
Joined
Dec 14, 2007
Messages
19,456
Oooooo!!!!!!!!!!!!!!!!!!!!!!!Wanna do something like this for me?
3.gif
 

EricaR

Ideal_Rock
Joined
Dec 3, 2007
Messages
2,392
Slightly different view of the heart card. The front of the heart is embossed with a glittery embossing powder which gives it a nice sparkle.

mexicocard2.jpg
 

FrekeChild

Super_Ideal_Rock
Joined
Dec 14, 2007
Messages
19,456
Are you going to post these in the DIY thread too?
 

EricaR

Ideal_Rock
Joined
Dec 3, 2007
Messages
2,392
Once I get everything here, including the pillow boxes, I''ll put them in the DIY thread!

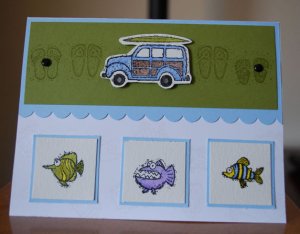
This is the second card for the Welcome Bags. Since we are having a beach wedding, what better than a beach themed card? Plus, I think the fish are hysterical! We will write a personalized note for each guest in here. The green and blue color are the same as I used on the first card and on my DIYs. I''ll use the same colors throughout my projects to help tie things together.

mexicocard3.jpg
 

FrekeChild

Super_Ideal_Rock
Joined
Dec 14, 2007
Messages
19,456
Dude. That middle fish is gnarly....
32.gif
23.gif
 

EricaR

Ideal_Rock
Joined
Dec 3, 2007
Messages
2,392
He''s not gnarly!!! He''s super cute. Plus, I colored him PURPLE!

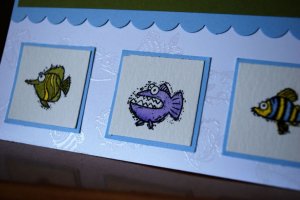
A close up of Mr. PurpleFish himself. If you look behind the fish you can see that the card isn''t just white - there are other fish there that I did with clear embossing powder. I tried a bunch of things behind the fish and these worked best. It is a really subtle look but in the right light they jump off the page.

mexicocard4.jpg
 

FrekeChild

Super_Ideal_Rock
Joined
Dec 14, 2007
Messages
19,456
No trust me, he''s gnarly. Cute, but I wouldn''t want to come across him while swimming. Eek.
 

EricaR

Ideal_Rock
Joined
Dec 3, 2007
Messages
2,392
Would it help if I colored his teeth green and brown? ;-)

This afternoon I''m working on some pillow boxes to hold mints, and some bag toppers for some wedding themed chocolate coins. I need to clean up my work table because it looks like a craft store exploded in here! I also need to do cards for Friday, Saturday and Sunday mornings. Hmmmmmmmm... I think I want to do some with butterflies because I got a really neat new die for my die cutting machine that does fabulous butterflies. Maybe I''ll stamp the paper with flip flops to make them beach themed butterflies???? That might be pushing it too much.
 

FrekeChild

Super_Ideal_Rock
Joined
Dec 14, 2007
Messages
19,456
Yes. Make his teeth MORE gnarly. That''s a GREAT idea!!!

38.gif


Has your FI seen all of this stuff?
 

Hudson_Hawk

Super_Ideal_Rock
Joined
Nov 2, 2006
Messages
10,541
They''re awesome! I could totally use your help with my OOT bags...
 

EricaR

Ideal_Rock
Joined
Dec 3, 2007
Messages
2,392
K just sort of goes with the flow on the crafty stuff. He doesn''t care one way or the other on any of it. Oh well! If it makes me happy it makes him happy.

Thanks Hudson Hawk! The actual bags are just things I picked up here and there (little plastic flip flop necklaces, mints that packaged in little tuxes and bridal gowns, some beachy looking coasters, etc) and then I''m personalizing the whole thing with the cards and a few other bits and pieces. At least my mom will appreciate them!
 

FrekeChild

Super_Ideal_Rock
Joined
Dec 14, 2007
Messages
19,456
Did he see gnarly fish guy?
 

EricaR

Ideal_Rock
Joined
Dec 3, 2007
Messages
2,392
He probably didn''t even notice it. Just sorted of nods and says "thats nice honey".
 

FrekeChild

Super_Ideal_Rock
Joined
Dec 14, 2007
Messages
19,456
Men are...no comment.

Ok. So I figured it out. Gnarly Fish Guy reminds me of the eels and shark from The Little Mermaid.

Or maybe like a demented Flounder.
 

PilsnPinkysMom

Brilliant_Rock
Joined
Oct 11, 2008
Messages
1,878
EricaR: Quite the crafter you are, lady! Even with years of sorority crafting behind me, I can''t even make a cute card!! I think its so sweet that you''re putting time into each card and each bag-- I have a feeling your guests will take notice.

Ever thought of setting up shop and making cards/invites for people? Perhaps you should make an "Etsy Store" and then we can steal your fab designs...
31.gif
31.gif
31.gif
 

MMM

Brilliant_Rock
Joined
Sep 19, 2006
Messages
526
so fun!
what a nice first impression of you wedding. i know everyone will notice how much time and thought you put into these. really, really cute!
 

kittybean

Ideal_Rock
Joined
May 2, 2008
Messages
4,125
Wow, those are so cute! You have awesome card-making skills
1.gif
.
 

EricaR

Ideal_Rock
Joined
Dec 3, 2007
Messages
2,392
Awww, thanks everyone! I really do have fun making everything and love to share.

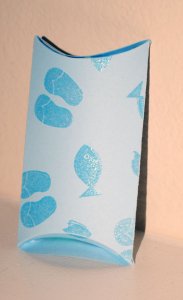
Next up are pillow boxes. I was originally going to put mints in them but the finished boxes came out really small so instead I''ll put one of the flip flop necklaces in each box.

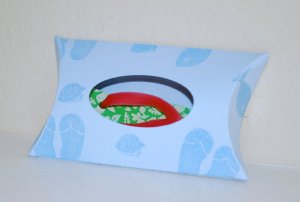
From the front. The oval is punched out, then I put a piece of transparency sheet behind it so you can peek in.

pillowboxfront.jpg
 

FrekeChild

Super_Ideal_Rock
Joined
Dec 14, 2007
Messages
19,456
Ok, so I''m a crafting n00b. How do you make all of this stuff?
 

EricaR

Ideal_Rock
Joined
Dec 3, 2007
Messages
2,392
I have a die cutting machine. The pillow box is a die for it. So I run it through the die cutting machine with a piece of paper and it cuts it out and scores the fold lines.

Then I pulled out some rubber stamps (flip flops, a seashell and a fish) and stamped them with glue, then covered the glue in embossing powder and embossed it using a heat gun. Punched out the oval, slapped the transparency on the inside and put it together. The whole thing took me less than 5 minutes.

Here is the back where you can see more of the stamped design. These pictures are sort of washed out - the natural light is gone so I had to use my flash. Sorry!

pillowboxback.jpg
 

FrekeChild

Super_Ideal_Rock
Joined
Dec 14, 2007
Messages
19,456
So...uh...what''s a die cutting machine?
 

EricaR

Ideal_Rock
Joined
Dec 3, 2007
Messages
2,392
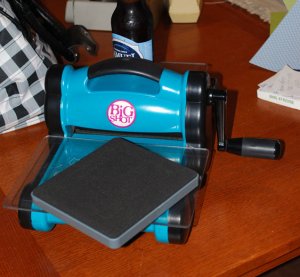
A die cutting machine cuts shapes out!

Sizzix Big Shot Machine from Amazon

You buy dies, which are the shape cutters, then run the die with some paper through the machine and it cuts it out for you! I didn''t use it on the first two cards I posted today, but I used it to cut out the shape of the pillow box and I''m about it use it for the bag toppers I''m making next. Stayed tuned!

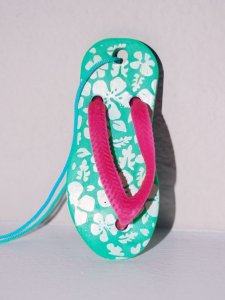
Now, I didn''t make this but I think they are super cute. These are little (well, about 1.5" long) flip flop necklaces. I''ll be putting two in each welcome bag, each in its own little pillow box.

pillowboxinside.jpg
 

FrekeChild

Super_Ideal_Rock
Joined
Dec 14, 2007
Messages
19,456
Lol. I thought it was a foot sized flip flop. Wow I'm a dork.

I was like, "Why is that flip flop on a cord?"
 

EricaR

Ideal_Rock
Joined
Dec 3, 2007
Messages
2,392
Well yes, you are a dork. Just for you I took step-by-step photos of my next project. This will show you the die cutting machine. This project was a bag of chocolate coins with a cute bag topper. PLEASE ignore my messy craft table. And yes, that is a beer sitting by my side for most of the project.
31.gif


Step 1: Choose your die (this one happens to be a Top Note die from Sizzix/Stampin'' Up) and get your cutting pads ready.

diecutting1.jpg
 

EricaR

Ideal_Rock
Joined
Dec 3, 2007
Messages
2,392
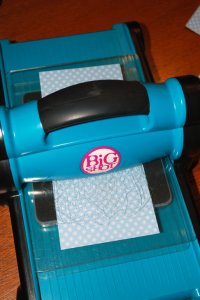
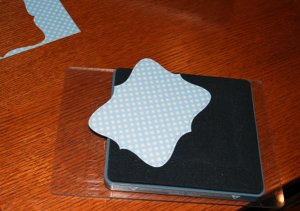
Step 2: Layer your sandwich - cutting plate on the bottom, then your die, followed by the paper of your choice, then the top cutting plate. Roll it through the machine.

diecutting2.jpg
 

FrekeChild

Super_Ideal_Rock
Joined
Dec 14, 2007
Messages
19,456
Do you own a craft store? Because it looks like it...
 

EricaR

Ideal_Rock
Joined
Dec 3, 2007
Messages
2,392
Yeah, I pretty much do own a craft store...

Step 3: Your shape pops right out!

diecutting3.jpg
 

EricaR

Ideal_Rock
Joined
Dec 3, 2007
Messages
2,392
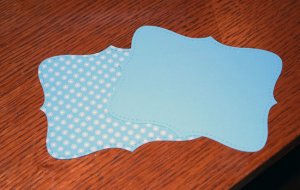
Step 4: Cut out a second one in a solid color. In my case, I used the same color, but one was a solid and one was a print. This changes a bit later...

diecutting4.jpg
 

EricaR

Ideal_Rock
Joined
Dec 3, 2007
Messages
2,392
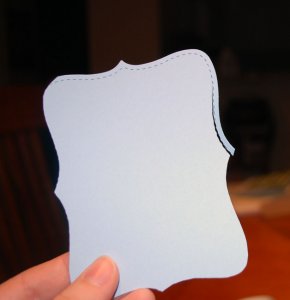
Step 5: I wanted the solid colored piece to be a bit smaller than the printed one, so I trimmed off the edge. If you look, you can see that the edge has a decorative perforation. I used that as my guide for cutting.

diecutting5.jpg
 
Status
Not open for further replies. Please create a new topic or request for this thread to be opened.
Be a part of the community Get 3 HCA Results
Top