shape
carat
color
clarity

Measurement accuracy choices???? A poll

Would you opt for the highest repeatability and accuracy in measuring diamonds below or equal to 6.3

  • 1.00ct and larger are most important to me.

    Votes: 1 100.0%
  • I have no idea why this is the case and need an explanation.

    Votes: 1 100.0%

  • Total voters
    1
  • Poll closed .
Status
Not open for further replies. Please create a new topic or request for this thread to be opened.

oldminer

Ideal_Rock
Trade
Joined
Sep 3, 2000
Messages
6,696
Date: 7/24/2006 4:11:19 PM
Author: Serg

Date: 7/24/2006 1:31:14 PM
Author: oldminer
Sergey; Just because you are annoyed does not give you license to disseminate untruths. I think you last post is out of line and out to be edited by you. Please keep to the facts. When I don''t have the facts, I find out, not exaggerate. ImaGem can re-identify.


Dave,
I am not annoyed at all. I do not see any reason to be annoyed.

I did not say what Imagem can not re-identify.
I wrote:

''Parameters Cut from Imagem has worse accuracy than Sarin.
It is bad for task auto re-indentify
.''

I can published facts what Imagem has worse accuracy than Sarin. I can do it tomorrow if you want. I have more data about Imagem accuracy now and can proof my statement easy.


I hope what ''bad accuracy is bad for task auto re-indentify '' is clear for you
.
You may have some old data from when ImaGem opened in Surat. The new measures are quite precise and repeatable. Maybe there has been some initial problems that have been worked on. This does happen with new technology. If you think your data shows something of importance to be addressed, then please let us have a copy to examine.

I hope at the same time, you have identified the literature your rep handed out in Mumbai that showed greater lack of precision as stones became larger and as reducing lenses were used. I gave you the name of this piece of literature in one of my previous postings and you didn''t mention anything on that subject since. Every device has some issue, some weakness, something it could do better. We each want to bring out devices that do the best job and let the market decide which ones work the best for each task.

The "worse accuracy than Sarin" subject is quite a weak one to center on. I know that ImaGem is in good shape on those measures and your data, wherever obtained, is from flawed reports proving human failings, not software or hardware failures.
 

adamasgem

Brilliant_Rock
Joined
May 23, 2003
Messages
1,338
Date: 7/24/2006 4:22:40 PM
Author: oldminer

The ''worse accuracy than Sarin'' subject is quite a weak one to center on. I know that ImaGem is in good shape on those measures and your data, wherever obtained, is from flawed reports proving human failings, not software or hardware failures.
Dave.. I don''t see how you can say that. Humans cause the problems, NO SOFTWARE is bug free (case in point "Windows"), and hardware is designed by humans, and design errors cause problems eventually either in performance or failure. EVERYONE is on a constant learning curve, but some on a steeper slope than others...
 

Garry H (Cut Nut)

Super_Ideal_Rock
Trade
Joined
Aug 15, 2000
Messages
18,483
Date: 7/24/2006 6:27:30 PM
Author: adamasgem

Date: 7/24/2006 4:22:40 PM
Author: oldminer

The ''worse accuracy than Sarin'' subject is quite a weak one to center on. I know that ImaGem is in good shape on those measures and your data, wherever obtained, is from flawed reports proving human failings, not software or hardware failures.
Dave.. I don''t see how you can say that. Humans cause the problems, NO SOFTWARE is bug free (case in point ''Windows''), and hardware is designed by humans, and design errors cause problems eventually either in performance or failure. EVERYONE is on a constant learning curve, but some on a steeper slope than others...
Marty I think Dave is saying that the operator did not calibrate the micrometer measuring device back to zero before measuring stones on the report that was done a year or so ago.

But Dave this was part of Sergey''s question - if you input the wrong measurem,ent what will happen to the non contact scan data? Will it change the results (very fishy) or will it ring an alarm bell and bring the supervisor in with a big stick?
So far it seems to me to be a bit fishy. I have blasted Ogi in the past because they seemed to be doing the same by making their data from scans = the weight that is entered. For all sorts of reasons this is bad.

Still waiting for many answers Dave?
Each time we have had them in the past they seem to be less than satisfying. Well drafted, but lacking real info.
 

Serg

Ideal_Rock
Trade
Joined
Mar 21, 2002
Messages
2,631
re:You may have some old data from when ImaGem opened in Surat. The new measures are quite precise and repeatable. Maybe there has been some initial problems that have been worked on. This does happen with new technology. If you think your data shows something of importance to be addressed, then please let us have a copy to examine.

Dave,

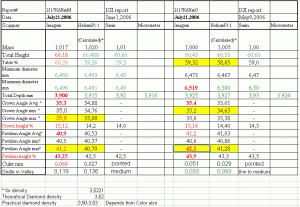
I have new data too. 21July 2006 is enough modern time?

ImagemAccuracyReport25072006.GIF
 

oldminer

Ideal_Rock
Trade
Joined
Sep 3, 2000
Messages
6,696
I believe what the chart shows has to do with the accuracy a side view of the diamond can calculate or measure the table width. ImaGem takes a table down view directly for this measure and it is going to be different than any side view measure. The ImaGem route is a correct one and a side view is okay, but a compromise on accuracy.

Once the table is different, the crown and pavilion angles also change slightly. This is what I see in the chart.

I promise to show Dr. Aggarwal this information later today for his review and comments. I appreciate the effort you are making to help us along. We only want to give the trade an excellent product, all of us............Sarin, Ogi, Octonus and ImaGem.
 

adamasgem

Brilliant_Rock
Joined
May 23, 2003
Messages
1,338
Date: 7/25/2006 4:15:29 AM
Author: Serg
re:You may have some old data from when ImaGem opened in Surat. The new measures are quite precise and repeatable. Maybe there has been some initial problems that have been worked on. This does happen with new technology. If you think your data shows something of importance to be addressed, then please let us have a copy to examine.

Dave,

I have new data too. 21July 2006 is enough modern time?
Thanks Sergey.. That data explains, I believe, that the problems with Imagem versus Helium/Sarin differences are due to the differences in methodologies used to infer (and I use the word "infer" to apply to both methodologies) the 3 dimensional diamond. The table/culet differences are finally the clue.

It appears, and I have to emphasize "appears", because there has been no explaination forthcoming from Imagem on what they actually do, that:

1) Imagem appears to use ONE face up view AND a micrometer depth measurement to "define" the entire diamond, much like the way we estimate pavilion and crown angles from the reflection pattern. This is unclear as to what they are doing, although it is theoretically possible, and the "accuracy" depends on how much of the reflection pattern data they are able to use. It deals with effectively automatically resolving a face up wire frame model of the diamond from the diamond from one "picture". The micrometer depth measurement "closes" the model in this type of methodology.

2) Helium (and Sarin/OGI) use MULTIPLE profile views (40 or more, I believe) and rotational resolver "measurements", to DEFINE the the planes of the entire diamond, and based on the intersections of the planes, define the diamond. A mircometer depth measurement could be used to "close" the model, although some type of micrometer/optical measurement (calibration) is used, akin to the Sarin pedestals. (I have never seen a Helium, but would expect a similar arrangement or reference).

BOTH methodologies rely on edge detection techniques to define lines (facet edges) or line segment lengths (ie Table size) and INFER the facet parameters (plane equation parameters), or at minimum the end points of line segments.

I believe that methodology#2 is inherently more statistically accurate, although methodology #1 does have technical merit and is physically more simple in implimentation.

I have certainly seen problems with the result of Sarin''s application of methodolgy #2, which can be shown when they try to infer the planes of a "painted" diamond from the 2D profile, and I believe that Helium has solved the mathematical problems related to this and that Sarin is working on it.

To be fair, neither methodology (Helium/Sarin/Imagem) has ever provided a full covariance matrix of their diamond''s "model".

A high resolution blow up of a faceup view along with the data presented COULD show who is "correct" using the table averages, although finding the diameter min maxs on the photo would be a pain.


Serg

Ideal_Rock
Trade
Joined
Mar 21, 2002
Messages
2,631
Dave,

Table is not main issue. ( But please do not think what Imagem has more correct Table. One year ago you told same about total Height . Now you agree Imagem report has error 60 microns, Sarin and Helium reports was correct)
See
1) Angles. Difference more than 0.5 degree . Sometimes 1 degree. It is to much
2) Please explain combination Pav=40,9degree, Pavilion Height=43,25% Culet=1%( 0,066mm) . I think Imagem pointed Pavilion and Crown height in valley points. Is it right? Do you know this fact? But even for point in girdle valley Imagem combination Pavilion height, Pavilion angle and Culet is not correct.
3) Near 16 micron mistake in total height
4) Near 19 micron mistake in Max diameter
 

Serg

Ideal_Rock
Trade
Joined
Mar 21, 2002
Messages
2,631

Re: 1) Imagem appears to use ONE face up view AND a micrometer depth measurement to "define" the entire diamond, much like the way we estimate pavilion and crown angles from the reflection pattern. This is unclear as to what they are doing, although it is theoretically possible, and the "accuracy" depends on how much of the reflection pattern data they are able to use. It deals with effectively automatically resolving a face up wire frame model of the diamond from the diamond from one "picture". The micrometer depth measurement "closes" the model in this type of methodology.


Marty ,
Thanks for explanation. Interesting. real info. Are you sure?

Now We know why Imagem has bad accuracy for angles, Why Imagem need additional information about total height.

Btw. Imagem need use calculate Pavilion Height and Crown height in bezel points. Imagem can not receive correct Height in Valley points for painting diamonds. Are you agree?


What is not clear for me yet: How do Imagem measure or calculate girdle thickness?( Do Imagem use MASS for calculation girdle thickness?)


adamasgem

Brilliant_Rock
Joined
May 23, 2003
Messages
1,338
Date: 7/25/2006 9:47:38 AM
Author: Serg

Re: 1) Imagem appears to use ONE face up view AND a micrometer depth measurement to ''define'' the entire diamond, much like the way we estimate pavilion and crown angles from the reflection pattern. This is unclear as to what they are doing, although it is theoretically possible, and the ''accuracy'' depends on how much of the reflection pattern data they are able to use. It deals with effectively automatically resolving a face up wire frame model of the diamond from the diamond from one ''picture''. The micrometer depth measurement ''closes'' the model in this type of methodology.


Marty ,
Thanks for explanation. Interesting. real info. Are you sure? I think Dave verified it while I was composing my post in response to your data see quote " ImaGem takes a table down view directly for this measure and it is going to be different than any side view measure. The ImaGem route is a correct one and a side view is okay, but a compromise on accuracy."

I''ve seen no proof of the highlighted phrase, pure hyperbole, I believe.

I don''t think Dave really knows (and he has admitted it in the past on technical issues), and bases comments on what Argawahl tells him, and a lot of faith. They certainly haven''t published anything that proves it, and compares the theoretical covariance differences in the two methodologies. I would think that the error correlations from one plane (facet) to another with a purely transformed model would be highly different than that of a profile derived model.

They certainly infer that they have the data to construct a 3D model of the stone, but choose not to publish it.

Now We know why Imagem has bad accuracy for angles, Why Imagem need additional information about total height. Yup.

Btw. Imagem need use calculate Pavilion Height and Crown height in bezel points. Imagem can not receive correct Height in Valley points for painting diamonds. Are you agree? A lot of math involved to correct for apparent depth, all dependent on the one depth measurement.

What is not clear for me yet: How do Imagem measure or calculate girdle thickness?( Do Imagem use MASS for calculation girdle thickness?) I think that is inferred based on the ungula of a ovoid/circular cylindar; see what I published in 1996 http://www.adamasgem.org/cut.html#tolk . Technically, they can''t "see" small extra facets or naturals on the girdle or pavilion girdle interface. Remember, GIA doesn''t plot extra facets that can''t be seen in the face up view under 10X, and I sort of doubt that they can with a planar view "photo".


adamasgem

Brilliant_Rock
Joined
May 23, 2003
Messages
1,338
Let me make it clear that a faceup view MAY be able to give better Table accuracy than a profile scanner, but that depends on the relative ability to define the table edges from the lower contrast inherent in a "photo", relative to the higher contrast in a profiler and the ability to rotate the stone (resolver accuracy) to find the max mins and define the intersection of the facet planes. This has been shown to be a problem with Sarin data, not generating meet point facets in their 3D renderings of some stones (like EightStars) when in fact the faceting is supurb.

Both methodologies have error mechanisms, Helium and Sarin have stated theirs, although not in Covariance form; Imagem has yet to state their uncertainties to my knowledge (they only state that they put out their numbers to three decimal places).
 

oldminer

Ideal_Rock
Trade
Joined
Sep 3, 2000
Messages
6,696
The example chart provided to show ImaGem''s "problem" is known to the ImaGem staff and it was addressed already. Further technology improvments are in the works to prevent such a calibration problem from becoming a fequent occurence. It was not a faulty depth measurement by the gauge, but an operator not being aware of a warning flag situation that had happened. The device actually detects and reports such problems, but not with enough noticeability to the operator. It will be made into a much larger warning.

The second issue of measurement style and accuracy is something of far greater interest. ImaGem measures the girdle thickness at the bezel facets and also all around the diamond. It calculates the average girdle thickness at the bezel facets and also calculates the average overall girdle thickness. For internal consistency it takes the average bezel facet girdle thickness and subtracts the average overall girdle thickness and divides this by 2. It then adds 1/2 to the crown height and 1/2 to the pavilion depth. However, the angles reported are "derived" at the actual BEZEL facet / girdle location. Therefore, what does appear to be error is simply a consistent methodology for reporting the measures. It has no bearing on the angle calculation, but does make the crown height, girdle thickness and pavilion depth equal to the total depth percentage reported.....This is a our way of finally bringing that strange situation to a close where the measures never added up before, they now do.

For Marty and others, the "uncertainty" is as follows for ImaGem: plus or minus 5 microns at 2 sigma for all linear measures except the table which is slightly higher. A more complete repeatability/accuracy report will be part of the ImaGem August newsletter. If you want the free newsletter please email [email protected]. We''ll be glad to include you.

All previous copies of the Newsletter are on the gemappraisers.com website.

I hope this helps those who are interested to better understand the approach that was taken.
 

Serg

Ideal_Rock
Trade
Joined
Mar 21, 2002
Messages
2,631
Date: 7/25/2006 3:35:59 PM
Author: oldminer
The example chart provided to show ImaGem's 'problem' is known to the ImaGem staff and it was addressed already. Further technology improvments are in the works to prevent such a calibration problem from becoming a fequent occurence. It was not a faulty depth measurement by the gauge, but an operator not being aware of a warning flag situation that had happened. The device actually detects and reports such problems, but not with enough noticeability to the operator. It will be made into a much larger warning.

The second issue of measurement style and accuracy is something of far greater interest. ImaGem measures the girdle thickness at the bezel facets and also all around the diamond. It calculates the average girdle thickness at the bezel facets and also calculates the average overall girdle thickness. For internal consistency it takes the average bezel facet girdle thickness and subtracts the average overall girdle thickness and divides this by 2. It then adds 1/2 to the crown height and 1/2 to the pavilion depth. However, the angles reported are 'derived' at the actual BEZEL facet / girdle location. Therefore, what does appear to be error is simply a consistent methodology for reporting the measures. It has no bearing on the angle calculation, but does make the crown height, girdle thickness and pavilion depth equal to the total depth percentage reported.....This is a our way of finally bringing that strange situation to a close where the measures never added up before, they now do.

For Marty and others, the 'uncertainty' is as follows for ImaGem: plus or minus 5 microns at 2 sigma for all linear measures except the table which is slightly higher. A more complete repeatability/accuracy report will be part of the ImaGem August newsletter. If you want the free newsletter please email [email protected]. We'll be glad to include you.

All previous copies of the Newsletter are on the gemappraisers.com website.

I hope this helps those who are interested to better understand the approach that was taken.
1)
re:For internal consistency it takes the average bezel facet girdle thickness and subtracts the average overall girdle thickness and divides this by 2. It then adds 1/2 to the crown height and 1/2 to the pavilion depth.

It is very funny . Please clarify what is mean Girdle thickness in Imagem Report/

2) In any case difference Between Helium and Imagem angles is up to 1 degree. What is Imagem explanation for such Phenomena?

3) re:For Marty and others, the 'uncertainty' is as follows for ImaGem: plus or minus 5 microns at 2 sigma for all linear measures except the table which is slightly higher.

The difference between max Sarin and Helium diameter and Imagem max diameter( for diamond with right total height) Is 19 microns. It is 8 sigma. Do you know what is 8 sigma?
 

adamasgem

Brilliant_Rock
Joined
May 23, 2003
Messages
1,338
Date: 7/25/2006 3:35:59 PM
Author: oldminer
The example chart provided to show ImaGem''s ''problem'' is known to the ImaGem staff and it was addressed already. Further technology improvments are in the works to prevent such a calibration problem from becoming a fequent occurence. It was not a faulty depth measurement by the gauge, but an operator not being aware of a warning flag situation that had happened. The device actually detects and reports such problems, but not with enough noticeability to the operator. It will be made into a much larger warning.

Marty size the warning, as Don Quiote would say

The second issue of measurement style and accuracy is something of far greater interest. ImaGem measures the girdle thickness at the bezel facets and also all around the diamond.

So you are rotating the stone for a profile view as well as taking a face up view... Interesting, A two camera approach can definately result in improvements. I''d like to see the 3D model resulting from it.

It calculates the average girdle thickness at the bezel facets and also calculates the average overall girdle thickness. For internal consistency it takes the average bezel facet girdle thickness and subtracts the average overall girdle thickness and divides this by 2. It then adds 1/2 to the crown height and 1/2 to the pavilion depth.

However, the angles reported are ''derived'' at the actual BEZEL facet / girdle location. I take it that you are only reporting averages, am I incorrect on this?

Therefore, what does appear to be error is simply a consistent methodology for reporting the measures. It has no bearing on the angle calculation, but does make the crown height, girdle thickness and pavilion depth equal to the total depth percentage reported.....This is a our way of finally bringing that strange situation to a close where the measures never added up before, they now do. OK.

For Marty and others, the ''uncertainty'' is as follows for ImaGem: plus or minus 5 microns at 2 sigma for all linear measures except the table which is slightly higher.

The three linear measures you report are min max diameters and depth.. Do the same uncertainties apply for all sizes of stones?
Are you saying or implying the TABLE and culet percentage AVERAGES have a higher uncertainty than the equivilent extrapolated +/- 5 micron level ? (Average Table%) x Diameter 2 sigma > 5 microns.

A more complete repeatability/accuracy report will be part of the ImaGem August newsletter. If you want the free newsletter please email [email protected]. We''ll be glad to include you. All previous copies of the Newsletter are on the gemappraisers.com website.That will be interesting.

I hope this helps those who are interested to better understand the approach that was taken.

Thanks Dave
 

oldminer

Ideal_Rock
Trade
Joined
Sep 3, 2000
Messages
6,696
So you are rotating the stone for a profile view as well as taking a face up view... Interesting, A two camera approach can definately result in improvements. I'd like to see the 3D model resulting from it

It is only a single camera in the VeriGem and dual camera in the GL3100 (corrected 7/26/06 9:45am EDST) with a creative way of doing side and face-up views. The diamond is rotating, yes.

I take it that you are only reporting averages (crown and pav angles), am I incorrect on this?

We record exact angles on every measure and report averages/ We could readily report every measure like a Helium for someone willing to pay for that level of detail, but it is all recorded.

The three linear measures you report are min max diameters and depth.. Do the same uncertainties apply for all sizes of stones?

The device has the same level of accuracy and precision from 1/4 ct on to the largest size of diamonds. Stones smaller than 1/4ct have slightly less precision / accuracy.

Are you saying or implying the TABLE and culet percentage AVERAGES have a higher uncertainty than the equivilent extrapolated +/- 5 micron level ? (Average Table%) x Diameter 2 sigma > 5 microns.

Repeatability : ± 0.005mm with 2 Sigma probability for linear measurements for all sizes except for table. Repeatability for angles depends on size of stone. Color 1/3rd grade, Fluorescence ± 0.03 on C.I.E. (Commission Internationale L' Eclairage, France) XYZ scale
Marty, if you want to really get into the technical side of this beyond this point, I suggest you directly ask Dr. A. [email protected] I think he would be pleased to give you a direct and honest response.

In any case difference Between Helium and Imagem angles is up to 1 degree. What is Imagem explanation for such Phenomena?

I think ImaGem would say that a good part of the reason is a problem with the precision of the measurements. Of course, you will say it is us and we say it is you. Its rather pointless as no reader here knows how to judge. One of us is probably more right than the other, but I have insisted all along that both methods may be good enough for what the market needs or wants. One diamond with bad measures proves nothing about the technology. At least we can admit there was a problem that we believe has been fixed. You can try us later to see if we are right.

1 little, 2 little 3 little sigmas, 4 little 5 little 6 little sigmas, 7 little 8 little 9 little sigmas, 10 little geeky boys! I have not idea what 8 sigma is...... When I need to know, someone will explain it to me. I have a very good memory for details when the facts are important to me.

Thanks for all your patience in this very long, wide ranging thread. It covered a lot of territory I never imagined it would hit on.
 

adamasgem

Brilliant_Rock
Joined
May 23, 2003
Messages
1,338
Date: 7/25/2006 5:50:50 PM
Author: oldminer
So you are rotating the stone for a profile view as well as taking a face up view... Interesting, A two camera approach can definately result in improvements. I''d like to see the 3D model resulting from it

It is only a single camera with a creative way of doing side and face-up views. The diamond is rotating, yes.
Smoke and mirrors (or three prisms)
36.gif
 

adamasgem

Brilliant_Rock
Joined
May 23, 2003
Messages
1,338
Date: 7/25/2006 5:50:50 PM
Author: oldminer

1 little, 2 little 3 little sigmas, 4 little 5 little 6 little sigmas, 7 little 8 little 9 little sigmas, 10 little geeky boys! I have not idea what 8 sigma is...... When I need to know, someone will explain it to me. I have a very good memory for details when the facts are important to me.
Dave.. The statistical term sigma allows you to make statements about your CONFIDENCE LEVEL in the truth..

You can say that you have 90% confidence that the true value lies between +/- 1.86 sigmas of the mean value stated, an interval..

Your 2 sigma bounds define about a 92% confidence interval, in that you have 92% confidence that the truth lies somewhere in that interval defined by the mean value +/- 5 microns. Of course your estimate of the uncertainty may be screwed up due to operator errored input..
 

Garry H (Cut Nut)

Super_Ideal_Rock
Trade
Joined
Aug 15, 2000
Messages
18,483
Date: 7/25/2006 5:50:50 PM
Author: oldminer

I think ImaGem would say that a good part of the reason is a problem with the precision of the measurements. Of course, you will say it is us and we say it is you. Its rather pointless as no reader here knows how to judge. One of us is probably more right than the other, but I have insisted all along that both methods may be good enough for what the market needs or wants. One diamond with bad measures proves nothing about the technology. At least we can admit there was a problem that we believe has been fixed. You can try us later to see if we are right.
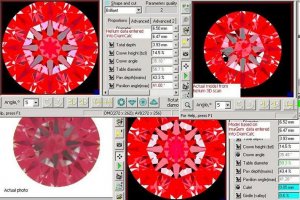
Dave there is a way to confirm which measure is correct.

It is the building of a 3D model and comparing that model in ray tracing systems like DiamCalc.

In this case Helium wins.
This collage is for the deeper pavilion stone on sergey''s chart above. (The other stone would have been a better example of differences)

Note the top left and bottm right models with the chart data entered - the Helim date 9top left) is far closer to the actual photo of the stone (bottom right).


The top right is a diamCalc view based on the Helium 3D actual scanned model. it is all but identical to the real photo.


so there can be no doubt as to which method or data is accurate.


As I have asked Dr A before - give us 3D .stl files (which he said he could easily do) and there needs be no debate. Abscence of info always makes one suspicious of motives for not providing info.


It is also a shame that the peer review process has not been taken advantage of. Clearly ImaGem has not been as successful in this process even though we have been told that the worlds best experts were involved in thorough testing.

2117k6Hm0 collage.JPG
 

Serg

Ideal_Rock
Trade
Joined
Mar 21, 2002
Messages
2,631
Garry,

Imagem Pav angle max is 42.1degree
41.2 is Imagem Pav avg
Please check

You need use DC model with Pav Avg=41.2
 

Serg

Ideal_Rock
Trade
Joined
Mar 21, 2002
Messages
2,631
re:It has no bearing on the angle calculation, but does make the crown height, girdle thickness and pavilion depth equal to the total depth percentage reported.....This is a our way of finally bringing that strange situation to a close where the measures never added up before, they now do.

Dave,

Diamond 1.000 ct with parameters

Pavilion Angle avg =41.2degree
Crown Angle abg=35.4 degree
Girdle in bezel =0.093 mm
Culet= 0.051 mm
Diameter min=6.473 mm
Diameter max=6.519 mm

And Table=59.32%

Should has Height 3.95-3.97 mm and mass 1.02-1.03. ( Not 3.924 mm and 1.000ct)

I think Imagem receive crown height like :
Imagem crown height=Total height -Pavilion Height-girdle height +may be small special correction
 

Serg

Ideal_Rock
Trade
Joined
Mar 21, 2002
Messages
2,631
re:One diamond with bad measures proves nothing about the technology. At least we can admit there was a problem that we believe has been fixed. You can try us later to see if we are right.


Dave,

I showed to you 3 diamonds with VERY bad measures. It are proving a lot of about Imagem Technology.

But if you need more for opening your mind I will do it . It is expenses( a lot of my time and time my partners), but I will do it .


How many examples do you need?
 

oldminer

Ideal_Rock
Trade
Joined
Sep 3, 2000
Messages
6,696
I KNOW WHAT 2 SIGMA MEANS. The other message was for a skeptic.
 

Garry H (Cut Nut)

Super_Ideal_Rock
Trade
Joined
Aug 15, 2000
Messages
18,483
Dave what on earth are you doing up at 5.15am?
I thought I was the only Pscper awake before 6am

(I have been told about Sigma and could probably get a pas if the pass mark was 50%, but no credit or distinction)
 

strmrdr

Super_Ideal_Rock
Joined
Nov 1, 2003
Messages
23,295
you know this thread is interesting and iv picked up a few bits of interesting info.
If someone cared to ask him Jon can provide a ton of real world examples of how well the helium/DC combo works for making realistic models.
As everyone knows by now He has a lighting model that matches his standard photo lighting to a very very high degree that can be used for the comparison.
They are good enough that they are often better than average photos and close to the best photos because of alignment issues when taking photo''s.
A helium data generated dmc file contains all the info I need to select a diamonds cut.
That and dark-field clarity photos will tell you everything one needs to know.

One the other hand I agree with Dave that the current generation sarin is not up to the task and that ogi scanners are even worse.
Hopefully the new generation of scanners coming out will provide data that can be used to make good models.
In the mean time only helium has proven capable of providing data for accurate models.
It bugs me that AGS is using sarin data for their models and cut grade but its much much better than using rounded numbers which is just slightly better than nothing.
 

oldminer

Ideal_Rock
Trade
Joined
Sep 3, 2000
Messages
6,696
I was up at 5:15 am today with my 2 Shih Tzu''s who told me in no uncertain terms that it was time for their bodily functions AND their breakfast. My wife is away with her girlfriends for a few days of R&R and the dogs have taken up sleeping on my bed as a last resort, I suppose.

There ws an important correction made to one of my previous posts today. There is 1 camera in the VeriGem and 2 cameras in the GL3100. I had said one camera, but was not thinking clearly at the time, so I have made the correction. The old, pre-3000 had a single camera that moved inside, but took 3 times longer to process the stones. The use of two cameras has processing time into the under 4 minute range for measures, light behavior grading, color, fluorescence color/strength, and potential registration.
 

Garry H (Cut Nut)

Super_Ideal_Rock
Trade
Joined
Aug 15, 2000
Messages
18,483
Date: 7/26/2006 9:59:47 AM
Author: oldminer
I was up at 5:15 am today with my 2 Shih Tzu''s who told me in no uncertain terms that it was time for their bodily functions AND their breakfast. My wife is away with her girlfriends for a few days of R&R and the dogs have taken up sleeping on my bed as a last resort, I suppose. Excuse accepted. It is just past 6am here ;-)

There ws an important correction made to one of my previous posts today. There is 1 camera in the VeriGem and 2 cameras in the GL3100. I had said one camera, but was not thinking clearly at the time, so I have made the correction. The old, pre-3000 had a single camera that moved inside, but took 3 times longer to process the stones. The use of two cameras has processing time into the under 4 minute range for measures, light behavior grading, color, fluorescence color/strength, and potential registration. is this proportions Dave? I imagine fixed cameras to be more accurate for reading proportions.
 

adamasgem

Brilliant_Rock
Joined
May 23, 2003
Messages
1,338
Date: 7/26/2006 9:59:47 AM
Author: oldminer
I was up at 5:15 am today with my 2 Shih Tzu''s who told me in no uncertain terms that it was time for their bodily functions AND their breakfast. My wife is away with her girlfriends for a few days of R&R and the dogs have taken up sleeping on my bed as a last resort, I suppose.
I guess you didn''t want the Shih Tzu''s Shih''in in the Tzus
17.gif
 

oldminer

Ideal_Rock
Trade
Joined
Sep 3, 2000
Messages
6,696
Date: 7/26/2006 4:11:57 PM
Author: Garry H (Cut Nut)

Date: 7/26/2006 9:59:47 AM
Author: oldminer
I was up at 5:15 am today with my 2 Shih Tzu''s who told me in no uncertain terms that it was time for their bodily functions AND their breakfast. My wife is away with her girlfriends for a few days of R&R and the dogs have taken up sleeping on my bed as a last resort, I suppose. Excuse accepted. It is just past 6am here ;-)

There ws an important correction made to one of my previous posts today. There is 1 camera in the VeriGem and 2 cameras in the GL3100. I had said one camera, but was not thinking clearly at the time, so I have made the correction. The old, pre-3000 had a single camera that moved inside, but took 3 times longer to process the stones. The use of two cameras has processing time into the under 4 minute range for measures, light behavior grading, color, fluorescence color/strength, and potential registration. is this proportions Dave? I imagine fixed cameras to be more accurate for reading proportions.
The cameras are fixed in position. You are very correct about their exacting position requirements for physical measures as well as light measures.
 

MichaelLC

Rough_Rock
Joined
Jul 24, 2006
Messages
19
Guess I missed the poll, but I''d go with Under 1.0c.

One, because that''s my range right now, :) and also because that''s where majority of buyers are.

I can understand wanting to invest R&D into the more pricey weights, so I''m going to cheat (since it''s closed anyway) and vote for putting accuracy into 1.0c stones.
 
Status
Not open for further replies. Please create a new topic or request for this thread to be opened.
Be a part of the community Get 3 HCA Results
Top