Newest Mrs Box in Blue. My favorite color so far.
I don't use them for rings however but for my earrings. The double slot boxes works perfectly for my earrings.
Aww thanks @Rubies-R-Me. The double slots (not just Mrs Box but all the little boxes I have now) fit my earrings perfectly and they fit well in the safe too and are easy to line up and organize. My ER and WBs are in the box my dh made for me and they will always remain there as that was created by my dh with his own 2 hands and they belong there.
Newest Mrs Box in Blue. My favorite color so far.
I don't use them for rings however but for my earrings. The double slot boxes works perfectly for my earrings.
Very lovely @stracci2000
I have not spent the full price for the Mrs Box. In the past I have bought them on sale or from other PSers. I agree it is too expensive at full price.
Very lovely @stracci2000
I have not spent the full price for the Mrs Box. In the past I have bought them on sale or from other PSers. I agree it is too expensive at full price.
I don't think it is weird to be a crafty girl at all. I think it is super impressive. Maybe you should start making these to sell? I bet you would have many people who would love to purchase these from you.
Newest Mrs Box in Blue. My favorite color so far.
I don't use them for rings however but for my earrings. The double slot boxes works perfectly for my earrings.
Newest Mrs Box in Blue. My favorite color so far.
I don't use them for rings however but for my earrings. The double slot boxes works perfectly for my earrings.
Gorgeous. I agree on the darker colours. Diamonds look icy white in the darker colours, like my black Tiffany box. I'm waiting until they restock the Jubilee or Louis V.
I treated my rings to a new Mrs. Box. They have this new bezel style and you can add an engraved metal plate. Here is the Havenhart color. I had the lid engraved with lyrics from our first dance
I found instructions for making square ones, but they are tricky to pull off, and the measurements needed tweaking. I moved on to trying round boxes and they are so much easier!
I am off to running errands now, but I will come pack here in a few hours and post how I made this round one! Promise!
@LinSF ,
OK, below are instructions to make a square box. You have to scroll down to the "May 12" posting to find the instructions. http://fussykiki.blogspot.com/
I made 2 messy ones, but the third one turned out OK. The corners were so hard to do, and I couldn't find 4 cm wide velvet ribbon anywhere! In fact, I couldn't even find real velvet in any fabric stores, either. Seriously! I went into a thrift store and bought a real velvet dress for 4.00 and cut it up.
So I experimented with paper towel tubes and made some round ones.
I couldn't find my old instructions, so I put one together and took photos of the steps.
You will need 1 paper towel tube, good quality double stick tape like 3M, velvet, contrasting fabric, Elmer's glue, and stiff but flexible foam, like from a packing box. The foam should be about 7/8" thick.
Cut tube into 4 rings. Two will be 1/2" wide and two will be 7/8".
Cut a 1/2" section from one of each size and tape back together to form 2 smaller rings.
On thin cardboard, trace inside rings to make one small circle and two large circles, label and cut out.
Trace small circle onto foam and cut out, then cut in half.
Cut a strip of velvet 1 3/4" wide and 6 1/2" long. Cover largest wide ring using double stick tape inside and out. This will be tricky!
Cut another velvet 1" wide and 6 1/2" long and cover largest narrow ring the same way.
Cover the two large circles with velvet also, using double stick. Trim about 1/16" from around each circle to make allowance for thickness of velvet.
Cut contrasting fabric into two strips, same size as velvet strips, and cover smaller rings the same way.
Cover smaller circle as well. Try not to let fabric crease or bunch up. I didnt try too hard at this because I was trying to take photos! Certain fabrics will be worse than others.
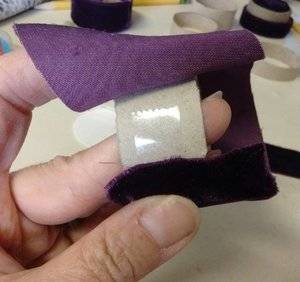
Now place smaller narrow ring into wider velvet ring.
Add velvet "cap" and contrasting inside piece. Use Elmer's to glue the box top together.
Continued in next post
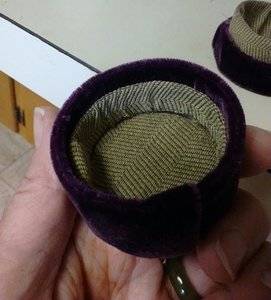
Assemble parts and glue box bottom together.
Trim your foam to fit into box bottom.
Pull foam back out with tweezers and cover with velvet using double stick, making sure to completely cover the inside where your ring will slip into.
Add glue down inside and push foam pieces into place
The box should fit together good but if not you may have to go back and redo some steps.
This project is tedious and I guarantee that your first one will be a flop!
But by the time you are on your 4th one, they will start turning out OK!
Keeping the fabric from bunching up is challenging, and you must be trimming everything along the way.
(My contrasting fabric is bunched up because I did this for demonstration!)
Elmers will soak into the fabric, so be careful not to get it on parts of the material where it will be seen.
Some materials are thicker than others, so you must keep that in mind also.


300x240.png)