- Joined
- Apr 30, 2005
- Messages
- 34,660
I accept that phones are today's cameras for the vast majority.
This thread is not about smartphones.
I've notice some here own DSLRs, but just leave them on AUTO because it's not obvious or intuitive how to use their DSLR's many features and controls.
Taking a DSLR off AUTO and controlling things yourself can quickly get overwhelming.
But leaving it in AUTO is like owning a Ferrari but never driving it over 20 MPH even when you're in a hurry.
But some extraordinary pics require you 'drive at 160 MPH'.
Over time I plan to post several "lessons".
My goal is to write stuff so it's clear to everyone.
When I fail, please let me know and I'll do my best to clarify.
Honestly I don't know how to use many of my Nikon D810's features - though it is a very high end camera.
It's just over the top how many things these gizmo can do, and I have never needed many of the features.
When I wanna do something new I read the manual and/or google up help sometimes via a video.
If your camera's owner's manual is not handy, google up its PDF file and save it somewhere handy.
Understanding the basics will let you venture beyond the limitations of leaving your DSLR in AUTO mode.
Point and shoot cameras have been around for 120 years, and they are fine.
But I'd like to get folks who's DSLRs are stuck on AUTO to take their photography to the next level.
Lesson 1 ... It's all about controlling the amount of light ...
As with your eyes, a camera's sensor needs the right amount, not too bright, not too dark.
Most cameras do a pretty good job of doing all the thinking and adjusting of light on AUTO.
But good photography is about much more than getting a good light exposure to make the sensor happy.
The 3 things that control the amount of light ALSO offer specific creative controls that have nothing to do with the correct light exposure.
In the lessons ahead I'll teach you about these.
Then you can use these effects to take pics that do a better job of telling the story in your head.
Here we go.
There are two ways to control how much light gets into your camera.
Once the light is in the camera there is a third thing that manipulates the light that does get in.
I'll number them, 1, 2, and 3.
1. Shutter Speed is how long the shutter stays open, letting light reach the camera's sensor.
A longer shutter speed lets in more light.
For example a shutter speed of one full second, lets in twice as much light as setting of half a second.
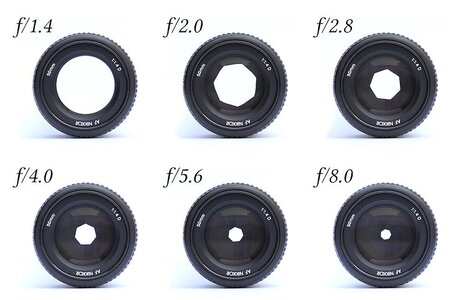
2. Aperture, or f-stop, is the size of the adjustable hole in the lens
The hole's size is expressed as an "f-number", for instance f 4.
Unfortunately the f numbers go backwards; the larger the f number the smaller the hole.
For example f 8 is a smaller hole than f 1.4.
Wikipic:

3. The third thing that manipulates the light that the Shutter speed and aperture lets into the camera is called ISO.
I think of ISO as a volume control (or electronic amplifier) but not for sound, for light.
When there's lots of light you set the ISO number low, like 64, for the pics with the least fuzziness, grain, or noise.
When the light level is low you may want to set the ISO number high, like 10,000 or more, to 'amplify' what little natural light is there, which usually gives you an overall more pleasant-looking pic than using a harsh artificial flash to crank up the light.
As with audio equipment if you turn the volume up too high you'll hear background noise in the quiet parts of the music, and distortion in the loud parts.
It's very similar with cameras and light - even the most expensive cameras - it's just the physics of the limitations of even the finest camera sensors.
The human eye can resolve a much much wider light range from bright to dark than can any camera's sensor.
That's the whole reason for cameras having these 3 light-controlling features: Shutter speed, Aperture, and ISO.
Stay tuned for lesson 2.
This thread is not about smartphones.
I've notice some here own DSLRs, but just leave them on AUTO because it's not obvious or intuitive how to use their DSLR's many features and controls.
Taking a DSLR off AUTO and controlling things yourself can quickly get overwhelming.
But leaving it in AUTO is like owning a Ferrari but never driving it over 20 MPH even when you're in a hurry.
But some extraordinary pics require you 'drive at 160 MPH'.
Over time I plan to post several "lessons".
My goal is to write stuff so it's clear to everyone.
When I fail, please let me know and I'll do my best to clarify.
Honestly I don't know how to use many of my Nikon D810's features - though it is a very high end camera.
It's just over the top how many things these gizmo can do, and I have never needed many of the features.
When I wanna do something new I read the manual and/or google up help sometimes via a video.
If your camera's owner's manual is not handy, google up its PDF file and save it somewhere handy.
Understanding the basics will let you venture beyond the limitations of leaving your DSLR in AUTO mode.
Point and shoot cameras have been around for 120 years, and they are fine.
But I'd like to get folks who's DSLRs are stuck on AUTO to take their photography to the next level.
Lesson 1 ... It's all about controlling the amount of light ...
As with your eyes, a camera's sensor needs the right amount, not too bright, not too dark.
Most cameras do a pretty good job of doing all the thinking and adjusting of light on AUTO.
But good photography is about much more than getting a good light exposure to make the sensor happy.
The 3 things that control the amount of light ALSO offer specific creative controls that have nothing to do with the correct light exposure.
In the lessons ahead I'll teach you about these.
Then you can use these effects to take pics that do a better job of telling the story in your head.
Here we go.
There are two ways to control how much light gets into your camera.
Once the light is in the camera there is a third thing that manipulates the light that does get in.
I'll number them, 1, 2, and 3.
1. Shutter Speed is how long the shutter stays open, letting light reach the camera's sensor.
A longer shutter speed lets in more light.
For example a shutter speed of one full second, lets in twice as much light as setting of half a second.
2. Aperture, or f-stop, is the size of the adjustable hole in the lens
The hole's size is expressed as an "f-number", for instance f 4.
Unfortunately the f numbers go backwards; the larger the f number the smaller the hole.
For example f 8 is a smaller hole than f 1.4.
Wikipic:

3. The third thing that manipulates the light that the Shutter speed and aperture lets into the camera is called ISO.
I think of ISO as a volume control (or electronic amplifier) but not for sound, for light.
When there's lots of light you set the ISO number low, like 64, for the pics with the least fuzziness, grain, or noise.
When the light level is low you may want to set the ISO number high, like 10,000 or more, to 'amplify' what little natural light is there, which usually gives you an overall more pleasant-looking pic than using a harsh artificial flash to crank up the light.
As with audio equipment if you turn the volume up too high you'll hear background noise in the quiet parts of the music, and distortion in the loud parts.
It's very similar with cameras and light - even the most expensive cameras - it's just the physics of the limitations of even the finest camera sensors.
The human eye can resolve a much much wider light range from bright to dark than can any camera's sensor.
That's the whole reason for cameras having these 3 light-controlling features: Shutter speed, Aperture, and ISO.
Stay tuned for lesson 2.
Last edited:


300x240.png)