shape
carat
color
clarity

Wood Finishing Tips (for those in need)

Status
Not open for further replies. Please create a new topic or request for this thread to be opened.

somethingshiny

Ideal_Rock
Joined
Jul 22, 2007
Messages
6,746
Wood finishing and refinishing is a great way to reduce, reuse, and recycle! In the current economy, this could be a great alternative for those who are looking to replace or update old furniture. It''s also a fun hobby where you really see results! I''ve been refinishing furniture for several years and I would be glad to answer questions. If I don''t have the answer, I can find it.


1.gif
 

brazen_irish_hussy

Ideal_Rock
Joined
Jun 13, 2006
Messages
2,044
good timing! I have a wood table I have been trying to redo and getting the old paint off is a pain. It is very ornate so sanding doesn''t work very well. We have tried both a gel and a liquid paint remover, but both turn the paint ito the consistancy of chewing gum and we can''t get it off. I love this table and want it to be nice, but we can''t until we can get the paint off
 

oobiecoo

Ideal_Rock
Joined
Sep 10, 2007
Messages
2,264
I have a question but I''m not sure if you can answer it! I have some bar stools that I''d like to re-do... probably paint. They are the cheapie ones you see at like Target or Walmart... white particle-board-esque legs and wood-veneer-ish top. Should I use a liquid sander before painting them? Or should I use sand paper? I''ve re-done furniture before but I think it was all real wood.
 

somethingshiny

Ideal_Rock
Joined
Jul 22, 2007
Messages
6,746
BIH~

You need to verify that it''s not a veneered surface. A veneer is a very thin wood that is adhered to the top of a lesser quality wood. The more you work at stripping that, the worse you''re gonna be.

Ornate work is the hardest to clean up. You have a few options.


The first is to invest in a tool that will help you to get into the details and scrape out the "chewing gum" once you''ve put a stripper on it. You can be creative and look in your manicure kit for a tool that would work first. Also try looking in your a tackle box or tool box. I''ve found many tools there. If you have to buy a tool, you will have to take a picture of the detail into the store (like Home Depot, etc) to choose the correct tool, there are many. Then you will need to hand sand it in the crevices with a folded piece of sand paper.

Another option is to use a heat gun. This works best with oil based paints and varnishes (which is probable if the piece is more than 25 years old). It melts it beyond the chewing gum consistency and is easier to remove. You will still need a scraper to get in the details and the hand sanding. Be very careful to not scorch the wood. You will smell the burn before you see it, so once you start thinking "S''mores!", back off with the heat! A heat gun is a great investment if you have other finishing projects like wood work, stairs, etc.

The last option, and probably the easiest if you aren''t "attached" to your piece, is to remove the ornate details (many furniture pieces have the details applied over a solid wood surface, especially true if there is a veneered surface) If they come off, you can buy new ones. There are hundreds of styles of detail work available. If your detail is actual carving or turning, you need to just work at it cause you obviously can''t replace those.


There are stainable glues and fillers that you can use to fix any imperfections before refinishing.


A tip on sanding: ALWAYS use a high quality sand paper in the appropriate grit. You start with coarse to remove old finish and work your way down to fine to create a smooth surface. When using a belt sander, palm sander, etc. make sure you check your paper frequently. Once the grit is worn down, the sander is just heating up the wood with friction and making the finish harder to remove.

link for heat gun info
 

somethingshiny

Ideal_Rock
Joined
Jul 22, 2007
Messages
6,746
oobiecoo~ Liquid sander will probably be too harsh for your surface. It actually etches into the paint and could etch right into the veneer. If the pieces are in good condition (no huge imperfections in the surface where sanding is required), your best bet is to use a deglosser. It''s cheap and easy to use. It creates a surface for a new finish to adhere without the extent of sanding. Just apply with a soft cloth (with gloved hands). You''ll probably notice a bit of discoloration. If you''re going darker, the discoloration won''t show. If you''re going with a pale color, use Mineral Spirits to clean up the discoloration before applying your new finish.

If you need to sand a little, go slowly with a medium to fine grit paper (by hand). You''ll need to be very careful because veneer is easily splintered once it has a flaw. Another option, if your surface needs a little TLC, you can use any variety of textured paints or faux treatments to conceal them. And, remember glossy paints show flaws and matte finishes hide flaws.

I am in the middle of doing a little table that I just used a deglosser on. It''s going from 1970''s wood-like to red!
 

oobiecoo

Ideal_Rock
Joined
Sep 10, 2007
Messages
2,264
Never heard of the de-glosser before! I''ll check that out next time I''m at Lowes... they would have it, right? So then I wouldn''t need any kind of other primer to make the paint stick? I''ll probably wait until Thanksgiving or Christmas break to tackle this. Now I just have to decide on the color... hmmm.
 

somethingshiny

Ideal_Rock
Joined
Jul 22, 2007
Messages
6,746
Yes, the deglosser is everywhere. You don''t need anything else after using it. It takes a matter of minutes to dry.

Have fun!
 

movie zombie

Super_Ideal_Rock
Joined
Jan 20, 2005
Messages
11,879
any before and after pictures possible of the red table when you''re finished?

movie zombie
 

somethingshiny

Ideal_Rock
Joined
Jul 22, 2007
Messages
6,746
MZ~ I never take before and after pics. No one''s really shown an interest in my furniture besides DH and my mom who both see it to begin with. The table is half done, but I could take some pics. It''ll have a mostly red top and ugly legs!
 

somethingshiny

Ideal_Rock
Joined
Jul 22, 2007
Messages
6,746
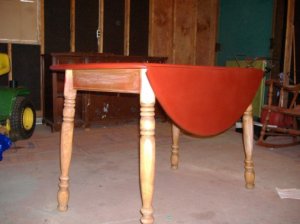
The following are photos of my current works.

The first, my soon-to-be kitchen table. my new house has a small kitchen and no dining room. I didn''t want to buy a table when we are intending on adding on in about a year, so I repurposed my sunroom table. I picked it up at a yard sale about 3 years ago. I think I paid $20 for the table and chairs. My total cost into refinishing the table is around $10 for products, and about 1 hour of my time. I need to finish painting, obviously, but that should only take another hour.

Sorry, no actual "before" pic, just a "during" pic.

kitchredss1.jpg
 

somethingshiny

Ideal_Rock
Joined
Jul 22, 2007
Messages
6,746
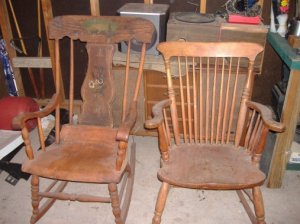
These are the chairs I''m working on.

The one to the right has been completely stripped and mostly sanded. It was free, I picked it up during our annual clean-up days. I had to repair some spindles and one of the rockers. I probably have around $10 into this chair (wood glue, sand paper, etc.) and will use extra polyurethane that I have on hand from other projects. The one on the left is partially stripped and sanded. I bought it at an antique store. The seat is one solid piece of oak so it makes it extra special. The only problem is, the oak split. I''ve spent hours rubbing linseed oil into the second chair to bulk up the wood again so the crack "fades". I have maybe $5 of oils and paper into that chair and it will take a lot of time and effort to make it beautiful again.

chairsss1.jpg
 

somethingshiny

Ideal_Rock
Joined
Jul 22, 2007
Messages
6,746
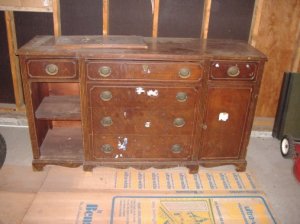
This last pic is of an antique buffet that I also got for free. Someone had been trying to sell it with no takers. When she saw how interested I was and she''s seen things I''ve done, she gave it to me. I haven''t done anything to it yet. It''s going to be a huge undertaking and I haven''t developed a plan of action. I want to keep the integrity of the details (it has velvet lined silver service drawers) but restore it completely.

antbufss1.jpg
 

movie zombie

Super_Ideal_Rock
Joined
Jan 20, 2005
Messages
11,879
i''m impressed!

and i love the red your using on the table!

you will have very very nice furniture w/o the cost the way you''re doing it. i admire that.

my project is going to be the bottom of a window sill. our windows are not framed as we have a very very modern style of house. however there is a wood sill at the bottom of 4 windows in the sun room. said sun has faded them in 4 years when we bought the place from a reddish but not light color of stain to almost a nonexistant oak. also, the grain appears to have come up on one at one place. any suggestions?

movie zombie

ps i''m enclined to go a stain but something a bit darker but with some red in it that will hopefully hold up to the intense sun/heat it gets there.
 

deegee

Brilliant_Rock
Premium
Joined
Apr 27, 2007
Messages
1,673
I hate, hate, hate my kitchen cabinets. They are an ugly orangey-yellow oak, and I have been trying to figure out how to update them. I have the same cabinets in my master bath so I experimented with one of the doors. I thought I could darken them with one of those stain/polyurethane combo''s from Minwax, but I didn''t like the result. The product I used was recomended for wood that has already been stained/finished. I was thinking of a darker cabinet with a lighter Corian or Silestone countertop. Any ideas?

I refinished the cabinets in our last house, and it ended up taking me forever. I had 50+ cabinet doors alone. It was a killer project, and I was hoping I could get by with less work this time. My kitchen certainly is smaller now. I hate to replace the cabinets because there is nothing wrong with them. They''re just ugly.
 

somethingshiny

Ideal_Rock
Joined
Jul 22, 2007
Messages
6,746
MZ~ Thanks for the compliments. However, I give most of my treasures away, so they won''t be in my house. I really love the buffet I have to work on, but I adore the one I already refinished that resides in my dining room. So, I don''t know where the "new" one will be living. One of the chairs has agreed to live with a friend of mine. He''s got pals over there.

I''m glad you like the red! I''m going with chocolates, reds, and yellowy-golds in the living room and kitchen. I think that table will be a great pop.

The raised grain in your sill is caused when the wood gets too dry. Most of the wood is contracting and therefore shrinking, but the grain of the wood is denser and can''t shrink as much, so it looks raised.

First, clean it really well and let it dry. Then, rub with oil. Linseed oil is my favorite. As the wood absorbs the oil it will bulk back up. Try to shade it from the sun during this process. You''ll have to wait for the oil to be absorbed before continuing on to the finishing. It may take a few times before it looks like it should.

After you have voluptuous wood again, you can strip the stain. Since the wood dried so badly, I think it only has a stain and not a sealer. You can sand down the stain pretty easily. Sanding will also smooth any remaining raised grains.

Clean with Mineral Spirits to remove any sanding dust or oil residue that would inhibit the stain or varnish. Let dry thoroughly.

Apply your stain or sealer according to the instructions on the can.

You can do just stain, but that will need some attention to keep it from getting to dried out. Stain is best applied with a rag (and gloved hands). Wipe it on, let it sit for a minute, then rub it off. The longer it sits on the wood, the deeper the color.

You can stain and then varnish (or just varnish). Use a natural bristle brush for the varnish. Apply 2-3 thin coats rather than one thick coat.


Or you can use a combo product. It gives the richness of stain and the protection of polyurethane in one coat. You can deepen the color by adding more coats, or even change the shade with a different color on top. Use a natural bristle brush to apply.

LINKY

I love this product. The Bombay mahogany is beautiful. If you want something a bit lighter, look into the walnut or chestnut colors.
 

somethingshiny

Ideal_Rock
Joined
Jul 22, 2007
Messages
6,746
deegee~ Hi.

You're taking on quite a project!

Did you just not like the Color of the Minwax product, the shade the wood picked up, or the texture, or what?

As you probably know, the best results are when you strip down the wood completely. If you don't want to put that much time into the project, your choice of the combo stain/poly is probably the best.

Did you prep the wood at all? You can use anything from sanding, to a deglosser, to a primer. If your wood is oak, it should absorb all finishes well once it's prepped. If it's actually a pine with an oak stain, it requires more steps. There is a wood conditioner made by Minwax that allows the stain to show a truer color.

And, most cabinets are laquered. The products that claim to go over pre-finished wood generally don't specify a laquered finish. They are great for going over pre-stained wood, but they don't bond to the laquer type finishes. If you think that's the case, you'll need to remove the laquer. Any basic stripper should do the job. Then, use a fine sandpaper to smooth it out and give the new finish something to bond to.

If you tried anything specific and it didn't work, let me know and we'll figure out another way.
 

fleur-de-lis

Brilliant_Rock
Joined
Apr 25, 2007
Messages
1,343
Wow, Somethingshiny, what a generous offer!

I would LOVE to be the recipient of your wise an learned input. We''ve been spending far too much time in the planning stages in designing our rooftop terrace, and recently I''ve been toying with the idea of picking up various mismatched-yet-interesting wooden chairs from Swap Meets and Yard Sales and refurbishing them in complementary ways so as to have a large table for informal italian-style banquets up there (to seat dinner parties of 20 or so) because the point is to enjoy it with friends, not let it sit idle for months or years on ends getting overpriced design contracts and artisan woodworkers in place. I live in a high-UV area (Los Angeles), lots of sun, and little rain yet some morning condensation during the shoulder months. If I were to strip down some formerly ugly yard-sale chairs to refinish, how would you recommend finishing basic wooden chairs to best survive such outdoor conditions? Prime and paint? Stain and seal? Any thoughts?

Thank you! Any input appreciated!

f-d-l
 

somethingshiny

Ideal_Rock
Joined
Jul 22, 2007
Messages
6,746
fdl~ Sound like you have a great space planned, how fun!

The best way to finish any piece is to strip it completely, but if that is out of your time range, a good sealer is going to keep you sane.

I would give it a good sanding, even if you don''t sand it down completely. Clean it thoroughly. Since it sounds like the furniture will always be outside, start with a good conditioner to get the wood looking its best. Minwax is my favorite conditioner. (use the conditioner if you''re going to stain, not paint)

You can paint or stain. Painting will take more time overall, but here are your options:

For furniture that is to be kept outdoors, paint will need more attention. It just can''t hold up to the elements without constant reapplication. If you really want a painted look, use a bonding primer after a light sanding. This will allow your paint to adhere the best. Use oil based paint. Then, use a sealer that is formulated as water resistant. It may change the color of your paint slightly but it''s necessary to seal the paint. Then, you''ll need to reapply a sealer every year. You''ll sand down any roughness, touch-up the paint and apply the sealer again. It can be done with beautiful results, just a lot more effort.

Another option to paint with is a spray that is for indoor/outdoor use. Prep your surface, then just spray. Spray painting takes some finesse, so if you''re not used to it, practice first. I''d still seal it even though it''s a pretty good sealer to begin with.

If you intend to stain the wood, strip it as far down as you want. Keep in mind that if you leave some residual color, you''ll need to stain it that color again or darker. Clean and condition the wood. Apply the stain with a rag, it will darken with each application. Let it dry completely. Then apply a water resistant sealer (Woodsman has a Natural UV Wood Sealer & Protector) with a natural bristle brush. (I don''t know what stores you have available, but many are now carrying a UV resistant topcoat.) Apply at least 3 coats. For upkeep with this method, you''ll probably still need to reseal every year, but it will only require a light sanding before the sealing.

You can also use the combo stain/sealer products. This is the approach I would take. Keep in mind all deck sealers. Check them out and see if they would accommodate your conditions. Woodsman (True Value) exterior stains are really nice. There are "solid color" stains that you could use to get more of a "painted" look. They cover the wood more than a normal stain and they come in lots of neutral colors. (reds, blues, greys, golds, etc). This product also protects from the sun and is water repellent, and protects against the "graying" that happens with outdoor wood. Their other exterior stains will give you the normal stained look with the benefit of a great outdoor sealer. Apply according to can directions. I believe they list a specific way to prep the wood also. This upkeep will be less than the above methods. Just apply a fresh coat (with or without the color) when it seems necessary. If you have a True Value, they have a sheet of all the colors and stains in the Woodsman line.


Good Luck and have fun!
 

movie zombie

Super_Ideal_Rock
Joined
Jan 20, 2005
Messages
11,879
i love the bombay color! and the cherry next to it also!

i think your tips will work for me. however, i''m going to have to have a cloudy day i think to begin the process.....and find a way to keep the cats off also. not impossible though.

how much odor with these products? possibly a project for a cool and cloudy late fall or winter day?

movie zombie
 

movie zombie

Super_Ideal_Rock
Joined
Jan 20, 2005
Messages
11,879
hey, Some, can you tell me which red you''re using on the table?

movie zombie
 

somethingshiny

Ideal_Rock
Joined
Jul 22, 2007
Messages
6,746
MZ~ Sorry it took so long to respond. I''ve been packing.

Most of the chemicals will have a harsh odor. You can find the "hospital masks" in the wood section of your hardware store. They do a great job cutting down the wooziness. I also advocate eye protection! You get a splatter of stripper in your eyeball, and you''ll feel it! I do a lot of my projects in the fall so I can ventilate as much as possible. You may just have longer drying times if it''s a little overcast.

The color on my table is actually an indoor/outdoor spray called cranberry red. I forget the name, but it''s a True Value line. Then, I used a Huntsman indoor/outdoor semi gloss clear coat over top. It''s done now and looking great.

Have fun!


----I will be offline for the next week----
 

LaurenThePartier

Super_Ideal_Rock
Joined
Mar 2, 2004
Messages
10,100
SS, your projects are great, thanks so much for sharing! I can''t wait to see what you do with that gorgeous buffet! What a great piece!

I finished my other chair using your advice (the wood glue saved me from splitering the back to pieces) and it looks much better than the first! Thanks so much for your help in my thread!
 

movie zombie

Super_Ideal_Rock
Joined
Jan 20, 2005
Messages
11,879
Some, thanks for taking time out from packing to respond! good luck with the move.

movie zombie
 

VRBeauty

Super_Ideal_Rock
Premium
Joined
Apr 2, 2006
Messages
11,212
Hi SomethingShiny -- I could use your help on a blessedly little project. I'm restoring the exterior of a a '50's-'60's silverware chest. Last year I helped a friend pick up a vintage set of silverplate on e-bay, and this is my gift to her to help her store it in style! It's a 2-level chest with a hinged top for the upper compartment, and a drawer down below. The exterior is all a dark mahogony-ish finish except for thr front, which has two recessed panels with a light blonde finish. I'm assuming the whole thing is covered with a veneer. The drawer has a handle that I might have to work around since it's secured from the inside, and my friend would prefer that I keep the original (pink!) lining intact. However... I might be able to loosen and remove just the lining on the sides, which would allow me to remove the hardware and would also make it easier to get to some of the wood surface.

Anyhow, any suggestions would be appreciated. Do you have any favorites when it comes to stains and varnish/urethane topcoats? Whatever I have around the house is probably so old that it would be better for me to start anew.

Thanks so much for offering your help! & BTW, I love your red-top table!
 

movie zombie

Super_Ideal_Rock
Joined
Jan 20, 2005
Messages
11,879
i''ve got another question when you have the time!

i have got a very old cabinet/chest that i bought in the younger days and in my infinite laziness finished w/o sealing. i''ve contemplated painting it or preparing it for another richer stain. the stain on it now is more of a dark walnut type and i want something warmer. i do not think i finished with a urethane type product and if i did it certainly has lost any functional use. any suggestions?

movie zombie
 

somethingshiny

Ideal_Rock
Joined
Jul 22, 2007
Messages
6,746
HI! So after a not so great couple weeks in the new house, I''m back online! I''ll try to catch up on this thread later today.

We refinished one of our bathrooms (except for the tub) last week. $500 for new walls, floor, potty, sink, vanity, lights and assorted odds and ends. I''ll post pics later.
 

somethingshiny

Ideal_Rock
Joined
Jul 22, 2007
Messages
6,746
Lauren, I''m glad your second chair was easier! I bet the pair looks great!
 

somethingshiny

Ideal_Rock
Joined
Jul 22, 2007
Messages
6,746
MZ~

First, you need to check if it''s urethaned. The easiest way is to scratch the finish with a knife (under the lid or on the bottom if possible). If it peels and crumbles, it''s got a urethane top-coat. If not, it''s just stained.

If it''s got a urethane top-coat, you can paint over it, but you can''t stain over it. If you want to change the stain, you''d have to start stripping off the urethane to get it down to where the color will take again.

If it''s not urethaned, you can change the stain. If you want to go much lighter, you need to remove as much of the original stain as possible and then apply the lighter stain. You can use a cloth dipped in Mineral Spirits to remove the stain if it''s oil based (it will lighten with every pass) or sanding.

If you want to stay in the same "darkness", just choose a stain that is going to give you the right shade once combined with the current stain. So, if you want to go to a warmer redder tone, you''ll get a VERY red stain to combat the dark walnut. If you want to go more golden, go MUCH more golden for the same reason.

Start with very thin coats of stain. Apply it in sections with your rag so you can remove excess stain to get it to the right color. IF you didn''t achieve the right color, you can keep going back with different stains as long as it''s not sealed. I actually don''t seal some of my furniture because I go with my whims of changing them.


Of course, read the instructions on whatever brand you buy. Some call for specific preparations on wood that''s not "new."

Stay away from anything marked NGR. It is hard to apply and it''s nearly impossible to get an even finish with it. It dries quickly so anytime it gets overlapped with the next pass, it gets twice as dark.
 

somethingshiny

Ideal_Rock
Joined
Jul 22, 2007
Messages
6,746
VRBeauty~ What a friend you are!! If you could post some pics of your chest it would help ( that sounds a bit off-color, but you know what i mean!)

My first tip is BE CAREFUL with the lining! Sometimes the old fabric will just crumble if you try to remove it. Take out the drawer and see if you can identify how it was secured to begin with. If you can see how it was made, you can un-make it. Otherwise, you''re just guessing and ripping.

It''s probably veneered, but you should be able to identify that for sure by removing the drawer also. On the edge of the wood, the veneer will have a clear line of demarcation from the wood below.

What condition is it in? You didn''t mention if it''s got problems or if it just needs a little warming. Veneer is so temperamental, it''s really hard to keep the glue from loosening when you sand or strip. Usually the best option is to use something to try to regain a unified color, clean well, and reseal the piece. Depending on the piece, and what the veneer may be, you could do a wood "bleaching" or use Mineral Spirits to even out the tone. There are wood stain "pens" available if you need to fill in any scuffs or scratches. Guardsman and Minwax are the only brands of the "pen" that I''ve used. But, I love them. I keep several colors on hand and touch-up when necessary (for instance during the move, my entertainment center took quite a hit on the uhaul door, but the pen covered it completely.)

Another option that''s great for most any type of wood is a beeswax rub. Melt together equal amounts of beeswax, turpentine, and linseed oil. Let it cool and rub it into the wood. The wax will fill any scratches, the turpentine evens the color, and the oil adds a beautiful er and enriches the wood.

With pictures, I may have more ideas.
 

movie zombie

Super_Ideal_Rock
Joined
Jan 20, 2005
Messages
11,879
thanks, Some! i''m sure its merely stained. i was way too lazy and probably still am.....and there is no layering of any type going on or where i could try and lift to find cracking. i actually think i''d still find this piece functional with a change in color and hardware.

WELCOME BACK! i feel like i''ve got my own personal diy helper when you''re here. and i''m sorry about the problems with the new to you house.

movie zombie
 
Status
Not open for further replies. Please create a new topic or request for this thread to be opened.
Be a part of the community Get 3 HCA Results
Top